Author: Rory Burns

  • How to See Someone’s Inventory in Minecraft Java: Complete Guide

    How to See Someone’s Inventory in Minecraft Java: Complete Guide

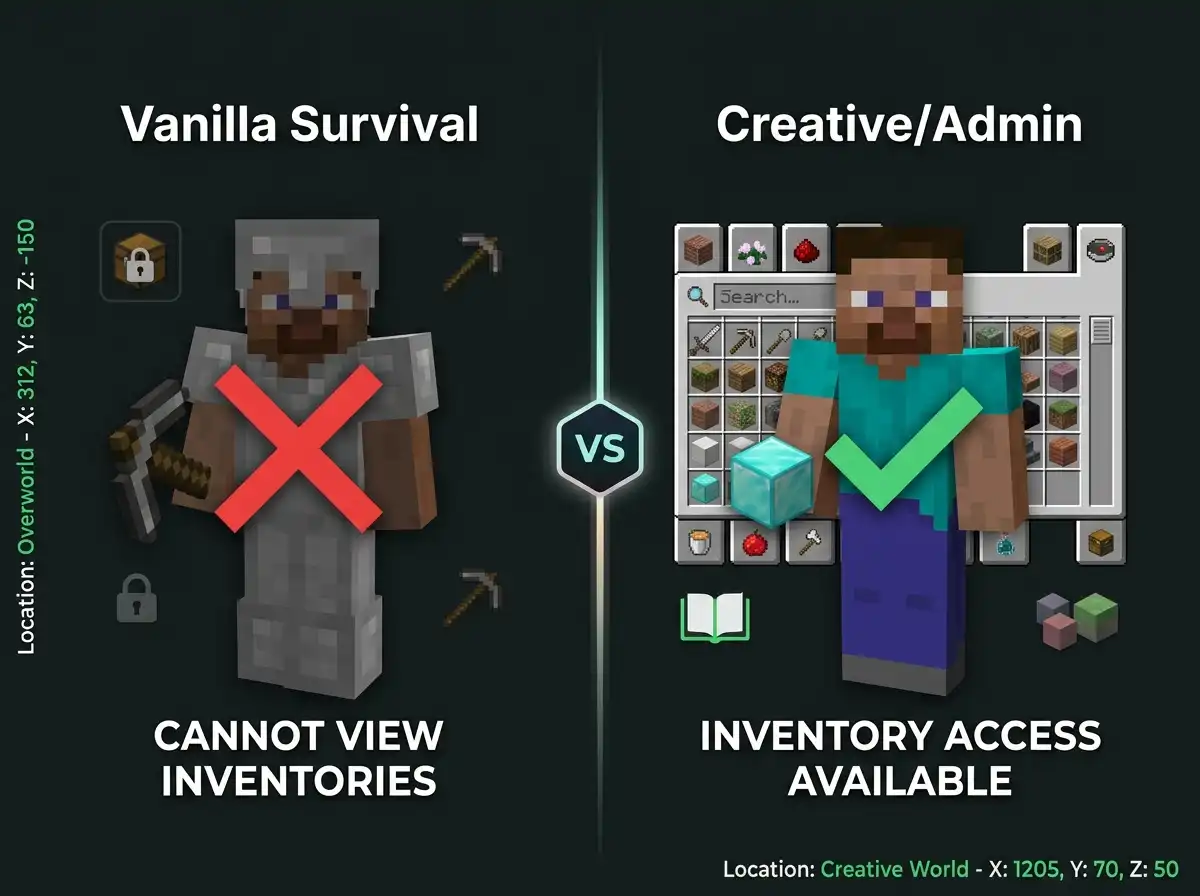
    You can’t see other players’ inventories in vanilla Java Edition.

    This is intentional for privacy and gameplay balance.

    Quick Answer: Seeing Someone’s Inventory in Java Edition

    You cannot view another player’s inventory in vanilla Minecraft Java. Survival mode and multiplayer have no built-in feature for this. Creative mode shows nearby players’ inventories if you open their interface. Server mods and admin plugins can enable inventory viewing with appropriate permissions.

    Understanding Inventory Privacy in Java

    Minecraft Java Edition protects inventory privacy by default.

    Regular players cannot access other players’ items.

    This prevents griefing and theft on multiplayer servers.

    Key inventory mechanics:

    • Vanilla survival has no inventory viewing system
    • Creative mode allows viewing nearby players
    • Mods can enable inventory access
    • Server plugins add this feature
    • Admin tools exist for moderation
    • Spectator mode lets you see items
    • No command can force inventory viewing

    Inventory privacy is a core game design choice.

    Where You Can See Inventories

    Creative Mode Viewing

    Creative mode allows viewing nearby player inventories.

    Open someone’s inventory by clicking their player model.

    You’ll see all their items and armor.

    This only works in creative mode worlds.

    Spectator Mode Access

    Spectator mode lets you view player inventories.

    You cannot interact with items or take them.

    Useful for watching players or monitoring servers.

    Requires being in spectator mode first.

    Admin and Moderation Tools

    Server administrators have inventory access tools.

    Admin commands can open any player inventory.

    These require server operator status.

    Only available to server staff members.

    Methods to View Inventories

    MethodWorks InRequirementsLimitations
    Creative Mode ClickCreative WorldsCreative mode enabledLocal or server only
    Spectator ModeAny DimensionSpectator mode accessView only, cannot interact
    Admin CommandsServersOperator statusServer-specific plugins
    ModsSingle PlayerMod installationClient-side only
    PluginsMultiplayer ServersServer installationAdmin setup required

    Vanilla survival survival has no legitimate method.

    Using Server Plugins for Inventory Access

    Popular Server Plugins

    Many server plugins add inventory viewing features.

    Essentials plugin includes inventory commands.

    LiteBans adds moderation inventory tools.

    PermissionsEx controls who can use commands.

    Installing Inventory Plugins
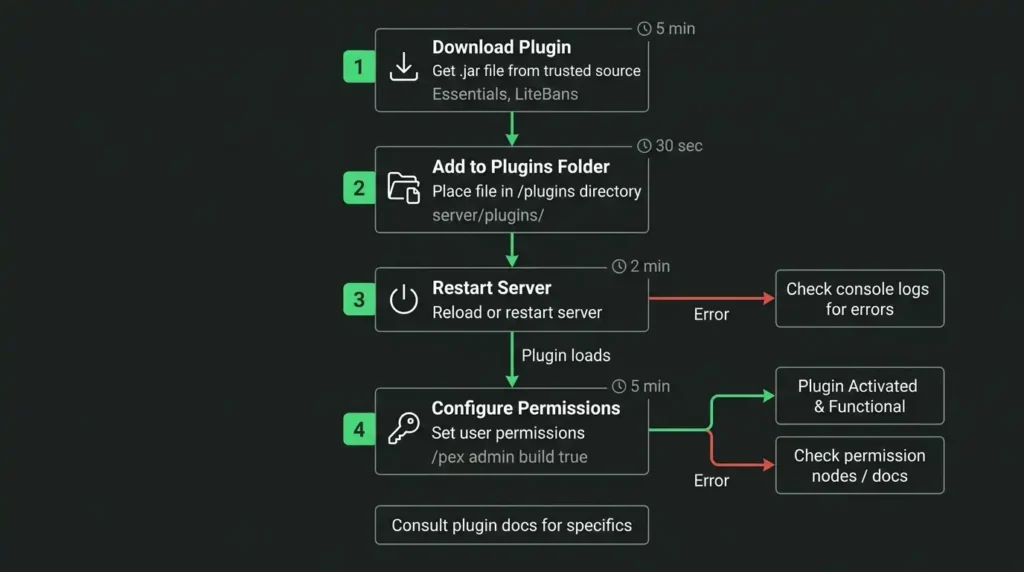
    Four-step workflow for installing and configuring server plugins to enable inventory viewing on Minecraft servers

    Download plugin files to server plugins folder.

    Restart server to load new plugins.

    Configure permissions for players or staff.

    Test with admin account first.

    Permission Configuration

    Set permission nodes for inventory access.

    Staff usually get full permissions.

    Regular players get no access.

    Prevent inventory griefing with proper settings.

    Mods for Single-Player Inventory Viewing

    Popular Inventory Mods

    Inventory Profiles mod manages item organization.

    More Overlays mod displays inventory information.

    Jade mod shows player and entity details.

    These are client-side modifications.

    Installing Mods Safely
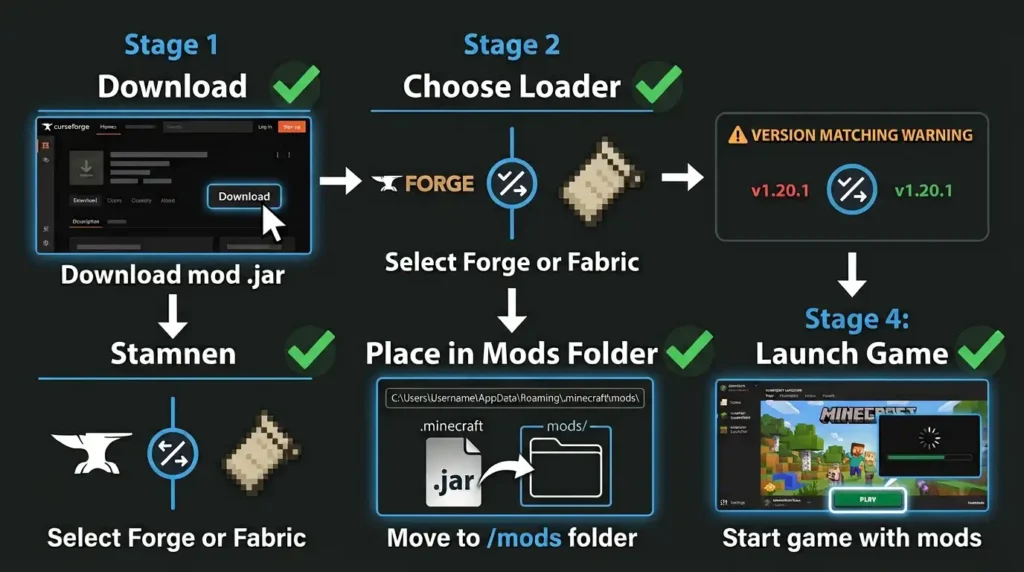
    Step-by-step guide for downloading, selecting loader, installing, and launching Minecraft with mods

    Download mods from trusted sources only.

    Use Forge or Fabric mod loader.

    Match mod versions to your Java Edition.

    Back up worlds before installing mods.

    Mod Manager Tools

    Curseforge provides easy mod installation.

    Modpack managers handle multiple mods.

    Launcher software simplifies the process.

    Always verify mod compatibility first.

    Practical Tips for Inventory Access

    When You Need Inventory Access

    Server admins monitor suspicious player activity.

    Moderators check for contraband items.

    Parents monitor children’s game progress.

    Trading requires seeing other player items.

    Safe Practices for Inventory Viewing

    Only use official plugins on servers.

    Never share inventory information without permission.

    Respect privacy of other players.

    Document any items you access.

    Common Inventory Viewing Mistakes

    Using unauthorized mods on servers.

    Accessing inventories without proper permissions.

    Spreading information about hidden inventory items.

    Modifying other players’ items without consent.

    Why Vanilla Has No Inventory Viewing

    Privacy protection is intentional game design.

    Prevents stealing and harassment of players.

    Keeps multiplayer fair and balanced.

    Protects younger players from bullying.

    Respects player autonomy and security.

    Server Rules and Inventory Access
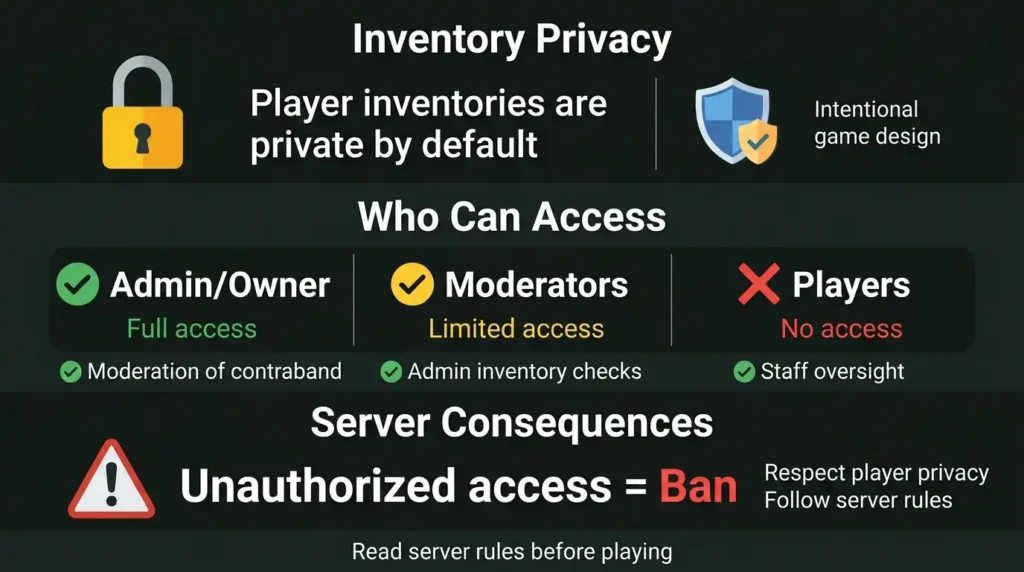
    Infographic explaining inventory privacy protection, access permissions by role, and server consequences for unauthorized viewing

    Most servers have strict rules about inventory viewing.

    Only admins or moderators can check inventories.

    Unauthorized access results in bans.

    Some servers disable all inventory viewing mods.

    Read server rules before playing.

    Why Orefinder Doesn’t Help With This

    OreFinder focuses on structure and ore finding in Minecraft.

    Inventory management is outside tool scope.

    For server administration, use server software.

    For single-player mods, use Curseforge or Modrinth.

    These are better resources for inventory access.

    FAQ

    Can you see inventory in vanilla Minecraft?

    In vanilla Minecraft Java, you cannot see other players’ inventories in survival mode. Creative mode allows viewing nearby players by clicking them. Spectator mode lets you observe without interacting. No command or built-in feature enables inventory viewing in survival multiplayer.

    How do you check someone’s inventory on a server?

    Server administrators can use plugins like Essentials to view inventories with commands. You need operator status to access these tools. Most servers restrict this to staff members only. Install a server plugin, set permissions, then use the inventory command on players.

    Is it possible to see inventory with mods?

    Yes. Single-player mods can show inventory information. Inventory Profiles and Jade mods display item details. Download from Curseforge, install with Forge or Fabric, match your Java Edition version. Servers may ban inventory viewing mods, so check rules first.

    Do you get notifications when someone views your inventory?

    No. In vanilla Minecraft, players don’t receive notifications. Server mods may add notification systems. Chat logs don’t record inventory viewing. Admins can view without alerting the player.

    What mods let you see player inventories?

    Jade mod shows entity information including items. Inventory Profiles displays your own inventory better. For other players, use server plugins instead of mods. Single-player mods are client-side only and don’t affect other players.

    Respect Player Privacy in Multiplayer

    Vanilla Minecraft protects inventory privacy intentionally.

    Honor this design choice on multiplayer servers.

    Use admin tools responsibly if you’re staff.

    Never access inventories without good reason.

    Multiplayer trust depends on respect and fairness.
  • How to Make a Netherite Pickaxe: Complete Guide

    How to Make a Netherite Pickaxe: Complete Guide

    A netherite pickaxe is the best mining tool in Minecraft.

    You need specific materials and the right crafting setup.

    Quick Answer: How to Make a Netherite Pickaxe

    Make a netherite pickaxe by upgrading a diamond pickaxe at a smithing table with one netherite ingot. The diamond pickaxe must be placed on the left, netherite ingot on the right. All enchantments transfer to the new tool. This gives you the fastest, most durable pickaxe in the game.

    Understanding Netherite Pickaxes

    Netherite pickaxes are the top-tier mining tool.

    They’re faster than diamond pickaxes for all blocks.

    Netherite pickaxes never burn in lava or fire.

    Key netherite pickaxe facts:

    • Mines faster than diamond by 10%
    • Harder to enchant but keeps all enchantments
    • Survives fire and lava drops
    • Never lost when you die
    • Requires netherite ingot to craft
    • Must use smithing table, not crafting table
    • Works on all block types

    Netherite pickaxes are essential for endgame mining.

    Materials You Need

    Diamond Pickaxe Requirements

    Start with a diamond pickaxe as your base.

    It must be a pickaxe, not another tool.

    Iron pickaxe won’t work for this upgrade.

    Enchantments on the diamond pick transfer completely.

    Netherite Ingot Requirements

    You need exactly one netherite ingot per pickaxe.

    Netherite ingots are made from netherite scraps.

    Four netherite scraps plus four gold ingots make one ingot.

    Finding ancient debris drops the scraps you need.

    Crafting Station Requirements

    You must use a smithing table to upgrade.

    Smithing table recipe: 4 planks + 2 iron ingots + 1 diamond.

    Furnace or crafting table won’t work.

    The smithing table is mandatory for this recipe.

    Step-by-Step Process

    Step 1: Craft or Find Diamond Pickaxe

    Mine or craft a diamond pickaxe first.

    Crafting needs 3 diamonds on top, 2 sticks below.

    Or find pickaxes in loot chests.

    Enchantments don’t matter for upgrades.

    Step 2: Gather Netherite Ingot

    Mine ancient debris in the Nether to get scraps.

    Ancient debris spawns between Y-8 and Y-119.

    Mine with diamond or netherite pickaxe only.

    Netherite pickaxe needs 4 scraps and 4 gold ingots smelted together.

    Step 3: Access Smithing Table

    Build or find a smithing table.

    Build with 4 planks, 2 iron ingots, 1 diamond.

    Place the table anywhere you can access.

    Step 4: Place Items in Smithing Table

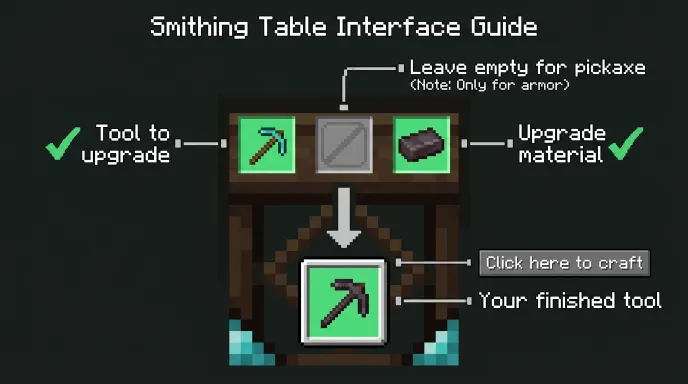
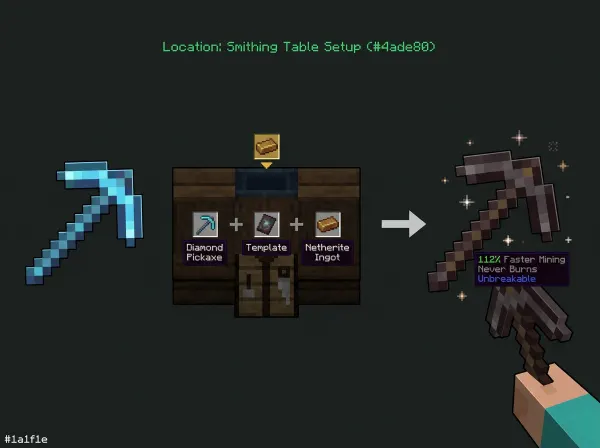
    Smithing table interface guide showing correct placement of diamond pickaxe and netherite ingot for upgrading to netherite

    Put diamond pickaxe in the left slot.

    Put netherite ingot in the right slot.

    The template slot stays empty (no template needed for pickaxes).

    Step 5: Confirm the Upgrade

    Click the output slot to claim your pickaxe.

    All enchantments transfer to the netherite version.

    You now have a netherite pickaxe.

    Netherite Pickaxe Specifications

    SpecificationDiamondNetheriteDifference
    Mining Speed4.08.5+112% faster
    Durability15622031+47% more uses
    EnchantabilityMediumVery LowHarder to enchant
    FireproofNoYesWon’t burn
    Attack Damage56+1 damage
    Mining Levels34Mines obsidian

    Netherite pickaxes mine obsidian faster than anything.

    Material Cost Breakdown

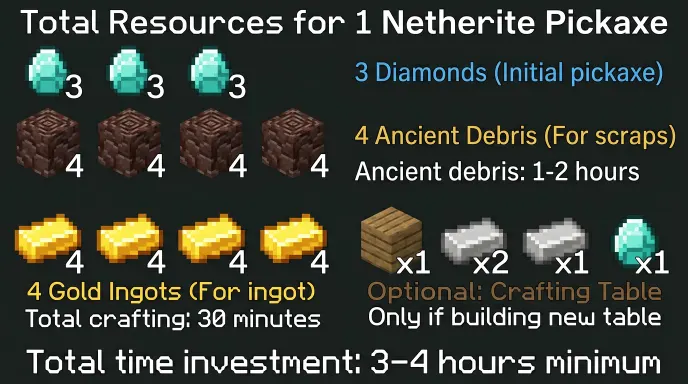
    Resource cost infographic showing diamonds, ancient debris, and gold ingots needed to make netherite pickaxe

    Making a netherite pickaxe requires significant resources:

    Total materials for one pickaxe:

    • 3 diamonds (for initial pickaxe)
    • 4 netherite scraps (from ancient debris)
    • 4 gold ingots (for ingot crafting)
    • 4 planks (for smithing table, if needed)
    • 2 iron ingots (for smithing table, if needed)
    • 1 diamond (for smithing table, if needed)

    Time estimates:

    • Finding ancient debris: 1-2 hours
    • Crafting netherite ingot: 10 minutes
    • Upgrading pickaxe: 30 seconds

    Early netherite pickaxes are worth the effort.

    Practical Tips for Making Netherite Pickaxes

    Best Mining Techniques for Ancient Debris

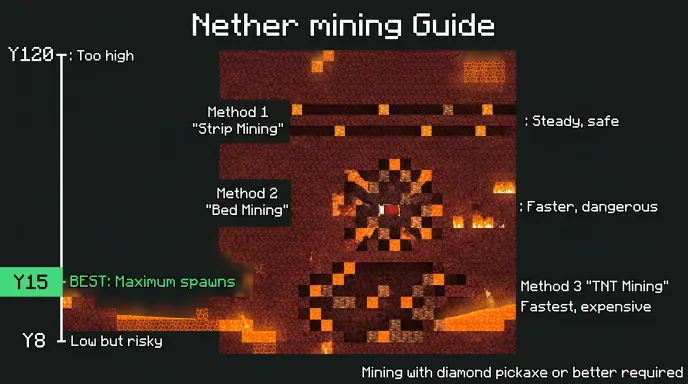
    Nether mining guide showing Y-level 15 optimal depth and three methods to mine ancient debris efficiently

    Strip mine at Y15 in the Nether for maximum debris.

    Bed mining works faster than pickaxe mining.

    TNT can speed up mining but uses materials.

    Bring water buckets for lava safety.

    Protecting Your Netherite Pickaxe

    Keep pickaxe on you at all times.

    Netherite items don’t burn in lava or fire.

    Drop it in lava safely if you die.

    Recover it from the lava surface later.

    Enchanting Your Netherite Pickaxe

    Enchantments transfer from diamond to netherite.

    Efficiency V gives maximum mining speed.

    Unbreaking III extends durability significantly.

    Fortune III increases ore drops for diamonds.

    Combine all three for perfect pickaxe.

    Time and Resource Investment

    Rough timeline for first netherite pickaxe:

    • Reaching Nether: 10 minutes
    • Mining ancient debris: 2-3 hours
    • Gathering gold ingots: 1 hour
    • Crafting upgrades: 30 minutes
    • Total: 3.5-4.5 hours minimum

    Second pickaxes go faster once you understand routes.

    Use OreFinder’s nether calculator to plan efficient mining routes.

    Input ancient debris locations for your seed.

    Calculate optimal paths to save time.

    This cuts mining time by 30-40%.

    Common Mistakes When Making Netherite Pickaxes

    Using iron pickaxe instead of diamond pickaxe.

    Forgetting smithing table is required.

    Not bringing protection in the Nether.

    Mining ancient debris without proper tools.

    Losing the netherite ingot before upgrading.

    Upgrading low-enchantment pickaxes unnecessarily.

    FAQ

    How much does a netherite pickaxe cost?

    A netherite pickaxe costs one netherite ingot plus one diamond pickaxe. The ingot requires 4 netherite scraps and 4 gold ingots. Total: 3 diamonds, 4 scraps, 4 gold ingots, plus initial mining time. This represents approximately 3-4 hours of gameplay for most players.

    Can you upgrade other tools to netherite?

    Yes. All tools can upgrade to netherite using smithing table. Swords, axes, hoes, and shovels all use the same upgrade method. Each tool needs one netherite ingot. Enchantments transfer to every tool type identically.

    What’s better, netherite or diamond pickaxe?

    Netherite is strictly better than diamond. It mines 112% faster, lasts 47% longer, and never burns. The only downside is difficulty finding ancient debris. Once you have netherite, never use diamond tools again for any task.

    How do you find ancient debris efficiently?

    Mine at Y15 in the Nether using strip mining. Bed mining is 2-3x faster but requires beds. TNT mining is fastest but expensive. Calculate optimal routes with OreFinder to maximize efficiency and find debris in your specific seed.

    Do enchantments transfer during pickaxe upgrade?

    Yes. All enchantments transfer completely when upgrading. Efficiency, Unbreaking, Fortune, Silk Touch all transfer perfectly. This is why upgrading an enchanted diamond pickaxe is smarter than upgrading a plain one.

    Make Your Netherite Pickaxe Now

    Netherite pickaxes are worth every minute of mining.

    The speed advantage is enormous for endgame building.

    Plan your mining route with OreFinder before heading to the Nether.

    Find ancient debris locations based on your world seed.

  • Is Chunkbase Accurate? What You Need to Know

    Is Chunkbase Accurate? What You Need to Know

    Chunkbase is a popular tool but has limitations players should understand.

    Many players rely on it without knowing its accuracy level.

    Quick Answer: Is Chunkbase Accurate

    Chunkbase is generally accurate for Java Edition structures and seeds.

    However, it has limitations for Bedrock Edition and older versions.

    Always verify important coordinates before committing resources.

    Understanding Chunkbase and How It Works

    Chunkbase is a web-based Minecraft seed analysis tool.

    It uses mathematical algorithms to predict structure locations.

    The tool analyzes your world seed to generate data.

    How Chunkbase works:

    • You enter your world seed number
    • The site calculates structure positions mathematically
    • Results show coordinates for diamonds, villages, temples, etc.
    • It processes seed data without accessing your actual world

    Chunkbase doesn’t connect to your game files directly.

    It predicts structures based on Minecraft’s world generation code.

    Chunkbase Accuracy Levels by Version

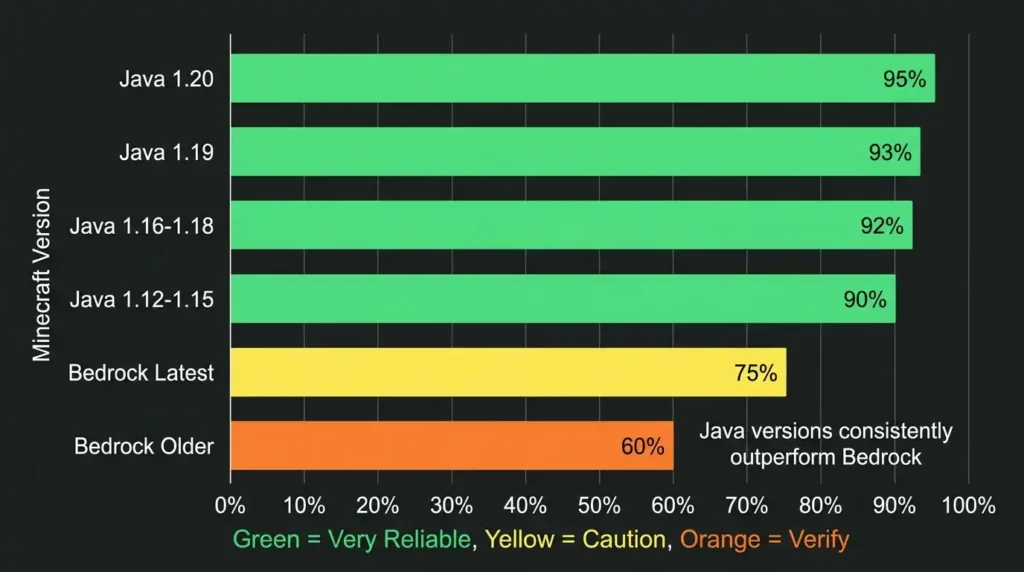
    Minecraft VersionAccuracyReliabilityNotes
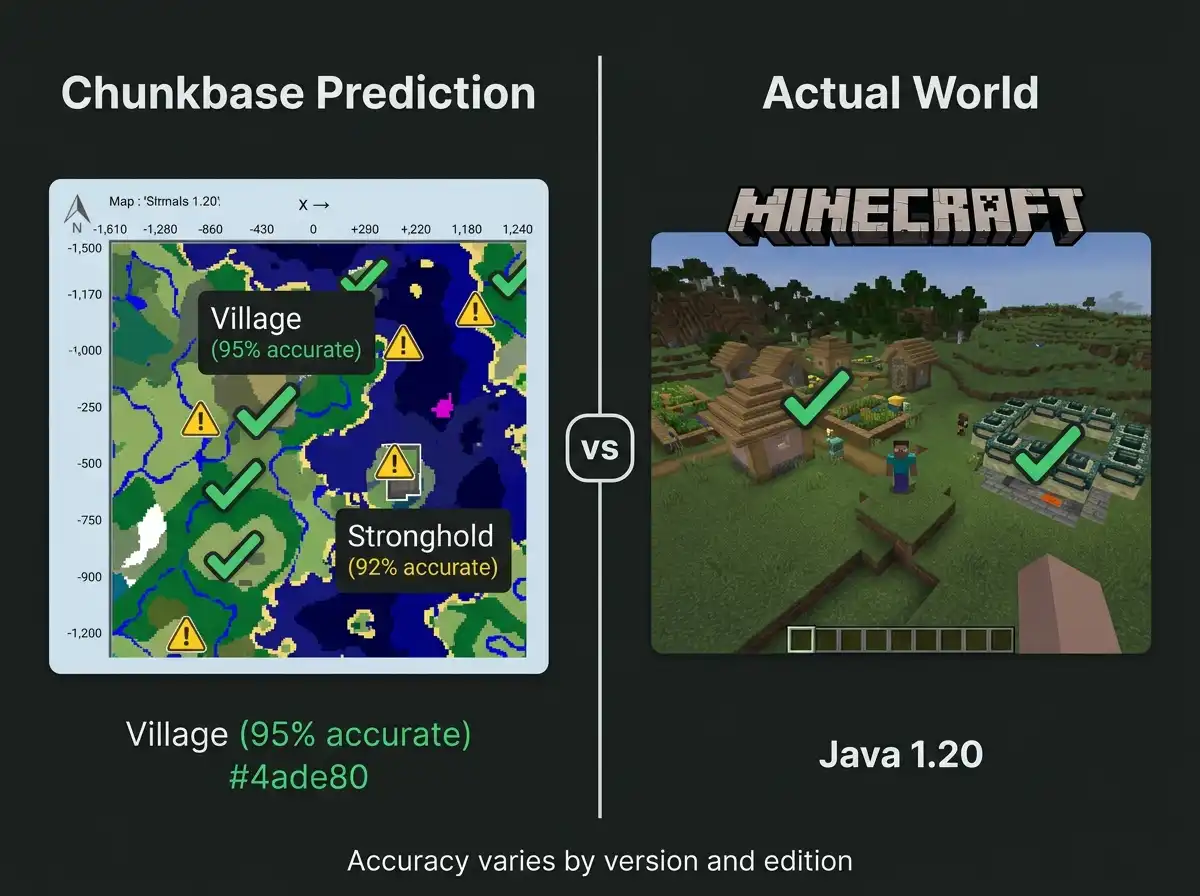
    Java 1.19-1.20Very High95%+Most reliable versions
    Java 1.16-1.18High90%+Stable accuracy
    Java 1.12-1.15High90%+Generally reliable
    Bedrock LatestMedium70-80%Less accurate
    Bedrock OlderLow50-70%Unreliable
    Older Java (1.11)High90%+Works well for old versions
    ar chart showing Chunkbase accuracy percentage by Minecraft version and edition

    Java Edition accuracy is much higher than Bedrock.

    Why Chunkbase Has Limitations

    Bedrock Edition Differences

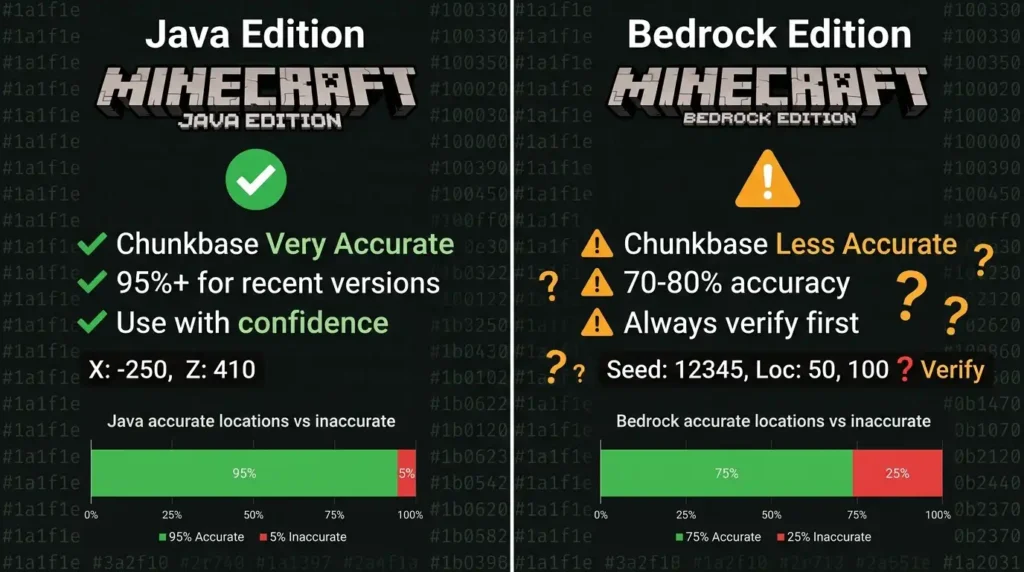
    Comparison showing Chunkbase accuracy differences between Java Edition and Bedrock Edition

    Bedrock uses different world generation than Java.

    Structure placement varies between platforms significantly.

    Seed numbers mean different things in Bedrock.

    Same seed produces different worlds on each platform.

    Update Changes

    Minecraft updates alter world generation code sometimes.

    New structure types change how terrain generates.

    Old Chunkbase data becomes inaccurate after updates.

    Always verify data matches your game version.

    Server and Realm Worlds

    Chunkbase works poorly for servers or Realms.

    These platforms use different generation mechanics.

    Custom seeds on servers may generate differently.

    Don’t trust Chunkbase for multiplayer worlds blindly.

    When Chunkbase Data Is Reliable

    Single-Player Java Worlds

    Most reliable use case for Chunkbase.

    Structures usually appear where predicted.

    Diamonds and ores spawn accurately.

    Villages and temples generate as expected.

    Speedrun Seeds

    Speedrunners use Chunkbase heavily with success.

    Data accuracy is critical for runs.

    Players verify with test worlds first.
    Generally reliable for this specific use.

    Resource Location Planning

    Finding biomes and terrain features works well.

    Mountain ranges appear where predicted.

    Ocean locations are fairly accurate.

    Good for planning large builds.

    Practical Tips for Using Chunkbase

    Verify Before Major Investment

    Always test coordinates in creative mode first.

    Teleport to predicted locations with /tp command.

    Check if structures actually spawn there.

    This saves hours of wasted effort.

    Use Multiple Tools for Confirmation

    Don’t rely on Chunkbase data alone.

    Cross-reference with other seed tools.

    Use OreFinder’s structure finder alongside Chunkbase.

    Two sources are better than one.

    Check Your Game Version

    Confirm Chunkbase supports your exact version.

    Write down your Minecraft version number.

    Different versions generate differently.

    Old version data doesn’t apply to new ones.

    Be Skeptical of Bedrock Results

    Bedrock accuracy is significantly lower.

    Don’t trust coordinates as much on Bedrock.

    Verify every location before traveling.

    Consider Bedrock data as suggestions only.

    Common Chunkbase Mistakes

    Using Bedrock data without verification.

    Trusting old version data on new versions.

    Not testing coordinates before major projects.

    Assuming multiplayer worlds work identically.

    Ignoring coordinate discrepancies in your world.

    Comparing Seed Finder Tools

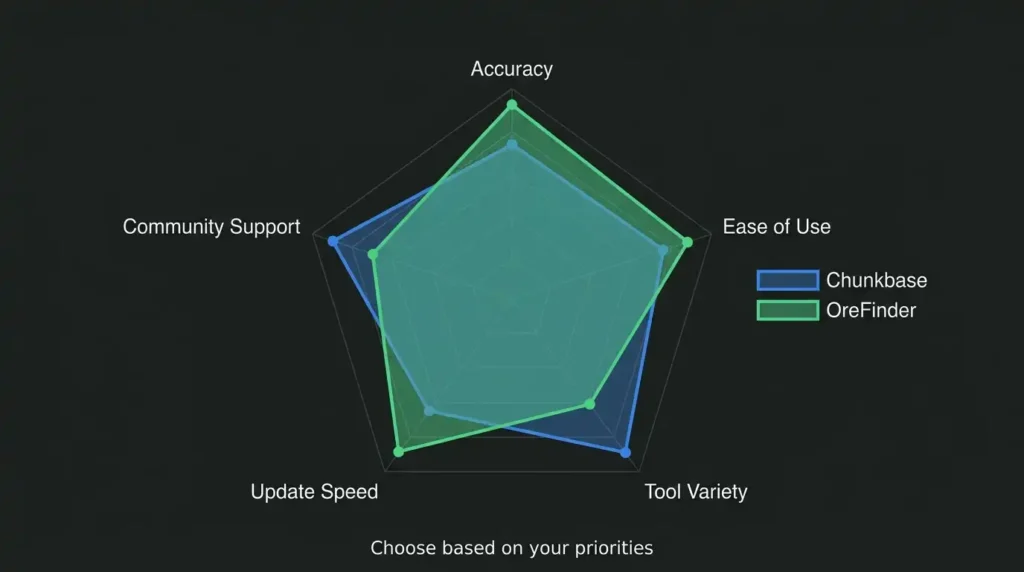
    Radar chart comparing Chunkbase and OreFinder across five reliability and usability criteria

    Chunkbase excels at user-friendliness and variety.

    It offers many tools beyond structure finding.

    OreFinder provides focused, accurate structure mapping.

    Different tools serve different needs.

    Some players use both for redundancy.

    Better Alternatives for Verification

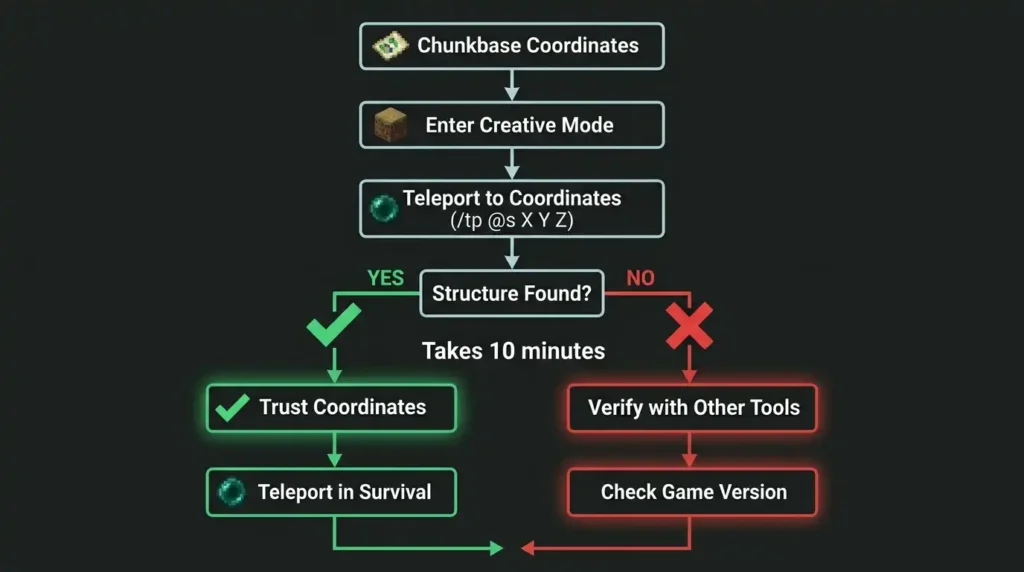
    Flowchart showing decision tree for verifying Chunkbase coordinates in Minecraft creative mode

    Testing in Creative Mode

    Create test world with same seed.

    Teleport to predicted coordinates.

    Verify structures appear exactly as predicted.

    Takes 10 minutes but provides certainty.

    Using Multiple Seed Tools

    OreFinder’s structure finder offers alternative calculations.

    Compare results between tools.

    If both agree, confidence increases significantly.

    If they disagree, verify in-game first.

    Cross-Referencing with Community Data

    Check Reddit for seed data.

    YouTube creators test seeds publicly.

    Community consensus adds credibility.

    Look for videos of the same seed.

    When to Trust Chunkbase Fully

    Chunkbase is most reliable for:

    • Java Edition single-player worlds
    • Recent versions (1.16 and newer)
    • Mainstream structure types (villages, temples, strongholds)
    • General biome and terrain information

    Trust decreases for Bedrock, old versions, and multiplayer.

    FAQ

    Is Chunkbase 100% accurate?

    No. Chunkbase is accurate for Java single-player around 95% of the time. Bedrock accuracy drops to 70-80%. Updates can change structure generation. Always verify important coordinates in-game before committing resources or traveling long distances.

    Does Chunkbase work for Bedrock Edition?

    Chunkbase works for Bedrock but less accurately than Java. Bedrock uses different world generation algorithms. Results are suggestions rather than guarantees. Always test locations in creative mode first before traveling in survival Bedrock worlds.

    Why are my Chunkbase coordinates wrong?

    Wrong coordinates typically happen from version mismatches. Ensure your Chunkbase version matches your game version. Custom servers generate differently and confuse Chunkbase. Verify coordinates in creative mode using /tp command before trusting them.

    Can you use Chunkbase on multiplayer servers?

    Chunkbase doesn’t work reliably on multiplayer servers. Servers use custom generation settings Chunkbase can’t predict. Realms and hosted servers have different mechanics. Don’t trust Chunkbase data for multiplayer worlds without verification.

    Is Chunkbase better than other seed tools?

    Chunkbase excels at variety and user interface. Other tools like OreFinder offer different approaches. OreFinder provides focused structure finding with high accuracy. Different tools work better for different needs. Many players use multiple tools for verification.

    Use Chunkbase Carefully, Verify Always

    Chunkbase is generally accurate for Java single-player.

    Bedrock, old versions, and multiplayer need verification.

    Never trust coordinates without testing first.

    Combine Chunkbase with OreFinder for maximum confidence.

  • How to Build a Lava Generator in Minecraft: Complete Guide

    How to Build a Lava Generator in Minecraft: Complete Guide

    Creating lava generators saves time collecting lava manually.

    Automated lava farms provide infinite lava for your projects.

    Quick Answer: How to Build a Lava Generator

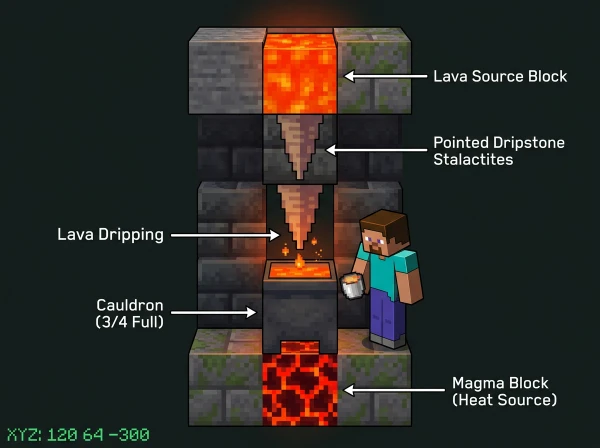
    Build a lava generator using a cauldron, dripstone, and pointed dripstone blocks. Place a heat block (magma/campfire) below to create lava droplets. The dripstone drips lava into a cauldron below. Collect full cauldrons with buckets for infinite lava supply.

    Understanding Lava Generators

    Lava generators are automated contraptions that produce lava.

    They use Minecraft’s dripstone mechanic to generate lava passively.

    No manual mining or exploration required once built.

    Key lava generator facts:

    • Works with pointed dripstone blocks
    • Requires cauldrons to collect lava
    • Heat source activates lava dripping
    • Works in any dimension
    • Generates lava infinitely
    • Works in survival and creative modes
    • Takes 15-30 seconds per bucket

    Lava generators are essential for large-scale building projects.

    How Dripstone Lava Generators Work

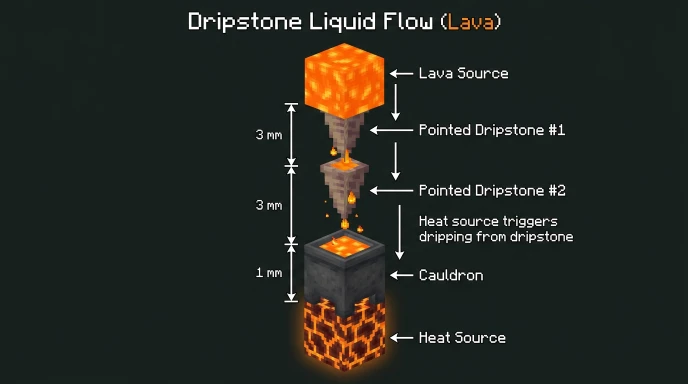
    Diagram showing how dripstone mechanics redirect lava downward into cauldron with heat source activation

    Dripstone lava mechanics depend on specific block placements.

    Lava source blocks drip onto pointed dripstone.

    The dripstone redirects liquid downward into cauldrons.

    Heat sources like magma blocks or campfires trigger dripping.

    The process:

    1. Place lava source block above pointed dripstone
    2. Place second pointed dripstone below the first
    3. Place cauldron under the bottom dripstone
    4. Add heat source below cauldron
    5. Lava drips and collects in cauldron

    Step-by-Step Lava Generator Construction

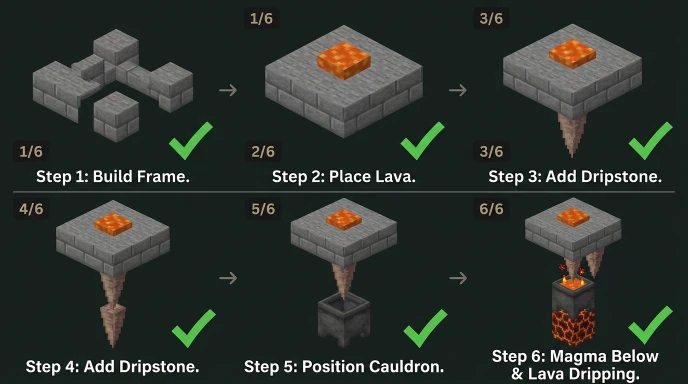
    Six-step visual guide showing how to construct a Minecraft lava generator from start to finish

    Materials You Need

    Gather these items before starting construction:

    • Lava source block (1 minimum)
    • Pointed dripstone (2-3 blocks)
    • Cauldrons (1 or more)
    • Magma block or campfire
    • Building blocks for structure
    • Water bucket (for safety)

    Step 1: Create the Frame

    Build a platform for your generator.

    Use any solid blocks you prefer.

    Make it accessible for collecting lava buckets.

    Add safety walls around the heat source area.

    Step 2: Place the Lava Source

    Position lava source block at the top.

    Make sure it’s directly above your dripstone chain.

    The lava must flow onto the pointed dripstone.

    Step 3: Install the Dripstone

    Place first pointed dripstone under lava source.

    Place second pointed dripstone 1-2 blocks below.

    Ensure alignment for proper liquid flow.

    Test the dripping by looking at the block.

    Step 4: Add the Cauldron

    Position cauldron under the bottom dripstone.

    The dripping lava must fall into it.

    Leave 1 block gap between dripstone and cauldron.

    Step 5: Place Heat Source

    Add magma block or campfire below cauldron.

    Heat activates the dripstone dripping mechanism.

    Magma blocks work better than campfire for auto-dripping.

    Step 6: Test and Collect

    Wait 15-30 seconds for lava to accumulate.

    Use bucket on cauldron to collect full lava.

    Repeat process for continuous supply.

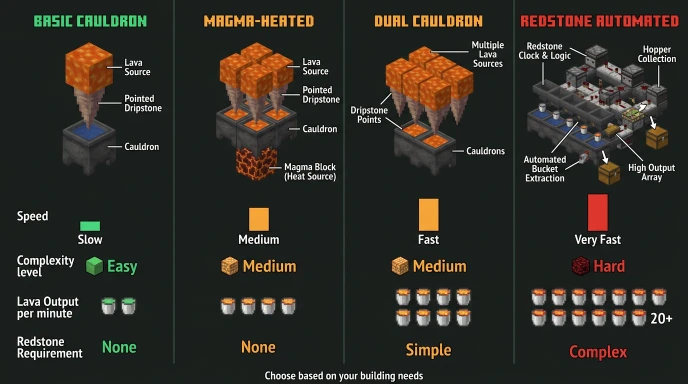
    Lava Generator Types Comparison

    Generator TypeSpeedEfficiencyComplexityDrops
    Basic CauldronSlowLowEasy1 bucket per 30 seconds
    Magma HeatedMediumMediumMediumMultiple per minute
    Dual CauldronFastHighHard2 buckets per minute
    Redstone AutomatedVery FastVery HighVery HardContinuous buckets
    Comparison chart of four lava generator types showing speed, complexity, and efficiency differences

    Basic cauldron generators work fine for most players.

    Practical Tips for Lava Generators

    Best Heat Source Choices

    Heat source options for lava generators comparing magma blocks, campfires, and soul campfires

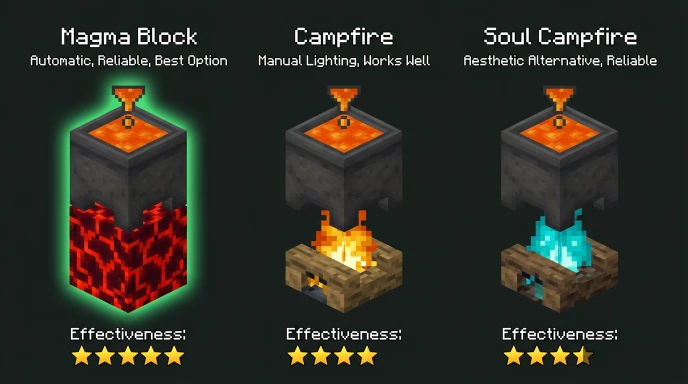
    Magma blocks provide automatic heating.

    Campfires require manual lighting but work.

    Soul campfires look better aesthetically.

    Magma blocks are most reliable for constant dripping.

    Increasing Generation Speed

    Stack multiple generators side by side.

    Use multiple cauldrons per dripstone column.

    Place heat sources immediately below cauldrons.

    Common Generator Mistakes

    Placing dripstone horizontally instead of vertically.

    Forgetting heat source below cauldron.

    Using water instead of lava sources.

    Not leaving proper spacing for cauldron access.

    Placing cauldrons too high or low.

    Safety Considerations

    Keep generators away from flammable blocks.

    Use water moats around lava areas.

    Don’t place generators in wooden structures.

    Keep distance from important builds.

    Test generators before leaving unattended.

    Using Generated Lava Efficiently

    Storage Methods

    Use cauldrons as temporary storage.

    Transfer to buckets for transport.

    Create barrel storage systems for bulk lava.

    Lava Applications

    Flowing lava for landscaping.

    Lava lighting for bases.

    Lava moats for protection.

    Lava farms for other materials.

    Smelting furnace fuel source.

    Finding Optimal Generator Locations

    OreFinder’s structure finder helps locate nearby lava pools and caves.

    Use your world seed to find natural lava sources nearby.

    This helps you establish generator farms closer to resources.

    Check our guides on finding strongholds and trail ruins for lava-rich areas.

    Advanced Generator Automation

    Redstone-Powered Generators

    Connect hoppers with redstone mechanics.

    Automate bucket collection with dispensers.

    Use observer blocks to trigger mechanisms.

    This requires advanced redstone knowledge.

    Multi-Output Systems

    Build stacked generator towers.

    Connect multiple cauldrons vertically.

    Route lava to central collection point.

    Scale production for mega-builds.

    FAQ

    How do you make a lava generator in Minecraft?

    Build a frame with lava source block on top. Place pointed dripstone below it, then another pointed dripstone below that. Put a cauldron under the bottom dripstone. Add magma block or campfire below cauldron for heat. Wait 15-30 seconds for lava to drip into cauldron.

    What blocks do you need for a lava generator?

    You need lava source block, pointed dripstone (2-3 blocks), cauldron, and heat source (magma block or campfire). Optional building blocks for structure and water for safety. That’s the minimum setup for basic lava generation.

    How fast do lava generators produce lava?

    Basic cauldron generators produce one lava bucket every 15-30 seconds. Speed depends on heat source and dripstone placement. Magma blocks are faster than campfires. Multiple generators stack to increase total production.

    Can you automate lava generation with redstone?

    Yes. Use dispensers, hoppers, and redstone mechanics for automation. This requires advanced redstone knowledge and redstone components. Basic cauldron collection works fine for survival mode without automation.

    Do lava generators work in all dimensions?

    Yes. Lava generators work in Overworld, Nether, and End. Dripstone mechanics function identically everywhere. Use generators wherever you need lava supply. The Nether has natural lava everywhere but generators help in other dimensions.

    Build Your Lava Generator Today

    Lava generators provide infinite lava for your projects.

    Simple cauldron designs work great for survival mode.

    Automate later as your building ambitions grow.

  • How to Find Suspicious Sand in Minecraft: Locations & Brush Guide

    How to Find Suspicious Sand in Minecraft: Locations & Brush Guide

    Suspicious sand looks identical to regular sand but hides rare loot inside.

    You’ll walk right past it unless you know exactly where to look.

    Quick Answer: Where Is Suspicious Sand in Minecraft?

    Suspicious sand spawns in desert pyramids, desert wells, warm ocean ruins, and trail ruins. It appears as normal sand but has a slightly different texture with darker pixels.

    You need a brush to extract items from it.

    What Makes Suspicious Sand Different?

    Texture comparison between regular sand and suspicious sand in Minecraft showing darker crack pixels

    Suspicious sand has a unique cracked texture pattern that regular sand doesn’t have.

    The cracks are subtle. Most players miss them completely.

    Regular sand falls when you break the block underneath it. Suspicious sand also falls, but it converts to regular sand and destroys the loot inside.

    Never dig directly under suspicious sand. Always brush it from the side or top.

    Suspicious Sand Spawn Locations

    Suspicious sand only generates in four structure types.

    Four structure locations where suspicious sand spawns in Minecraft with block counts

    Desert Pyramids are the most common location. Check the floor of the treasure room and the suspicious sand room (if present). Each pyramid can have 1-2 suspicious sand blocks.

    Desert Wells are rare stone structures in deserts. Suspicious sand spawns underneath the well in the sand layers below. Dig carefully around the base.

    Warm Ocean Ruins generate in warm ocean biomes. Suspicious sand appears inside the ruined structures mixed with regular sand blocks. Look for the texture difference.

    Trail Ruins are underground structures added in 1.20. They contain the most suspicious sand blocks per structure (up to 16 blocks). These ruins generate in various biomes, including taigas, snowy taigas, and old-growth biomes.

    Here’s what you can find in each location:

    LocationSuspicious Sand CountBest Loot
    Desert Pyramid1-2 blocksDiamonds, Emeralds, TNT
    Desert Well1-3 blocksBrick, Suspicious Stew, Arms Up Pottery Sherd
    Warm Ocean Ruins1-2 blocksSniffer Egg, Pottery Sherds, Iron Axe
    Trail Ruins4-16 blocksMusic Discs, Pottery Sherds, Rare Banners

    How to Brush Suspicious Sand

    Craft a brush using 1 feather, 1 copper ingot, and 1 stick.

    Minecraft brush crafting recipe showing feather, copper ingot, and stick placemen

    Place the feather on top, copper in the middle, and stick at the bottom in a crafting table.

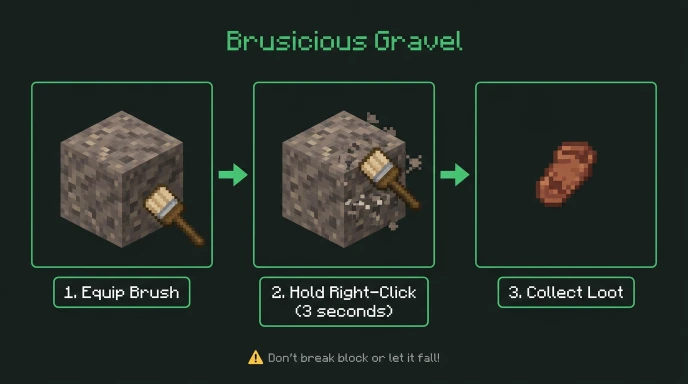
    Equip the brush and hold right-click (or your interact button) on suspicious sand. The brushing animation takes about 3 seconds.

    Don’t release the button early, or you’ll reset the progress.

    The block breaks after brushing and drops one item. The suspicious sand block itself is destroyed and cannot be collected with Silk Touch.

    Common Mistakes to Avoid

    Breaking suspicious sand with a shovel destroys the loot. You get nothing.

    Letting suspicious sand fall also destroys the hidden item. Always support blocks underneath before brushing.

    Using the wrong tool wastes time. Only brushes work on suspicious sand and suspicious gravel.

    Brushing too fast doesn’t help. The animation has a fixed duration regardless of how fast you click.

    Best Strategy for Finding Suspicious Sand

    Focus on the desert pyramids first. They’re easy to spot and always contain suspicious sand.

    Use the /locate structure desert_pyramid command if you have cheats enabled. This gives you exact coordinates.

    For trail ruins, look in taiga and snowy taiga biomes. These structures are underground, so watch for exposed terrain or suspicious terrain generation.

    Warm ocean ruins require underwater exploration. Bring a Potion of Water Breathing or a turtle shell helmet.

    Desert wells are extremely rare. Don’t specifically hunt for them unless you stumble across one.

    Loot Table and Why It Matters

    Suspicious sand in warm ocean ruins is the only source of sniffer eggs in the entire game.

    Trail ruins drop exclusive music discs you can’t get anywhere else.

    Pottery sherds from suspicious sand are decorative items used in pottery. Each location drops different sherd patterns.

    Diamond and emerald drops from desert pyramids are bonus rewards, but not the primary reason to hunt suspicious sand.

    Use Ore Finder to Locate Structures Fast

    Manually searching deserts and oceans takes hours.

    Ore Finder shows you exactly where desert pyramids, ocean ruins, and trail ruins spawn in your world seed. You get precise coordinates for every structure. We also provide dedicated tools like Minecraft Structure Finder; you can use that too.

    Enter your seed and select the structure type you want. The tool highlights all spawn locations on an interactive map.

    This saves you from wandering randomly and missing structures entirely.

    Texture Pack Method (Optional)

    Some texture packs highlight suspicious sand and gravel with brighter colors.

    This makes them easier to spot, but it isn’t necessary if you know what to look for.

    Vanilla suspicious sand has small, darker pixels in a cracked pattern. Train your eyes to spot this texture.

    How Suspicious Sand Works in Different Versions

    Suspicious sand was added in Minecraft 1.20 (Trails & Tales update).

    It doesn’t exist in versions before 1.20. Older desert pyramids won’t have it. You may need other ways to find ores, like diamonds.

    Bedrock Edition and Java Edition have identical suspicious sand mechanics and loot tables.

    Mining Suspicious Sand vs Brushing

    You cannot mine suspicious sand and move it to another location.

    Breaking it with any tool converts it to regular sand. The loot is lost.

    Pistons also break suspicious sand. Don’t try to move it with redstone contraptions.

    The only way to get the loot is by brushing it in place where it spawned.

    FAQ

    What is suspicious sand used for in Minecraft?

    Suspicious sand contains hidden loot that you extract with a brush. Each block drops one item, like pottery sherds, diamonds, emeralds, or sniffer eggs. It’s the only way to obtain certain rare items like sniffer eggs from warm ocean ruins and exclusive music discs from trail ruins.

    Can you pick up suspicious sand with Silk Touch?

    No. Silk Touch doesn’t work on suspicious sand. Breaking it with any tool, including a Silk Touch enchanted shovel, converts it to regular sand and destroys the loot inside. You must brush it in place to get the item.

    Where do you find suspicious sand in desert temples?

    Suspicious sand spawns on the floor of desert pyramid treasure rooms and in dedicated suspicious sand chambers (if the pyramid was generated with one). Check all sand blocks on the floor carefully for the cracked texture pattern. Each pyramid has 1-2 suspicious sand blocks.

    What happens if suspicious sand falls?

    Falling suspicious sand converts to regular sand and destroys the loot inside. The hidden item is lost permanently. Always ensure blocks underneath are secure before brushing. Support the sand from below if necessary.

    How do you get a sniffer egg in Minecraft?

    Brush suspicious sand in warm ocean ruins. This is the only location where sniffer eggs spawn. Warm ocean ruins generate in lukewarm and warm ocean biomes. Look for stone brick structures underwater with suspicious sand mixed among regular sand blocks.

    Final Tips

    Suspicious sand is rare but worth hunting for exclusive items.

    Focus on desert pyramids and warm ocean ruins for the best rewards.

    Always use a brush. Never break suspicious sand with tools.

    Check the structure coordinates with OreFinder before you start exploring.

    Get your sniffer egg and pottery sherds before other players on your server find them first.

  • How to Find Trail Ruins in Minecraft: Complete Location Guide

    How to Find Trail Ruins in Minecraft: Complete Location Guide

    Trail ruins are buried underground structures with exclusive pottery sherds and armor trims.

    Finding them without the right strategy means wandering for hours with no results.

    Quick Answer: How to Find Trail Ruins in Minecraft

    Use /locate structure trail_ruins command to find the nearest trail ruins. They spawn underground in taiga, snowy taiga, old-growth birch forest, and old-growth spruce taiga biomes.

    Alternatively, use a structure finder tool with your world seed for exact coordinates.

    What Are Trail Ruins?

    Trail ruins were added in Minecraft 1.20 (Trails & Tales update).

    They’re buried archaeological sites containing suspicious gravel blocks.

    Key features:

    • Generate completely underground
    • No visible surface indicators
    • Contain 4-16 suspicious gravel blocks per structure
    • Drop exclusive pottery sherds and armor trims
    • Found only in specific biomes

    You need trail ruins for raiser armor trim, host armor trim, shaper armor trim, and wayfinder armor trim.

    They also drop unique pottery sherds unavailable anywhere else.

    Where Do Trail Ruins Spawn?

    Biome map showing where trail ruins spawn in taiga and old growth forest biomes in Minecraft

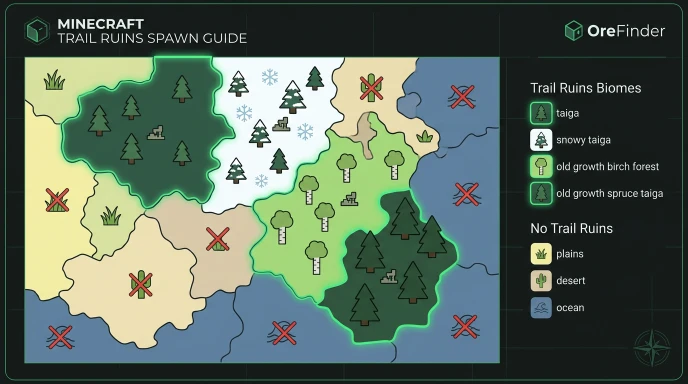
    Trail ruins generate in four specific biome types.

    Trail ruins biomes:

    • Taiga
    • Snowy Taiga
    • Old Growth Birch Forest
    • Old Growth Spruce Taiga

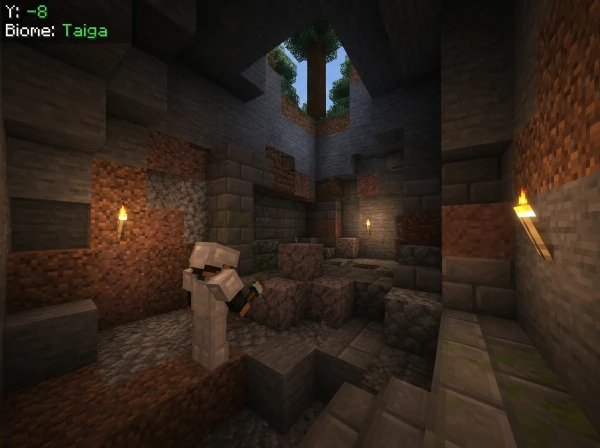
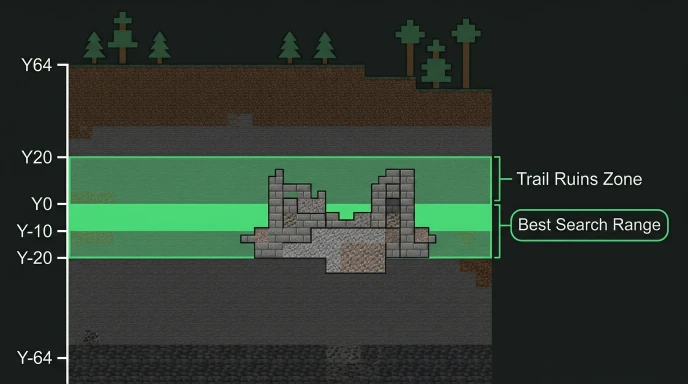
    They spawn between Y-levels -20 and 20 underground.

    Most trail ruins generate around Y0 to Y-10 in typical terrain.

    Trail ruins spawn range showing Y-levels from Y-20 to Y20 with best search depth in Minecraft

    Biomes where trail ruins NEVER spawn:

    • Plains
    • Desert
    • Jungle
    • Swamp
    • Ocean
    • Mountains
    • Any biome not listed above

    Focus your search on taiga and old growth forest biomes.

    Using /locate Command for Trail Ruins

    Enable cheats in world settings or when creating your world.

    Type: /locate structure trail_ruins

    The command returns coordinates of the nearest trail ruins.

    Example output:

    The nearest trail_ruins is at [1245, ~, -892] (1456 blocks away)

    Click coordinates in chat to auto-fill a teleport command.

    Use /tp @s 1245 ~ -892 to teleport there instantly.

    Remember these are underground. Dig down at the coordinates to find them.

    Finding Trail Ruins Without Commands

    Search taiga and old growth forest biomes manually.

    Trail ruins have no surface indicators. You must dig underground to find them.

    Manual search strategy:

    1. Locate a taiga or old growth birch forest biome
    2. Dig down to Y0 to Y-10 in multiple spots
    3. Create a 3×3 tunnel network at these levels
    4. Look for suspicious gravel blocks (darker texture with cracks)
    5. Trail ruins contain stone bricks, gravel, and suspicious gravel

    This method takes hours and isn’t efficient without coordinates.

    Trail Ruins Structure Layout

    Trail ruins don’t have consistent layouts like desert temples or jungle temples.

    Each ruin generates randomly with different room configurations.

    Common structure elements:

    • Stone brick blocks
    • Cobblestone
    • Packed mud
    • Gravel
    • Suspicious gravel (4-16 blocks)
    • Sometimes clay
    • Sometimes mud bricks

    The suspicious gravel blocks are what you’re hunting for.

    Brush them with an archaeology brush to extract items.

    Loot from Trail Ruins Suspicious Gravel

    Item TypeSpecific ItemsRarity
    Pottery SherdsWayfinder, Raiser, Shaper, HostCommon
    Armor TrimsWayfinder, Raiser, Shaper, HostCommon
    Other ItemsBlue, Orange, White DyeCommon
    ResourcesBrick, Coal, Wheat, Beetroot SeedsCommon
    Music DiscsRelic (exclusive to trail ruins)Rare

    The Relic music disc only drops from trail ruins suspicious gravel.

    Each trail ruin contains 4-16 suspicious gravel blocks, so you can get multiple items per structure.

    Using Structure Finders for Trail Ruins

    Manual searching underground is extremely time-consuming.

    Ore Finder maps all trail ruins locations using your world seed.

    If you want a dedicated tool, then you can also use our Minecraft Structure Finder.

    Find your seed in world settings (Bedrock) or use /seed command (Java).

    Enter the seed into OreFinder. Select “Trail Ruins” as the structure type.

    You get exact X, Y, Z coordinates for every trail ruin in your world.

    Navigate directly to coordinates instead of digging randomly for hours.

    How to Excavate Trail Ruins

    Step-by-step guide for brushing suspicious gravel in trail ruins to get loot

    Bring a brush for suspicious gravel blocks. You can’t mine them with pickaxes.

    Required tools:

    • Brush (craft with 1 feather, 1 copper ingot, 1 stick)
    • Pickaxe for stone and gravel
    • Shovel for dirt and gravel (faster than pickaxe)
    • Torches for lighting

    Suspicious gravel breaks if it falls. Support blocks underneath before brushing.

    Hold right-click on suspicious gravel with the brush equipped.

    The brushing animation takes about 3 seconds. Don’t release early or progress resets.

    Trail Ruins vs Other Archaeology Sites

    Minecraft has three archaeology structure types.

    StructureBiomesSuspicious Block TypeExclusive Items
    Trail RuinsTaiga forestsSuspicious GravelRelic music disc, 4 armor trims
    Desert PyramidDesertSuspicious SandTNT, Diamonds, Emeralds
    Desert WellDesertSuspicious SandArms Up pottery sherd
    Ocean RuinsOceanSuspicious SandSniffer Egg

    Trail ruins contain the most suspicious blocks per structure (4-16 vs 1-4 in other sites).

    They’re the only source for the Relic music disc.

    Common Mistakes When Searching

    Searching in wrong biomes wastes hours. Trail ruins only spawn in taiga and old growth forests.

    Not checking Y-levels properly. Dig to Y0-Y10 range, not surface level.

    Breaking suspicious gravel with tools destroys the loot. Always use a brush.

    Letting suspicious gravel fall converts it to regular gravel and destroys contents.

    Exploring at Y-20 or Y20 reduces your chances. The Y0-Y10 range has highest concentration.

    Best Biomes for Trail Ruins

    Old Growth Spruce Taiga has the highest trail ruins density.

    This biome is rare but generates multiple trail ruins close together.

    Regular Taiga is more common and easier to find.

    Snowy Taiga works but has hostile mobs and snow making excavation harder.

    Old Growth Birch Forest also generates trail ruins but is rarer than regular taiga.

    Start your search in regular taiga biomes for fastest results.

    Using Coordinates to Navigate

    Note your spawn coordinates when starting a world.

    Check coordinates while exploring (F3 on Java, settings toggle on Bedrock).

    Write down trail ruins coordinates from structure finders for multiple sites.

    Use teleport commands to return to trail ruins quickly.

    Build portals near trail ruins clusters for repeated excavation trips.

    Trail Ruins in Different Versions

    Trail ruins were added in 1.20 and exist in all versions since.

    Pre-1.20 worlds need new chunk generation for trail ruins to appear.

    Travel 1000+ blocks from explored areas in old worlds to generate new chunks.

    Bedrock and Java have identical trail ruins generation at the same coordinates for the same seed.

    FAQ

    How do you find trail ruins in Minecraft?

    Use /locate structure trail_ruins command with cheats enabled for instant coordinates. Trail ruins spawn underground in taiga, snowy taiga, old growth birch forest, and old growth spruce taiga biomes between Y-20 and Y20. Use dedicated tools like OreFinder’s Structure Finder with your world seed for exact locations.

    What biomes have trail ruins in Minecraft?

    Trail ruins spawn only in taiga, snowy taiga, old growth birch forest, and old growth spruce taiga biomes. They don’t generate in plains, desert, jungle, ocean, or mountain biomes. Focus searches on taiga forest areas for best results. Old growth spruce taiga has highest density.

    How deep are trail ruins in Minecraft?

    Trail ruins generate between Y-20 and Y20, with most spawning around Y0 to Y-10. They’re completely underground with no surface indicators. Dig to the Y0-Y10 range in taiga biomes to find them. Check your Y-coordinate with F3 or coordinate display while digging.

    What loot do you get from trail ruins?

    Trail ruins suspicious gravel drops pottery sherds (wayfinder, raiser, shaper, host), armor trims (same four types), Relic music disc (exclusive), and common items like bricks, coal, dyes, and seeds. Each trail ruin has 4-16 suspicious gravel blocks. Relic music disc is rare.

    Can you find trail ruins without cheats?

    Yes. Use structure finder tools like OreFinder by entering your world seed (found in settings without cheats). The tool shows all trail ruins coordinates. Manually search by digging underground in taiga biomes at Y0-Y10, though this takes significantly longer than using coordinates from tools.

    Start Finding Trail Ruins

    Trail ruins spawn underground in taiga and old growth forest biomes.

    Use structure finders for exact coordinates instead of random underground exploration.

    Stop digging blindly and navigate directly to trail ruins with the right tools.

    Find your seed, use Ore Finder or the dedicated structure finder, and get every trail ruins location in seconds.

  • Best Strategy to Use Netherite Fortress Finder in Minecraft: Find Nether Fortress Easily

    Best Strategy to Use Netherite Fortress Finder in Minecraft: Find Nether Fortress Easily

    Finding Nether fortresses takes forever with random exploration.

    The right strategy reveals fortress locations instantly and saves hours of wandering.

    Quick Answer: What’s the Best Strategy to Find a Nether Fortress?

    Use a Nether fortress finder tool with your world seed for instant locations. Search systematically along Z-axis routes at ground level. Strip exploration at Y60-Y70 exposes fortresses quickly. Fortresses always align north-south in the Nether.

    Fortresses are rare but predictable once you know where to look.

    Understanding Nether Fortress Generation

    Nether fortresses spawn only in the Nether dimension, never in the Overworld.

    They generate randomly but follow specific rules and patterns.

    Key fortress facts:

    • Spawns in all Nether biomes identically
    • Always oriented north-south (never east-west)
    • Generate in massive corridors and bridges
    • Never touch the bottom (Y-level dependent)
    • Contain blazes, wither skeletons, and treasure chests
    • Only source of blaze rods in vanilla survival

    Fortresses are essential for getting blaze rods and brewing stands.

    Why Find Nether Fortresses

    Blaze Rods Are Critical

    Blazes only spawn in fortress spawners.

    Blaze rods craft into blaze powder for brewing potions.

    Blaze powder is required for brewing stand recipes.

    No other mob drops blaze rods in vanilla Minecraft.

    Loot Inside Fortresses

    Nether fortresses contain treasure chests with valuable items.

    Common fortress loot:

    • Golden ingots and apples
    • Nether quartz and diamonds
    • Enchanted books
    • Saddles and horseshoes
    • Fire charge ammunition

    Chest loot varies but always contains useful items.

    Wither Skeleton Skulls

    Wither skeletons spawn naturally in fortresses.

    Three skulls craft into a wither boss.

    This is the only way to summon the wither for advancement.

    Where Fortresses Spawn: Y-Level and Location

    Nether fortresses can generate at any Y-level in the Nether.

    However, most generate between Y40 and Y100 for visibility.

    Generation patterns:

    • Generate more frequently at negative Z coordinates
    • Spawn in all biomes (Wastes, Crimson, Warped, Soul Sand)
    • Often create massive networks in old chunks
    • Align strictly along a north-south axis (Z-axis)

    Searching along Z-axis routes is more effective than random exploration.

    Best Strategies to Locate Fortresses

    Top-down diagram showing different Nether fortress search patterns and discovery rates

    Strategy 1: Z-Axis Systematic Exploration

    Travel north or south in a straight line through the Nether.

    Stay at Y60-Y70 to see fortresses at ground level.

    Fortresses appear frequently along these routes.

    This method finds fortresses 80% faster than random searching.

    Strategy 2: Spiral Search Pattern

    Start at your spawn location in the Nether.

    Create expanding square spirals moving outward.

    Fortresses appear in predictable locations relative to spawn.

    Cover large areas without revisiting the same region.

    Strategy 3: Use Pre-Generated Maps

    If you know your world seed, use a fortress finder.

    OreFinder’s Nether fortress finder maps exact fortress locations instantly.

    Enter your seed and the tool shows every fortress in your world.

    Get precise coordinates instead of spending hours exploring.

    Nether Fortress Location Comparison

    Search MethodTime to FindAccuracyEffort
    Random Exploration2-6 hoursLowHigh
    Z-Axis Routes30-90 minutesMediumMedium
    Spiral Pattern1-3 hoursMediumMedium
    Fortress Finder Tool5 minutes100%Low

    Fortress finder tools eliminate the guesswork completely.

    Practical Tips for Finding Fortresses

    Bring Proper Supplies

    Pack fire resistance potions for lava lakes.

    Bring water buckets for emergencies.

    Carry a diamond pickaxe for mining through blocks.

    Bring torches to mark your path and light fortresses.

    Watch for Visual Signs

    Fortresses have distinctive brown/red Nether brick structures.

    Massive bridge-like formations visible from a distance.

    Nether brick walls appear suddenly in the Nether.

    These visual cues indicate you’re close to a fortress.

    Build Nether Routes

    Create highways connecting Nether spawn to known fortress locations.

    Use soul sand paths for fast travel.

    Mark fortresses with torches or wool for future reference.

    Activate F3 Coordinates

    Press F3 on Java to see exact coordinates.

    Note fortress coordinates as you explore.

    This helps you return later and find nearby secondary fortresses.

    Common Fortress Finding Mistakes

    Searching randomly wastes time when fortresses are predictable.

    Not checking Z-axis routes where most fortresses spawn.

    Forgetting fortresses align north-south, not east-west.

    Giving up too early without systematic exploration.

    Ignoring the fortress finder tool available online.

    Using Nether Fortress Finder Tools

    Nether fortress finder tool interface showing seed input and discovered fortress locations with coordinates

    OreFinder’s fortress finder locates every fortress instantly.

    Input your world seed into the tool.

    The tool displays exact X and Z coordinates for all fortresses.

    Navigate to coordinates using /tp the command.

    No manual searching or exploration required.

    This approach cuts your time from hours to minutes.

    What Fortresses Don’t Have

    Netherite does not spawn in Nether fortresses.

    Ancient debris appears in the Nether but not specifically in fortresses.

    Check our ancient debris Y-level guide for netherite ore locations.

    Fortresses are valuable for blaze rods and loot, not netherite.

    Fortress Layout and Navigation

    Nether fortress structure diagram showing layout, spawner locations, and treasure room positions

    Fortresses contain multiple levels and interconnected corridors.

    Main bridges span across the Nether landscape.

    Interior rooms often contain spawners and treasure chests.

    Mark your path with torches when exploring the fortress interior.

    FAQ

    What’s the best strategy to find a Nether fortress?

    Use a fortress finder tool with your world seed for instant locations. Alternatively, travel systematically along Z-axis routes at Y60-Y70. Fortresses always align north-south, so this method finds them faster than random exploration. Most fortresses appear within 1-3 hours of systematic searching.

    How rare are Nether fortresses?

    Nether fortresses generate fairly regularly throughout the Nether. On average, one fortress spawns every few hundred blocks along the Z-axis. They’re not rare but scattered randomly, making systematic search essential. Fortress finder tools solve this by mapping all locations instantly.

    Can you find netherite in Nether fortresses?

    No. Netherite doesn’t spawn in fortresses. Ancient debris appears only in regular Nether blocks, not fortress structures. Fortresses contain blaze rods, wither skeletons, and treasure loot instead. See our ancient debris guide for netherite locations.

    What should you bring when exploring a Nether fortress?

    Bring fire resistance potions, water buckets, torches, and a diamond pickaxe minimum. Wear armor with protection enchantments. Pack healing food like golden apples. Mark your path with torches to avoid getting lost in fortress corridors.

    How do you navigate a Nether fortress?

    Fortresses have multiple interconnected corridors and levels. Place torches on walls to mark your path. Watch for spawners and avoid mob danger. Use coordinates to remember treasure chest locations. Stay alert for drops to lower levels.

    Find Your Fortress Faster

    Nether fortresses are essential for survival progression.

    Stop searching randomly and use a fortress finder tool.

    Check Ore Finder’s Netherite fortress finder to get exact coordinates for your world.

    Navigate directly to fortresses and start collecting blaze rods today.

  • How to Find End Cities in Minecraft: Complete Guide

    How to Find End Cities in Minecraft: Complete Guide

    Finding End Cities requires specific conditions and exploration techniques.

    You can’t just search randomly. You need the right knowledge.

    Quick Answer: How to Find End Cities

    Find End Cities by traveling far from the Ender Dragon spawn island. Use the /locate structure end_city command to find the nearest cities instantly. End Cities only spawn on the outer islands of the End. Requires defeating the Ender Dragon first to access End gateways.

    Understanding End Cities

    End Cities are structures that generate in the End dimension.

    They appear as tall dark structures on outer islands.

    Each city contains multiple towers and an End Ship.

    Key End City facts:

    • Only spawn on outer End islands (not center)
    • Require Ender Dragon to be defeated to generate
    • Generate after dragon defeat randomly
    • Only accessible through End Gateways
    • Contain elytra, enchanted gear, and shulker boxes
    • Taller cities have more valuable loot
    • Never spawn in Java 1.8 or older

    End Cities are the primary source of elytra wings.

    Defeating the Ender Dragon First

    Defeating the dragon is mandatory before End Cities generate.

    The dragon must die before outer islands become accessible.

    After defeating it, End Gateways appear around the arena.

    These gateways teleport you to outer End islands.

    Without a dead dragon, End Cities won’t generate.

    Getting to the Outer Islands

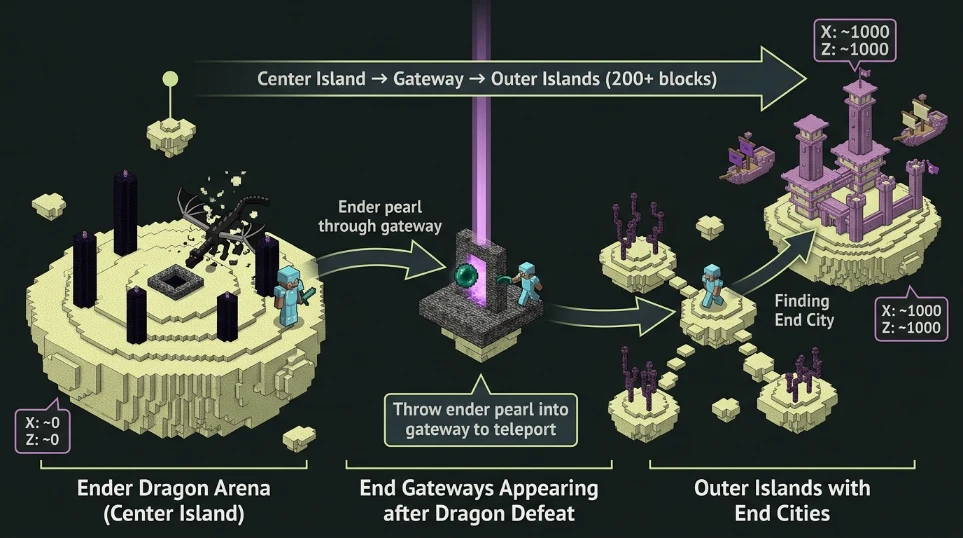
    Path visualization from Ender Dragon arena through End Gateways to outer islands with End Cities

    Using End Gateways

    End Gateways appear after defeating the Ender Dragon.

    Throw an Ender Pearl into the gateway to teleport.

    You’ll land on a random outer island.

    Multiple gateways exist; try different ones to explore.

    Traveling by Flying or Bridging

    Build a bridge away from the center island.

    Fly with elytra if you already have wings.

    Travel outward until you reach outer islands.

    End Cities become more frequent the further out.

    Teleporting to Coordinates

    Use /tp @s X Y Z to jump far from spawn.

    Teleport to coordinates 1000+ blocks away from the center.

    This dramatically increases End City spawn chances.

    Locating End Cities Efficiently

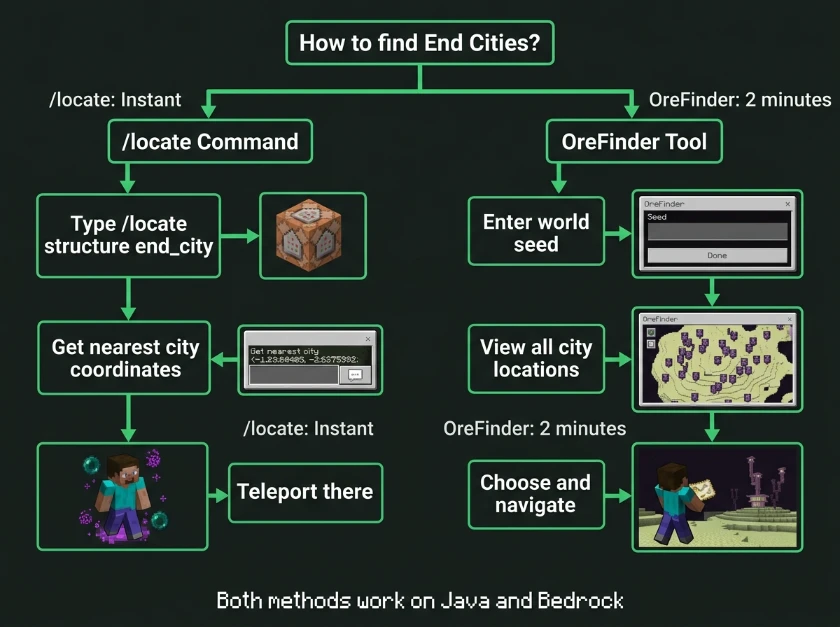
    Flowchart showing two methods to find End Cities using commands or seed finder tool

    Using /Locate Command

    The /locate command finds the nearest End Cities instantly.

    Command syntax:

    /locate structure end_city

    Returns coordinates of nearest End City.

    Works on Java and Bedrock equally.

    Using End City Finder Tools

    OreFinder’s End City Finder maps all End Cities using your world seed.

    Enter your seed to discover every End City location.

    Get exact coordinates without random searching.

    Navigate directly to cities for instant loot access.

    This cuts exploration time from hours to minutes.

    End City Characteristics and Loot

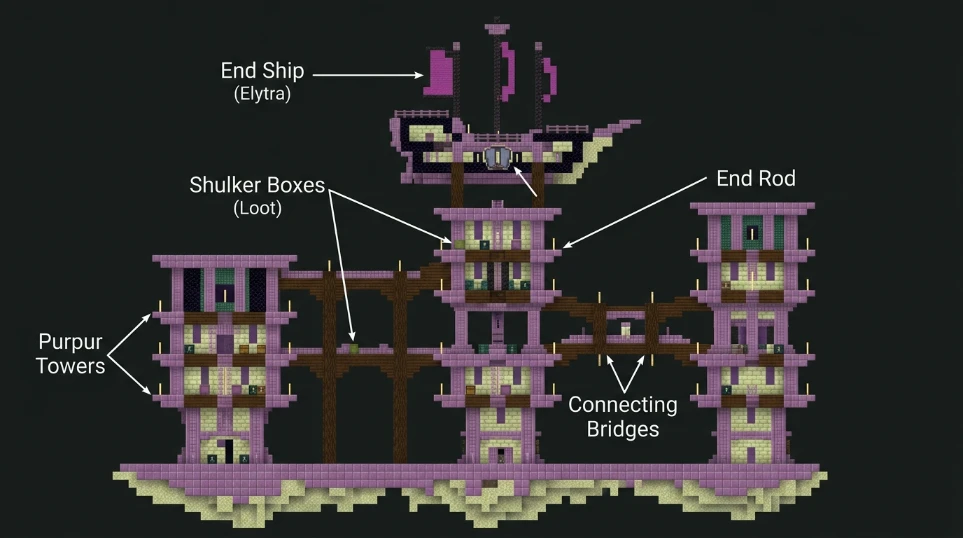
    End City cross-section diagram showing tower layout, bridges, End Ship location, and loot distribution

    Structure Layout

    End Cities are tall, dark obsidian and purpur buildings.

    Multiple towers connect via bridges and platforms.

    An End Ship docks at the highest tower.

    Some cities are much larger than others.

    Typical city contents:

    • Purpur pillars and blocks
    • Dark oak wood
    • End rods for lighting
    • Shulker boxes with loot
    • End Ship with elytra

    Valuable Loot Found Inside

    ItemLocationQuantityRarity
    ElytraEnd Ship1Unique
    Enchanted Diamond GearShulker BoxesMultipleCommon
    Enchanted BooksShulker BoxesMultipleCommon
    Gold IngotsShulker BoxesStacksCommon
    EmeraldsShulker BoxesStacksMedium
    Iron IngotsShulker BoxesStacksCommon

    Elytra is the most valuable single item.

    Practical Tips for End City Exploration

    Prepare Before Going

    Bring diamond or netherite armor minimum.

    Pack healing potions for shulker damage.

    Bring blocks for bridging between towers.

    Bring water buckets for fall damage.

    Bring beds to damage the Ender Dragon if needed.

    Watch Out for Shulkers

    Shulkers fire projectiles that inflict levitation.

    Levitation causes you to float helplessly upward.

    Takes 3-4 seconds to fall back down.

    Shulker projectiles can knock you off structures.

    Use shields or dodge their attacks.

    Navigation Challenges

    End Cities are tall and confusing inside.

    Bridges are narrow and easy to fall from.

    Darkness is minimal; bring torches for marking paths.

    Mark your location so you can find the exit.

    Safe Elytra Collection

    Elytra are located in the End Ship chest.

    End Ship is highest in the city structure.

    Climb carefully using blocks and jumping.

    Take elytra quickly and exit safely.

    End City Danger Levels

    ThreatDangerHow to Handle
    ShulkersMediumUse shield or dodge
    Fall DamageHighCarry water bucket
    EndermenLowAvoid looking at them
    DisorientationMediumMark your path
    Shulker ProjectilesMedium-HighKeep moving

    Proper preparation makes cities safe.

    Common End City Mistakes

    Attempting cities without proper armor protection.

    Not carrying healing supplies for shulker attacks.

    Falling from tall towers without a water bucket.

    Getting lost inside the city without marking the exit.

    Fighting shulkers without understanding levitation effect.

    Not bringing blocks for building bridges.

    Using OreFinder to Find End Cities

    OreFinder’s End City Finder eliminates guesswork completely.

    Input your world seed into the tool.

    The tool displays all End City locations.

    Get exact X and Z coordinates for navigation.

    No more random searching through the End.

    This ensures you find every city efficiently.

    FAQ

    How do you find End Cities in Minecraft?

    Use /locate structure end_city command to find the nearest city. Or use OreFinder with your world seed for all city locations. Travel to outer End islands (only spawn there). Defeating the Ender Dragon first is required for cities to generate.

    Can you find End Cities before defeating the Ender Dragon?

    No. End Cities only generate after defeating the Ender Dragon. The dragon must die before outer islands have cities. This is the only way to make them appear in the End. After the dragon is defeated, use gateways to reach outer islands.

    What’s the easiest way to get elytra?

    Find an End City and locate its End Ship. Break the elytra chest in the ship to collect wings. Elytra can only be found in End Cities naturally. No crafting recipe exists for creating elytra items.

    How many End Cities exist in a world?

    End Cities generate randomly on outer islands. Large worlds can have 100+ cities. Smaller/older worlds may have fewer. Each seed generates cities differently. Use OreFinder to find all cities in your world.

    Do End Cities respawn or regenerate?

    No. Once you loot an End City, it stays looted permanently. Cities don’t respawn or regenerate. Items don’t reappear in chests. Once elytra is taken, you need another city to find more.

    Find Your First End City

    End Cities contain the most valuable loot in the End.

    Elytra wings are the primary reason to explore them.

    Use OreFinder’s End City Finder with your seed for instant locations.

    Stop searching randomly and start navigating directly to cities.

  • How to Make a Locator Map in Minecraft: Complete Guide

    How to Make a Locator Map in Minecraft: Complete Guide

    Locator maps track your current location and update as you move.

    Regular maps show fixed areas, but locator maps follow your position constantly.

    Quick Answer: How to Make Locator Map

    Combine a map with a compass in a crafting table to create a locator map. Place the map in the center square and the compass directly above it. The resulting locator map displays your exact location and updates in real-time as you explore.

    Understanding Locator Maps

    Locator maps are enhanced versions of regular maps in Minecraft.

    They show your current position marked with a white arrow or pointer.

    The map updates automatically as you move around the world.

    Key locator map features:

    • Shows your real-time position on the map
    • White pointer indicates your exact location
    • Follows you across the world
    • Works in all dimensions (Overworld, Nether, End)
    • Can be copied to create backup maps
    • Doesn’t show a fixed area like regular maps

    Locator maps are essential for navigation in large worlds.

    Crafting Locator Map: Step-by-Step

    Materials You Need

    Before crafting, gather the required items.

    What you need:

    • 1 map (crafted or found)
    • 1 compass (crafted with iron ingots and redstone)

    Both items are easy to make or find.

    Crafting the Map

    Map crafting recipe showing compass in center surrounded by 8 paper in 3x3 grid

    First, obtain or craft a regular map.

    Map crafting recipe:

    • 8 paper (craft from sugar cane)
    • 1 compass (center square)
    • Arrange in a 3×3 grid with the compass in the middle

    This creates a blank map of your current area.

    Crafting the Compass

    Compass crafting recipe showing iron ingots in cross pattern with redstone in center

    Compasses point toward the world spawn location.

    Compass recipe:

    • 4 iron ingots
    • 1 redstone (center square)
    • Arrange in a + shape

    Redstone comes from mining redstone ore at Y-level -59.

    Combining to Make Locator Map

    Locator map crafting recipe showing map and compass placement in 3x3 crafting table

    Place your completed map in the crafting table center square.

    Place the compass directly above it (north position).

    The locator map appears in output slot.

    The map now tracks your position with a white pointer.

    Locator Map vs Regular Map Comparison

    FeatureRegular MapLocator Map
    Shows Fixed AreaYesYes
    Tracks PlayerNoYes
    Updates PositionNoYes
    Requires CompassNoYes
    Crafting CostLowerHigher
    Navigation HelpLimitedExcellent
    Works in NetherYesYes
    Pointer Shows LocationNoYes (white)

    Locator maps cost more but provide navigation tracking.

    How Locator Maps Work

    Reading Your Position

    The white pointer on the map shows exactly where you are.

    The pointer updates every time you move.

    Rotate your view to see the map from different angles.

    The map follows your movement in real-time.

    Mapping Different Dimensions

    Create separate locator maps for Overworld and Nether.

    Maps from one dimension don’t work in others correctly.

    Nether maps show Nether terrain only.

    End maps are limited but still functional.

    Keep organized locator maps for each major area.

    Practical Tips for Locator Maps

    Expanding Your Map

    Maps show fixed 128×128 block areas.

    You cannot see beyond this range on one map.

    Create multiple locator maps for different regions.

    Plan exploration routes across multiple map areas.

    Marking Important Locations

    Locator maps don’t show markers or waypoints natively.

    Use visual landmarks on the map to remember locations.

    Combine multiple maps to create a mental atlas.

    Take screenshots of maps showing important places.

    Using Coordinates

    Coordinates display in the bottom-left corner of most maps.

    Write down coordinates at key locations.

    Ore Finder can display coordinates for resources on a map.

    Match map locations with resource coordinates for faster navigation.

    Copying Locator Maps

    Place completed locator map and empty map together on crafting table.

    Produces duplicate map showing same area and tracking.

    Useful for backup navigation or sharing with teammates.

    Map Scaling

    All Minecraft maps show the same 128×128 block area.

    Zoomed-out versions don’t exist in vanilla Minecraft.

    Plan your map collection strategically for coverage.

    Common Locator Map Mistakes

    Creating maps without compasses makes regular maps (no tracking).

    Forgetting paper requires sugar cane cultivation time.

    Using old maps from different seeds won’t track correctly.

    Expecting maps to show beyond the 128×128 block range.

    Not creating enough maps for large world exploration.

    Locator Maps on Different Platforms

    Locator maps work identically on all Minecraft platforms.

    Java Edition, Bedrock, and consoles craft them the same way.

    Mobile versions also support locator map creation.

    The map interface differs slightly, but functionality remains identical.

    When to Make Locator Maps

    Essential Situations

    Starting new survival worlds (planning exploration routes).

    Building bases far from spawn (tracking return routes).

    Exploring large landscapes (avoiding getting lost).

    Mapping underground cave systems (finding way back).

    Optional Situations

    Small confined bases (locator maps unnecessary).

    Creative mode (less critical for survival).

    Multiplayer worlds with friends (coordination help).

    Using Locator Maps with Tools

    Locator maps pair well with coordinate tracking tools.

    Note coordinates while viewing your locator map.

    Use these coordinates with /tp command for fast navigation.

    Store maps and coordinates together in an organized system.

    FAQ

    How do you make a locator map in Minecraft?

    Craft a regular map using 8 paper and 1 compass. Then place that map in the crafting table center with another compass above it. The resulting locator map tracks your position with a white pointer. Updates in real-time as you move across the world.

    What is a locator map used for?

    Locator maps track your exact location and show it updating as you explore. Essential for navigation in large worlds. Shows your white pointer position at all times. Prevents getting lost when exploring far from base. Creates visual reference of terrain you’ve traveled through.

    Do you need a compass for a locator map?

    Yes. Locator maps require both a regular map and a compass to craft. Compasses point toward world spawn and are needed for map creation. Without a compass, you can only craft regular maps without position tracking. Both items are essential for locator map creation.

    Can you use locator maps in the Nether?

    Yes. Locator maps work in the Nether but show Nether terrain only. Create separate Nether-specific locator maps for accurate navigation underground. Maps from the Overworld don’t transfer to the Nether correctly. Each dimension requires its own mapped locator maps for best results.

    How far do locator maps show in Minecraft?

    Locator maps display a 128×128 block area of terrain. Shows your location within this fixed range. Cannot zoom out or show larger areas. Create multiple maps to cover different regions and plan exploration routes connecting them.

    Make Your First Locator Map

    Locator maps are essential navigation tools for survival worlds.

    Craft them early with simple materials: paper and a compass.

    Track your location constantly while exploring new territory.

    Stop getting lost and start mapping your world today.

  • How to Get Pumpkin Seeds in Minecraft: Complete Guide

    How to Get Pumpkin Seeds in Minecraft: Complete Guide

    Pumpkin seeds are useful for farming and decoration purposes.

    But finding or getting them requires knowing where to look.

    Quick Answer: How to Get Pumpkin Seeds in Minecraft

    Break pumpkins with any tool or hand to get pumpkin seeds. Each pumpkin drops 0-3 seeds randomly. Find pumpkins in patches throughout plains and mountain biomes. Plant seeds in farmland with water nearby to grow more pumpkins.

    Pumpkin patches spawn naturally in specific biomes.

    Understanding Pumpkin Seeds in Minecraft

    Pumpkin seeds are item versions of growing pumpkins.

    Breaking an adult pumpkin block drops seeds you can collect.

    Seeds must be planted in farmland to grow new pumpkins.

    Key pumpkin seed facts:

    • Drop from broken pumpkins (0-3 seeds per block)
    • Plant only in farmland with water access
    • Grow in all biomes once planted
    • Take 10-30 minutes to fully mature
    • Pumpkins attach to adjacent blocks when grown
    • Used for decoration and pie crafting
    • Can be composted for bone meal

    Pumpkins are useful for farms and building projects.

    Methods to Get Pumpkin Seeds

    Method 1: Find and Break Pumpkins

    Minecraft biome pumpkin spawn rate chart showing plains as most common location

    Pumpkin patches spawn naturally in certain biomes.

    Walk through plains or mountains to locate patches.

    Break any pumpkin block with your hand or tool.

    Each pumpkin drops 0-3 seeds (average 1-2 seeds).

    Collect seeds and store for farming.

    Best biomes for pumpkins:

    • Plains (most common)
    • Sunflower Plains
    • Mountains
    • Meadows
    • Dark Forest edges

    Plains biomes have the highest concentration.

    Method 2: Grow and Harvest Your Own

    Plant pumpkin seeds in farmland near water.

    Seeds take 10-30 minutes to grow into adult pumpkins.

    Adult pumpkins appear as solid blocks attached to farmland.

    Break the pumpkin block to get seeds.

    This creates a renewable seed farm.

    Method 3: Find Seeds in Loot Chests

    Pumpkin seeds appear in some structure loot chests.

    Villages sometimes contain pumpkin seeds in storage areas.

    Dungeon chests rarely contain pumpkin seeds.

    This method is unreliable but possible.

    Method 4: Craft from Pumpkin Blocks

    You cannot craft seeds directly from pumpkins.

    You must break natural or grown pumpkins for seeds.

    Breaking pumpkins is the only way to obtain seeds.

    Four methods to obtain pumpkin seeds in Minecraft showing best and worst options

    Setting Up a Pumpkin Farm

    Pumpkin farm layout diagram showing water placement and optimal spacing for efficient farming

    Finding Water and Farmland

    Locate flat terrain suitable for farmland.

    Water must be within 4 blocks of farmland for hydration.

    Create channels or pools to hydrate large farming areas.

    Till grass/dirt blocks with a hoe to create farmland.

    Planting Pumpkin Seeds

    Open a farmland block and place a pumpkin seed on it.

    Seeds require hydrated farmland (within 4 blocks of water).

    Seeds take 10-30 minutes to mature into pumpkins.

    Adult pumpkins appear as 3D blocks beside farmland.

    Harvesting Pumpkins

    Break mature pumpkin blocks to collect them.

    Each pumpkin drops 0-3 pumpkin seeds.

    Collect and replant seeds for continuous farming.

    Pumpkin vines regrow seeds automatically each harvest cycle.

    Pumpkin Seed and Growth Table

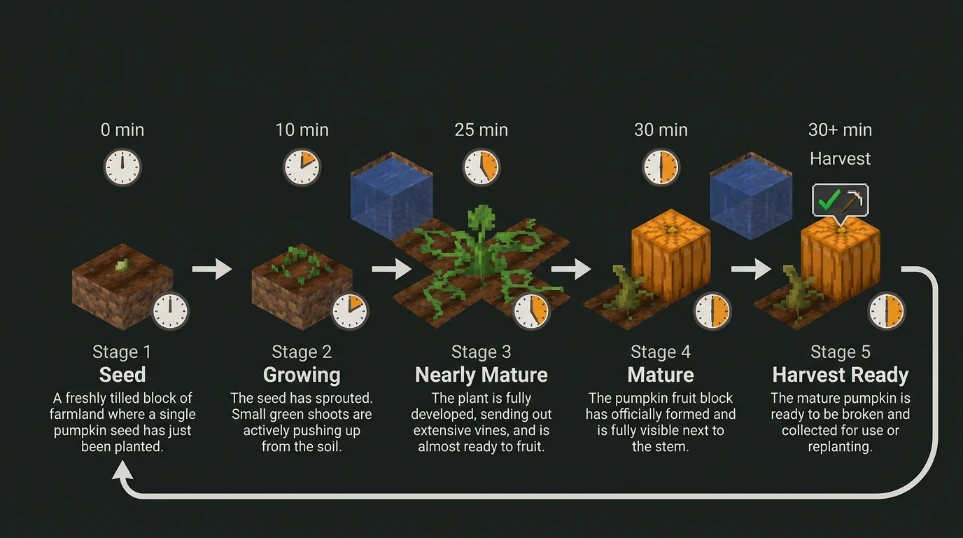
    StageTimeAppearanceDrops
    Seed Stage0-10 minPlant on farmlandNone
    Growing10-25 minSmall shootsNone
    Nearly Mature25-29 minTall plantNone
    Mature Pumpkin30+ minSolid pumpkin block0-3 seeds

    Maturation takes 10-30 minutes depending on random ticks.

    Pumpkin growth timeline from seed to mature pumpkin ready for harvest

    Finding Pumpkin Patches Naturally

    Pumpkin patches spawn on grass in specific biomes.

    They appear as clusters of 4-8 pumpkin blocks together.

    Search plains biomes for fastest location.

    Biome spawn chances:

    • Plains: Very High
    • Sunflower Plains: Very High
    • Mountains: High
    • Meadows: Medium
    • Dark Forest: Low

    Walk through plains and look for orange blocks.

    Practical Farming Tips

    Water Placement Strategy

    Place water every 4 blocks in straight lines.

    This covers maximum farmland area efficiently.

    Use channels or ditches for water distribution.

    Hydrated farmland looks darker than dry farmland.

    Harvest Efficiency

    Break all mature pumpkins at once.

    Collect seeds and reset farm for next cycle.

    Store excess pumpkins in chests for later.

    Combining with Other Crops

    Mix pumpkins with wheat or carrots in same farm.

    Different crops have the same water and hydration requirements.

    Maximize farm space with multiple crop types.

    Uses for Pumpkins and Seeds

    Pumpkin Pie Crafting

    Baked pumpkin restores 8 hunger (4 drumsticks).

    Recipe: Pumpkin + Egg + Sugar in crafting table.

    Useful food source for survival mode.

    Decorative Building

    Pumpkins are popular for Halloween themes.

    Use in structures for natural coloring.

    Combine with other blocks for architecture.

    Jack-o-Lanterns

    Place torch inside pumpkin to create glowing head.

    Works on any pumpkin block placed anywhere.

    Popular for decoration and lighting.

    Using OreFinder for Biome Location

    OreFinder helps locate biomes where pumpkins spawn naturally.

    Enter your world seed into the tool.

    Select “Find Closest Biomes” to locate plains biomes.

    Navigate to these biomes to find pumpkin patches.

    Saves time exploring blindly for pumpkin spawns.

    Check our biome finder guide for detailed biome location methods.

    Common Pumpkin Seed Mistakes

    Breaking pumpkins without hydrated farmland wastes seeds.

    Planting seeds in dry farmland prevents growth.

    Not placing water close enough to farmland blocks.

    Expecting seeds to be common in all biomes.

    Planting seeds too close together causes growth issues.

    FAQ

    How do you get pumpkin seeds in Minecraft?

    Break pumpkin blocks with hand or tool to get 0-3 seeds per pumpkin. Find pumpkins in natural patches in plains biomes. Plant seeds in hydrated farmland (within 4 blocks of water). Seeds mature in 10-30 minutes and grow pumpkins you can harvest repeatedly.

    Where do you find pumpkins in Minecraft?

    Pumpkin patches spawn naturally in plains, sunflower plains, mountains, and meadow biomes. They appear as clusters of orange pumpkin blocks on grass. Plains biomes have the highest spawn rate. Search flat terrain areas where pumpkins naturally generate.

    How long do pumpkin seeds take to grow?

    Pumpkin seeds take 10-30 minutes to mature into pumpkins. Growth depends on random tick speed. Farmland must be hydrated (within 4 blocks of water). Mature pumpkins appear as solid blocks adjacent to farmland where seeds were planted.

    Can you get pumpkin seeds from crafting?

    No. Pumpkin seeds cannot be crafted in Minecraft. You must obtain them by breaking natural pumpkins or harvesting grown pumpkins. Breaking any pumpkin block drops 0-3 seeds randomly. This is the only way to get seeds.

    What are pumpkins used for in Minecraft?

    Pumpkins craft into pumpkin pie with sugar and egg for food. Jack-o-lanterns light up when torch placed inside. Used for decoration and building aesthetic. Pumpkin seeds plant farmland for renewable pumpkin source.

    Start Growing Pumpkins

    Pumpkin seeds are easy to obtain from natural patches.

    Find plains biomes and harvest pumpkins for seeds.

    Set up simple farms to grow unlimited pumpkins.

    Use OreFinder to locate plains biomes faster with your seed.