Author: Rory Burns

  • What Is Copper Good For in Minecraft: Complete Guide To Finding Copper Ore

    What Is Copper Good For in Minecraft: Complete Guide To Finding Copper Ore

    Copper ore is abundant, but many players don’t know what to do with it.

    Understanding copper’s uses helps you decide if mining it is worth the time.

    –> Find Copper Ore Instantly

    Quick Answer: What Is Copper Good For in Minecraft?

    Copper is primarily used for decorative building blocks and lightning rod crafting. It oxidizes over time into beautiful green and blue variants. Lightning rods protect structures from lightning strikes. Copper has limited practical uses beyond decoration and weather protection.

    Understanding Minecraft Copper

    Copper ore spawns throughout the Overworld and generates easily.

    It’s one of the most abundant ores available to new players.

    However, copper is not essential for progression or advanced gear.

    Key copper facts:

    • Mines with a stone pickaxe minimum
    • Generates from Y-16 to Y-112
    • Most common in mountain biomes
    • Oxidizes naturally over time
    • Never required for boss fights or main progression
    • Purely for utility and decorative purposes

    Copper is optional but useful for specific builds.

    Copper Variants and Oxidation States
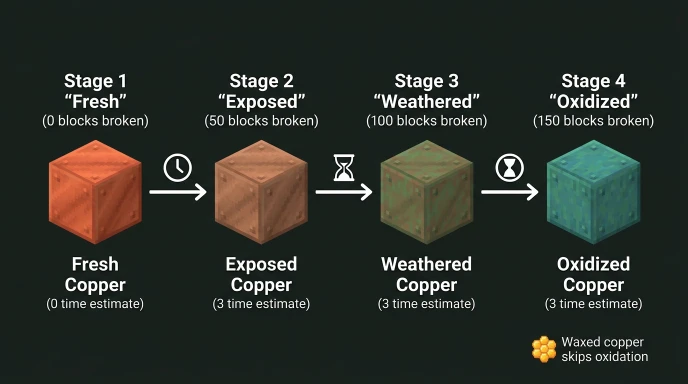
    Timeline showing Minecraft copper oxidation progression from fresh orange to fully oxidized blue-green

    Copper changes color as it oxidizes. Each stage offers different aesthetics.

    Block NameColorOxidation TimeUses
    Copper BlockOrange/redFreshDecoration
    Exposed CopperLighter brown50 blocks brokenDecoration
    Weathered CopperGreen-brown100 blocks brokenDecoration
    Oxidized CopperBlue-green150 blocks brokenDecoration
    Waxed variantsAll colorsNo changePrevent oxidation

    Waxed copper blocks never change color with honeycomb treatment.

    What Copper Is Actually Used For

    Lightning Rods (Primary Use)
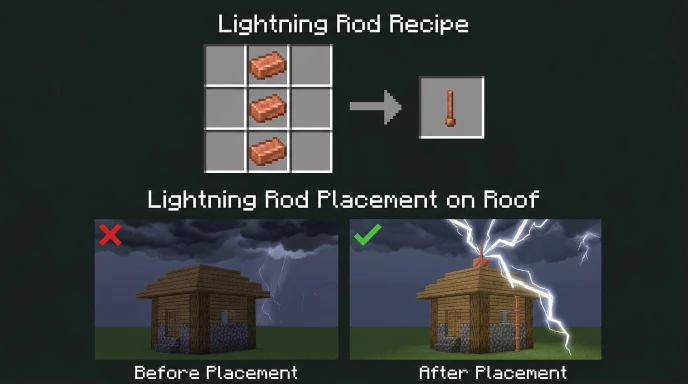
    Lightning rod crafting recipe and roof placement guide for Minecraft

    Copper is crafted into lightning rods for protection.

    Lightning rods redirect lightning strikes away from structures.

    Place them on roofs or high points to protect buildings.

    This is copper’s most practical in-game function.

    Lightning rod recipe:

    • 3 copper ingots arranged vertically in a crafting table
    • Produces 1 lightning rod

    Redstone components can detect lightning with rods nearby.

    Decorative Building Blocks

    Copper blocks are purely aesthetic for builds.

    The oxidation process creates dynamic color changes over time.

    Many builders use it for roofs and detailed decoration.

    Waxed copper prevents oxidation and locks in preferred colors.

    No Combat Applications

    Copper cannot be used for weapons or armor.

    No tools or weapons use copper as an ingredient.

    This makes it purely decorative outside of lightning rods.

    Copper Ore Location and Mining
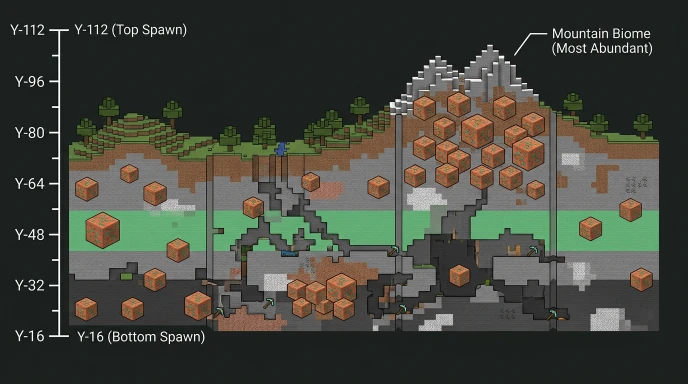
    Copper ore distribution diagram showing Y-levels and biome locations in Minecraft

    Where to Find Copper Ore

    Copper ore spawns from Y-16 to Y-112 in all Overworld biomes.

    Most abundant in mountain biomes above ground.

    Generates in large veins, making collection easy.

    Mining requirements:

    • Stone pickaxe minimum (wooden won’t drop ore)
    • No enchantments required
    • Fortune increases raw copper drops

    Mining Copper Efficiently

    Use a stone or iron pickaxe for fastest mining.

    Fortune III pickaxe yields 2-5 raw copper per block.

    Cave exploration at any level finds copper easily.

    No specific Y-level required, unlike diamonds or redstone.

    Ore Finder can map copper ore locations using your world seed.

    Enter your seed to find exact coordinates for copper veins.

    Navigate directly to copper-rich chunks instead of random mining.

    This saves time if you need large quantities for projects.

    Smelting and Using Copper Ingots

    Raw copper must be smelted into ingots first.

    Smelting process:

    • Place raw copper in the furnace
    • Each raw copper becomes 1 ingot
    • Takes 10 seconds per ingot in a regular furnace
    • Blast furnace smelts twice as fast

    Blast furnaces are faster for bulk copper smelting.

    Practical Copper Uses

    Lightning Protection for Farms

    Place lightning rods over mob grinders and farms.

    Prevents random lightning from burning your structure.

    Especially useful for large builds and automated systems.

    Decorative Building

    Use different oxidation stages for varied color palettes.

    Mix waxed and unwaxed copper for patterns.

    Create roofs and trim using the natural color progression.

    Copper stairs and slabs add dimension to builds.

    Combining with Other Materials

    Pair copper with wood for natural-looking structures.

    Mix with stone for medieval-style buildings.

    Contrast with dark wood for modern aesthetics.

    Common Copper Mining Mistakes

    Mining copper when you don’t need it wastes time.

    Forgetting to wax blocks before they oxidize to the wrong color.

    Using a wood pickaxe (won’t drop anything).

    Not using Fortune III when mining for bulk copper.

    Overcollecting copper for projects (it’s very abundant).

    Copper vs Other Decorative Ores

    Ore TypeBest ForEaseAbundance
    CopperLightning rods, roofsVery EasyVery High
    IronTools, weapons, armorEasyHigh
    GoldDecorative blocksEasyMedium
    LapisEnchanting, decorationMediumMedium
    DiamondBest tools, armorHardLow

    Copper is the easiest decorative ore to obtain.

    When to Mine Copper

    Mine copper if:

    • Building a project needing lightning protection
    • Want decorative building blocks with color variety
    • Planning farms or outdoor structures
    • Like the visual appearance of oxidized copper

    Skip copper if:

    • Focus on survival progression only
    • Don’t care about decorative blocks
    • Prefer indoor building
    • Want to maximize useful ore mining time

    Copper is optional based on your play style.

    FAQ

    What is copper good for in Minecraft?

    Copper is primarily used for crafting lightning rods that protect structures from lightning strikes. It’s also used for decorative building blocks that naturally oxidize into green and blue colors over time. Copper has no combat or survival progression uses. Waxed copper prevents oxidation to keep colors stable.

    Where do you find copper ore in Minecraft?

    Copper ore spawns from Y-16 to Y-112 throughout all Overworld biomes. It’s most abundant in mountain biomes. Copper generates in large veins, making collection easy. No specific Y-level targeting required, unlike diamonds or redstone.

    How do you use copper in Minecraft?

    Smelt raw copper into ingots. Use 3 ingots vertically in a crafting table to make lightning rods. Use copper blocks and stairs for decoration. Wax copper blocks with honeycomb to prevent color changes. Lightning rods must be placed on top of structures to protect them.

    Is copper worth mining in Minecraft?

    Copper is only worth mining if you need lightning rods or decorative blocks. It’s not required for progression or combat. Mine it only for specific building projects. Otherwise, copper mining time is better spent on other ores.

    Do you need copper for anything important?

    No. Copper is completely optional in Minecraft. No essential recipes or progression items require copper. It’s purely for decoration and optional lightning protection. You can complete the entire game without mining any copper.

    Use Copper for Your Builds

    Copper serves specific decorative and protective purposes in Minecraft.

    Mine it only when you need lightning rods or building blocks.

    Use Ore Finder if you need large copper quantities for projects.

    Get exact ore coordinates and mine efficiently with your world seed.


  • How to Find Realm Seed in Minecraft: Realms & Server Methods

    How to Find Realm Seed in Minecraft: Realms & Server Methods

    Finding seeds on Realms and servers is different from single-player worlds.

    Access and visibility depend on your permissions and game edition.

    Quick Answer: How to Find Realm Seed

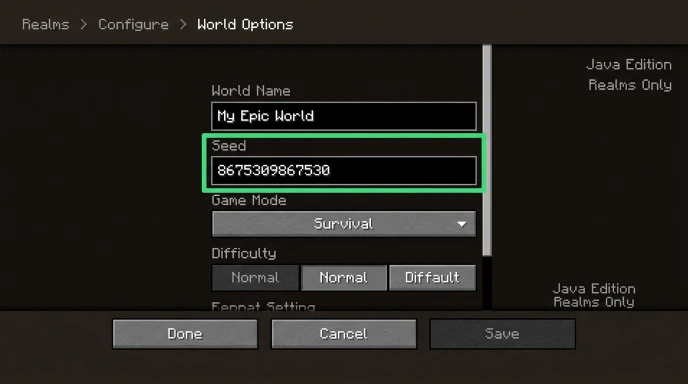
    Java Realm owners: Go to Realm settings > Configure > World Options to see the seed.

    Bedrock Realm: Download the world file to your device, then check local world settings.

    Servers: Ask the admin or use seed-cracking tools if no command access.

    Realms always have seeds, but access varies by edition and role.

    Do Minecraft Realms Have Seeds?

    Yes, absolutely. Every Minecraft world, including Realms, generates from a seed.

    Realms use identical generation algorithms to single-player worlds.

    The seed determines terrain, biomes, structures, and ore placement.

    The difference with Realms:

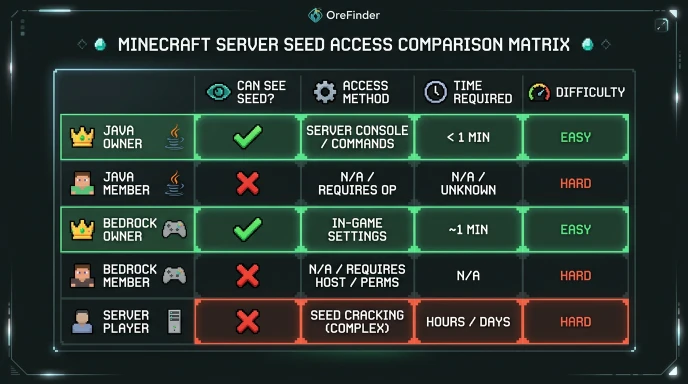
    • Realm owners can see the seed in settings
    • Regular members often cannot access the seed directly
    • Bedrock Realms hide seed data more restrictively
    • Seeds don’t sync between Java and Bedrock editions

    Realms are just hosted worlds with the same seed system.

    Finding Seed of Minecraft Realm: By Edition

    Java Edition Realm (Owner Access)

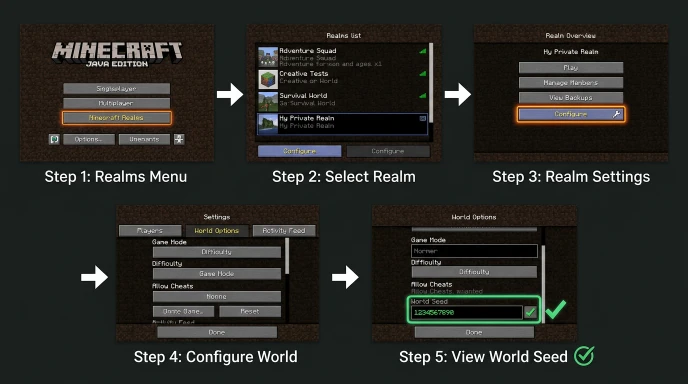
    Step-by-step navigation guide to find seed in Java Realms settings

    Step 1: Go to the main screen > Realms menu.

    Step 2: Click your Realm name to open it.

    Step 3: Click the “Configure” button.

    Step 4: Select the “World Options” tab.

    Step 5: The seed displays in the World Information section.

    Copy the full seed number including negative signs.

    Java Realm (Member Access)

    Regular members cannot see seeds through Realm settings.

    You must ask the Realm owner to share the seed.

    Alternatively, use seed-cracking tools (explained below).

    Bedrock Edition Realm (Owner)

    Bedrock Realms don’t display seeds in settings, even for owners.

    Workaround:

    1. Download the Realm world to your device
    2. Open Settings > Game on your device
    3. Scroll to the “Seed” field in world settings
    4. The seed displays in local world information

    This requires downloading the entire world first.

    Bedrock Edition Realm (Member)

    Members cannot download Realms without owner permission.

    Request the owner download and share the world.

    Or ask them to provide the seed directly.

    Seed-cracking from visible coordinates also works.

    Finding Seed on Minecraft Server

    Server seeds depend entirely on admin settings and permissions.

    If You Have Operator Permissions

    Type /seed command in chat while in-game.

    The command works identically to single-player worlds.

    The server must have cheats enabled for this to work.

    If You’re a Regular Player

    Most servers disable /seed command for non-ops.

    Ask server administrators to share the seed.

    Some servers publish seeds publicly in rules or MOTD.

    Others refuse to share seeds to prevent exploits.

    Third-Party Servers

    Large public servers may use custom world generators.

    These servers might not have traditional seeds.

    Or they may have seeds but keep them private.

    Check server documentation for seed sharing policies.

    Finding Seed Without /Seed Command

    Flowchart showing step-by-step seed-cracking process using visible world coordinates

    Seed-cracking uses visible world features to calculate the seed.

    What You Need

    • Coordinates of multiple structures (villages, temples, strongholds)
    • Biome locations and boundaries
    • Dungeon or spawner positions
    • At least 3-5 structure locations for accuracy

    The more coordinates you gather, the more accurate the result.

    Seed Cracking Process

    1. Explore world and find structure coordinates
    2. Use seed-cracking tool with coordinates
    3. Tool calculates possible seed matches
    4. Verify seed by checking world features match

    Online seed crackers:

    • ChunkBase (uses structure data)
    • Seed Finder tools (various options)
    • Specialized Minecraft calculators

    This method works on any world where you can explore.

    Bedrock Realm Seed Methods

    Bedrock makes seed access more difficult than Java.

    Method 1: Owner Downloads World

    The owner downloads the Realm world to local storage.

    Check local world settings for the seed.

    Share the seed with members via chat or document.

    Method 2: Ask Owner Directly

    Simply request the seed from the Realm owner.

    Most owners will share if you explain why you need it.

    This is the fastest and most direct method.

    Method 3: Use Seed Crackers

    Gather coordinates of multiple biomes and structures.

    Input coordinates into a seed-cracking tool.

    Tool calculates the seed from visible features.

    Works but requires significant exploration and coordinate gathering.

    Using Seeds with Ore Finder Tools

    Once you have your Realm or server seed, you can use it.

    OreFinder maps exact resource locations using seeds.

    Enter your seed into the tool to find:

    • All diamond ore locations
    • Ancient debris in the Nether
    • Stronghold positions
    • Rare biome coordinates

    This works for Realm seeds and server seeds equally.

    Having the seed unlocks your entire world’s resource locations.

    For seed-finding specifics, check our detailed seed-finding guide.

    Common Seed Finding Mistakes

    Using a Java seed in Bedrock creates completely different worlds.

    Not copying the full seed number (seeds are 15+ digits).

    Assuming all Realm members can access seeds (they can’t).

    Giving up without trying seed-cracking tools.

    Not asking server admins for seed sharing policies.

    Time to Get Realm/Server Seed

    Java Realm owner: Instant (just check settings).

    Bedrock Realm owner: 5-15 minutes (download and check).

    Asking admin: Depends on response time.

    Seed cracking: 1-3 hours (gathering coordinates).

    Direct methods are always faster than seed cracking.

    FAQ

    How do you find the seed of a Minecraft realm?

    Java owners: Realm settings > Configure > World Options > Seed displays. Bedrock owners: Download world to device, check Settings > Game > Seed field. Realm members: Ask the owner to share the seed. Use seed-cracking if the owner refuses.

    Do Minecraft Realms have seeds?

    Yes. Every Minecraft world, including Realms, generates from a seed. Realms follow identical generation rules to single-player worlds. Seeds determine terrain, biomes, structures, and ore placement. Bedrock Realms simply hide seed information more restrictively than Java Realms.

    How to find the seed on Bedrock?

    Bedrock Realm owners must download the world to their device first. Then check Settings > Game > scroll to the Seed field. Members need permission to download or must use seed-cracking with structure coordinates. This is more complex than Java Edition Realm access.

    How to find seed without /seed command?

    Use seed-cracking tools by gathering structure coordinates. Collect X, Z positions of villages, temples, strongholds, and biome boundaries. Input coordinates into the seed finder tool. The tool calculates possible seeds matching your world features.

    Can you find someone’s Minecraft realm seed?

    You can if the owner shares it. Seed-cracking from visible coordinates also works without permission. However, accessing server files without permission is prohibited. Seed-cracking from public exploration is acceptable and legitimate.

    Get Your Realm Seed Now

    Realm and server seeds are your gateway to resource mapping.

    Check your Realm settings or ask your admin for the seed.

    Once you have it, use OreFinder to find every resource instantly.

    Stop exploring randomly and start navigating to exact ore coordinates.

  • How to Get Netherite Armor in Minecraft: Complete Upgrade Guide

    How to Get Netherite Armor in Minecraft: Complete Upgrade Guide

    Netherite armor is the strongest gear in Minecraft.

    But getting it requires specific materials and an upgrade process at a smithing table.

    Quick Answer: How to Get Netherite Armor

    Upgrade diamond armor pieces using a smithing table and Netherite ingots. Place each diamond armor piece with 1 netherite ingot in the smithing table to create netherite armor. You need 4 netherite ingots total (1 per piece).

    All enchantments transfer to upgraded armor.

    Understanding Netherite Armor

    Netherite armor cannot be crafted directly from raw materials.

    Every piece requires a diamond armor version to upgrade at a smithing table.

    The upgrade process preserves all enchantments, durability, and custom names perfectly.

    Netherite armor benefits:

    • 30% more durable than diamond armor
    • 10% knockback resistance per piece (40% total with full set)
    • Floats in lava instead of burning
    • Same armor points as diamond (20 total)
    • Fire and lava immunity with full set

    Fire immunity is the biggest advantage for Nether work.

    Complete Netherite Armor Requirements

    Armor PieceDiamond RequiredNetherite Ingots NeededTotal Resources
    Helmet1 helmet1 ingot5 diamonds + 4 ancient debris
    Chestplate1 chestplate1 ingot8 diamonds + 4 ancient debris
    Leggings1 leggings1 ingot7 diamonds + 4 ancient debris
    Boots1 boots1 ingot4 diamonds + 4 ancient debris
    Full Set4 pieces4 ingots24 diamonds + 96 ancient debris

    Each netherite ingot requires 4 ancient debris blocks and 4 gold ingots.

    Step-by-Step Process for Getting Netherite Armor

    Flowchart showing four main steps to get netherite armor in Minecraft

    Step 1: Gather Diamond Armor

    Craft or find diamond armor first. You need 4 pieces minimum.

    Diamond armor recipes:

    • Helmet: 5 diamonds
    • Chestplate: 8 diamonds
    • Leggings: 7 diamonds
    • Boots: 4 diamonds

    Total: 24 diamonds for the full set.

    Find diamonds easily using OreFinder with your world seed for exact coordinates.

    Step 2: Gather Netherite Ingots

    You need 4 Netherite ingots total for a full armor set.

    Each ingot requires:

    • 4 ancient debris blocks (mined from the Nether)
    • 4 gold ingots

    See our complete netherite ingot guide for detailed crafting instructions and requirements.

    Step 3: Build Smithing Table

    Craft a smithing table using 2 iron ingots and 4 planks.

    Place it in your base or mining camp.

    Smithing tables are permanent and reusable for unlimited upgrades.

    Step 4: Upgrade Each Armor Piece

    Minecraft smithing table interface showing diamond armor upgrading to netherite with enchantments preserved

    Open the smithing table by right-clicking it.

    Place a diamond armor piece in the left input slot.

    Place 1 netherite ingot in the right input slot.

    (Version 1.20+: Add netherite upgrade template in the template slot first)

    The upgraded netherite armor appears in the output slot.

    Take it and repeat for the remaining pieces.

    Netherite Armor Stats vs Diamond Armor

    StatDiamondNetheriteImprovement
    Armor Protection20 points20 pointsSame
    Durability1561 uses2031 uses+30%
    Knockback ResistanceNone40% totalYes
    Lava ImmunityNoYesMajor
    Fire ResistanceNoYesMajor

    The lava immunity alone justifies the upgrade cost.

    Comparison chart showing netherite armor improvements over diamond armor in Minecraft

    Why Full Netherite Armor Matters

    Knockback resistance prevents getting knocked into lava during Nether mining.

    Fire immunity eliminates accidental damage from lava contact.

    30% durability increase means fewer repairs and less crafting.

    Complete set provides maximum protection for end-game content.

    Enchantments Transfer During Upgrade

    All armor enchantments carry over perfectly to Netherite versions.

    Common valuable armor enchantments:

    • Protection IV (maximum damage reduction)
    • Thorns III (reflects damage back to attackers)
    • Mending (auto-repairs from experience)
    • Unbreaking III (increases durability)

    Protection IV on all four pieces is the most valuable combination.

    Mending on the chestplate ensures it never breaks permanently.

    Using OreFinder to Speed Up Collection

    OreFinder maps exact ore locations using your world seed.
    Enter your seed to find all diamonds needed for armor crafting.

    For netherite ingots, see detailed guides on ancient debris locations and netherite ingot crafting.

    These specialized guides cover mining and crafting in depth.

    Common Mistakes When Getting Netherite Armor

    Trying to craft netherite armor directly won’t work. You must upgrade diamond pieces.

    Forgetting enchantments don’t transfer (they do, completely).

    Not having a smithing table ready before gathering materials.

    Breaking diamond armor before upgrading it to netherite.

    Time Estimate for Full Netherite Armor

    Rough timeline with preparation:

    • Gather diamonds: 1-2 hours
    • Gather netherite ingots: 2-4 hours (depends on mining efficiency)
    • Craft diamond armor: 20 minutes
    • Upgrade armor pieces: 15 minutes

    Total: 4-7 hours, depending on mining luck and resource gathering.

    FAQ

    How do you get Netherite armor in Minecraft?

    Upgrade diamond armor using a smithing table and Netherite ingots. Place diamond armor piece in left slot, netherite ingot in right slot. The upgraded Netherite armor appears in the output. Repeat for all four pieces. You need 4 Netherite ingots total.

    How many Netherite ingots do you need for armor?

    You need 4 Netherite ingots for a full armor set (helmet, chestplate, leggings, boots). One ingot per piece. This requires 16 ancient debris blocks and 16 gold ingots in total.

    Can you get Netherite armor without diamonds?

    No. Netherite armor requires diamond armor pieces to upgrade. You cannot craft netherite armor directly. Every Netherite armor piece must start as a diamond piece first at the smithing table.

    Do enchantments transfer when upgrading to netherite?

    Yes. All enchantments transfer to upgraded Netherite armor. Protection IV diamond chestplate becomes Protection IV netherite chestplate. Custom names, durability percentages, and all modifiers carry over unchanged.

    What’s better, Netherite armor or diamond armor?

    Netherite armor has 30% more durability and lava immunity. Knockback resistance from the full set prevents knockback damage. Same armor protection as diamond (20 points) but superior overall due to extra features.

    Upgrade Your Armor to Netherite

    Netherite armor is worth the resource investment.

    Gather your diamonds and netherite ingots using guides for each resource.

    Build a smithing table and upgrade all four pieces.

    Start getting the strongest armor protection available in Minecraft.

  • Best Minecraft Ore Finder App: Find Ores Instantly on Mobile

    Best Minecraft Ore Finder App: Find Ores Instantly on Mobile

    Finding ores manually in Minecraft takes hours of random mining.

    Mobile ore finder apps show exact coordinates without exploring blindly.

    Quick Answer: What Is a Minecraft Ore Finder App?

    A Minecraft ore finder app uses your world seed to map all ore locations instantly. It shows exact X, Y, Z coordinates for diamonds, emeralds, iron, and every ore type on your phone or tablet.

    No manual mining or exploring required.

    Understanding Minecraft Ore Finder Apps

    Ore finder apps read world seeds and calculate precise ore placement.

    Every Minecraft world is generated with a numerical seed that controls everything.

    Apps analyze this seed using Minecraft’s ore generation algorithms.

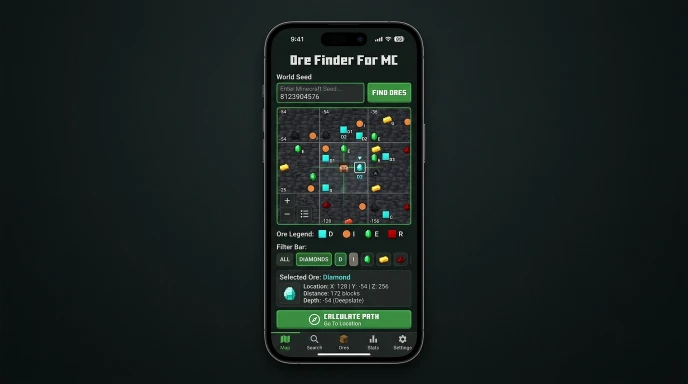
    They display all ore locations on an interactive map with coordinates.

    What ore finder apps do:

    • Map diamond, emerald, and iron ore locations
    • Show ancient debris and netherite coordinates
    • Identify rare biomes and structures
    • Calculate exact X, Y, Z coordinates
    • Support Java and Bedrock editions
    • Work offline after seed input

    The technology uses the same generation math Minecraft uses internally.

    How Ore Finder Apps Work

    Flowchart showing how Minecraft ore finder app works from seed input to navigation

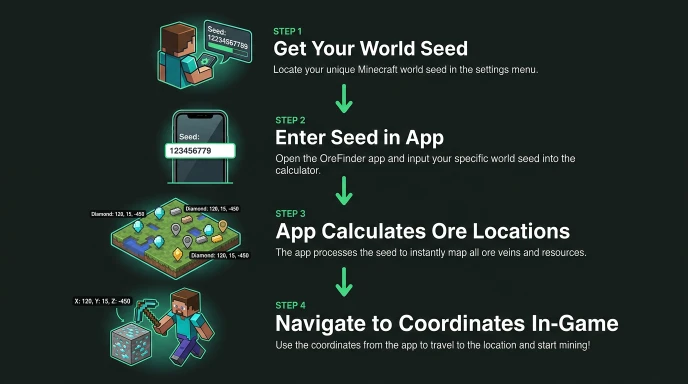
    Getting Your World Seed

    Java Edition: Use /seed command in chat or check world settings.

    Bedrock Edition: Open Settings > Game > scroll to “Seed” field.

    Copy the full seed number, including negative signs.

    Using the App

    1. Enter your seed into the ore finder app.
    2. Select your Minecraft edition (Java or Bedrock).
    3. Choose which ore type you want to locate.
    4. The app displays every vein location on an interactive map.
    5. Tap any location to see exact coordinates.
    6. Navigate to those coordinates in-game using /tp command.

    Accuracy and Updates

    Apps update when Minecraft releases new ore generation algorithms.

    Version 1.18+ changed ore distribution requiring seed map updates.

    Modern apps support current versions (1.20+).

    Always verify the app supports your Minecraft version.

    Ore Finder App vs Manual Mining

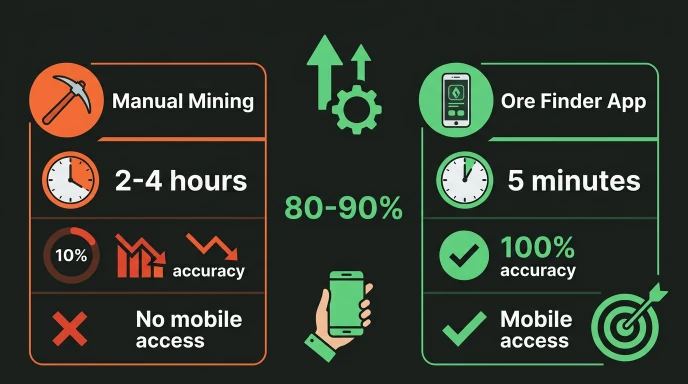
    MethodTime to Find 10 DiamondsAccuracyMobile Access
    Manual Strip Mining2-4 hoursLowNo
    Cave Exploration1-3 hoursMediumNo
    Ore Finder Website15 minutes100%Limited
    Ore Finder App5 minutes100%Yes

    Ore finder apps save 80-90% of mining time.

    Comparison chart showing time savings and accuracy differences between manual mining and ore finder app

    Key Features in Quality Apps

    Mobile app interface mockup showing ore finder features, map, coordinates, and ore filters

    Interactive Maps

    Show terrain, biomes, and structures simultaneously.

    Color-coded ore types for quick identification.

    Zoom in/out for macro and micro navigation.

    Multiple Ore Support

    Find diamonds, iron, gold, emeralds, and ancient debris.

    Locate coal, redstone, lapis, and copper ore.

    Show structure locations: villages, strongholds, temples.

    Coordinate Display

    Provide exact X, Y, Z for every resource.

    Show distance to nearest ore clusters.

    Display Y-level for depth guidance.

    Version Compatibility

    Support Java and Bedrock editions separately.

    Work with current versions and recent updates.

    Handle both positive and negative seed numbers.

    Ore Finder For MC: Mobile Advantage

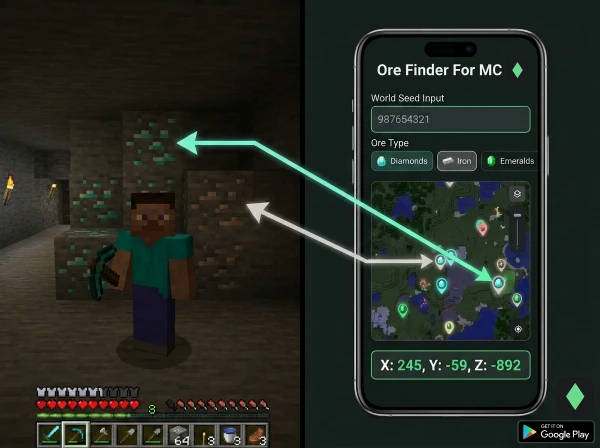
    Ore Finder For MC app download button and feature preview for Google Play Store

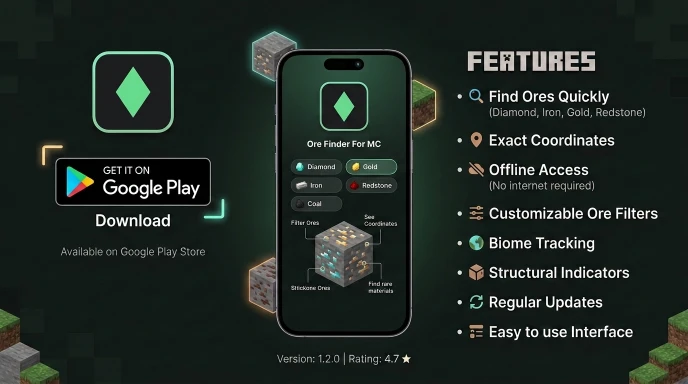
    Ore Finder For MC is a dedicated mobile app on Google Play Store.

    It offers identical features to the website with mobile optimization.

    Use it while playing on your phone or tablet.

    Check ore coordinates right from the Play Store app interface.

    No browser switching or typing on game console required.

    The app works offline once you input your seed.

    This is critical for seamless gameplay integration.

    Practical Tips for Using Ore Finder Apps

    Finding Your Seed Correctly

    Make sure you copy the entire seed number.

    Seeds can be 15+ digits long. Missing one digit changes the world.

    Java and Bedrock seeds are different for the same numerical seed.

    Always specify which edition your seed is for.

    Navigating to Coordinates

    Enable coordinates in your Minecraft settings first.

    Use /tp @s [X] [Y] [Z] to teleport directly.

    Replace X, Y, Z with app coordinates exactly.

    Mark important locations in-game once you arrive.

    Planning Efficient Routes

    Use the app to plan mining routes before starting.

    Group nearby ore clusters into single trips.

    Identify biome borders near ore for faster travel.

    Build temporary bases near high-concentration ore areas.

    Common Mistakes with Ore Finder Apps

    Using Java seed coordinates in Bedrock world (wrong edition).

    Transposing coordinate numbers when typing in-game.

    Not enabling the coordinates display before navigating.

    Forgetting that ore in already-mined chunks won’t regenerate.

    Expecting app to show real-time mining progress (it doesn’t).

    Comparing Free vs Paid Apps

    Free Ore Finder Apps

    Limited ore types or biome search capabilities.

    Ads displayed while using the app.

    May not support the latest Minecraft versions immediately.

    Basic coordinate display without advanced features.

    Paid Ore Finder Apps

    Full access to all ore and structure types.

    Ad-free experience for uninterrupted gameplay planning.

    Faster updates after Minecraft patches.

    Advanced features like distance calculations and route planning.

    Ore Finder For MC provides full features with a clean interface, all for free with no ads.

    You get the features of paid apps with no cost and zero ads.

    Tips for Maximum Mining Efficiency

    Pre-Plan Your Mining Session

    Open the ore finder app before entering your world.

    Identify your top 5-10 closest ore clusters.

    Note coordinates and Y-levels for each location.

    Calculate travel time between clusters using Nether routes.

    Using Coordinates Strategically

    Diamonds at Y-59: Strip mine at this exact level.

    Iron at Y232 (mountains) or Y16 (underground).

    Ancient debris at Y15: Only spawns in the Nether.

    Emeralds are only found in mountains at Y224.

    Check our guides on diamond coordinates and ancient debris Y-levels for specifics.

    Maximizing Tool Efficiency

    Pair the Ore Finder app with the Fortune III pickaxe.

    Use efficiency-enhanced tools for faster mining.

    Bring water buckets for lava safety.

    Light tunnels with torches to prevent mob spawning.

    FAQ

    Is the Ore Finder For MC app free?

    Yes, unlike many other apps, the Ore Finder For MC app is completely free and does not display any ads.

    What does a Minecraft ore finder app do?

    It maps ore locations using your world seed and displays exact coordinates. Input your seed, select the ore type, and get X, Y, Z coordinates for every vein. No manual mining required. Works on phones and tablets with offline access.

    Is using an ore finder app considered cheating?

    No. Ore finders use publicly available seed data and published algorithms. It’s like having mathematical knowledge about ore distribution. Most servers allow ore finder use. Check specific server rules if playing multiplayer.

    Which ore finder app is best for mobile?

    Ore Finder For MC offers full features, offline access, and a clean interface. It supports both Java and Bedrock editions. Available on the Google Play Store with regular version updates.

    Can ore finder apps work for multiplayer servers?

    Yes, if you know the server seed. Most public servers don’t share seeds to prevent exploits. Private servers with friends typically share seeds. Check server rules before using coordinates from apps.

    Do ore finder apps work with the latest Minecraft versions?

    Quality apps update for current versions. Ore Finder For MC supports Minecraft 1.20+ for both Java and Bedrock. Always verify app version compatibility before use.

    Start Finding Ores Instantly

    Ore finder apps eliminate hours of random mining.

    Get exact coordinates without exploring blindly.

    Download Ore Finder For MC from the Google Play Store today.

    Input your seed once and navigate directly to every ore cluster.

  • How to Mine Ancient Debris in Minecraft: Complete Mining Guide

    How to Mine Ancient Debris in Minecraft: Complete Mining Guide

    Ancient debris is the only source of netherite in Minecraft.

    Mining it requires specific techniques to avoid lava and maximize your haul.

    Quick Answer: How to Mine Ancient Debris

    Mine ancient debris at Y15 in the Nether using a diamond or netherite pickaxe. Bed mining or TNT mining exposes debris faster than pickaxe mining. Strip mining systematically at Y15 yields maximum ancient debris per hour.

    Ancient debris generates between Y8 and Y119 but concentrates heavily at Y15.

    Understanding Ancient Debris Mining

    Ancient debris only spawns in the Nether dimension, nowhere else.

    The ore appears in veins of 1-3 blocks, making it extremely rare.

    Unlike other ores, ancient debris generates in small clusters at two different levels: Y15 (primary peak) and Y-119 (secondary).

    Key mining facts:

    • Requires a diamond pickaxe minimum
    • Drops 1 ancient debris per block (no Fortune effect)
    • Never burns in lava or fire
    • Floats if you drop it in lava
    • Takes 15 seconds to break by hand (slow)

    The ore’s rarity makes technique critical for efficiency.

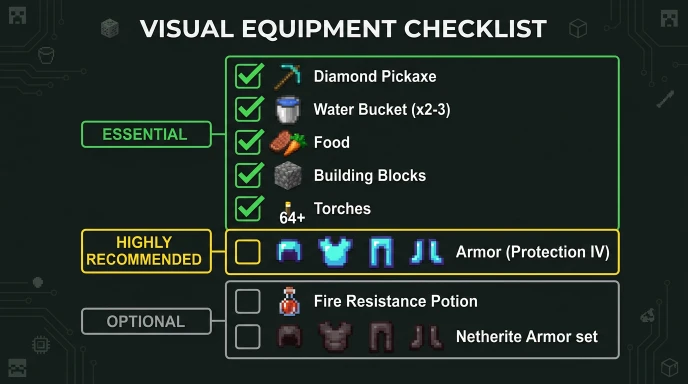
    What You Need Before Mining

    Essential mining supplies checklist for ancient debris mining in Minecraft Nether

    Essential Tools and Items

    Pickaxe: Diamond or netherite minimum. Stone picks don’t work.

    Armor: Protection IV reduces lava damage significantly.

    Water buckets: Bring at least 2-3 for lava emergencies.

    Food: Stack of cooked meat or golden carrots for healing.

    Blocks: 64+ blocks for building and safety.

    Torches: Light tunnels to prevent mob spawning.

    Optional But Helpful

    Fire resistance potions prevent lava damage entirely.

    Netherite armor and pickaxe make mining faster and safer.

    Efficiency enchantment speeds up mining considerably.

    Unbreaking extends pickaxe durability significantly.

    Checking Your Y-Coordinate

    Press F3 on Java Edition to see coordinates.

    The middle number in XYZ is your Y-level.

    On Bedrock Edition, enable “Show Coordinates” in world settings.

    Constantly check Y-level while mining. Drift to Y18 or Y12 reduces finds by 20-30%.

    Strip Mining Strategy at Y15

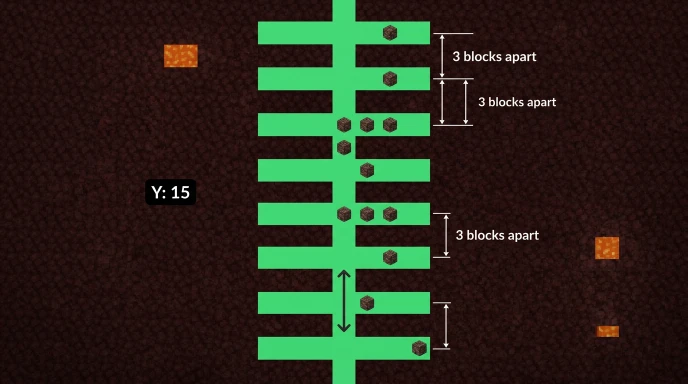
    Strip mining pattern diagram at Y15 for efficient ancient debris collection in Minecraft Nether

    Setting Up Your Mining Tunnel

    Dig down to Y15 using a safe staircase or water bucket method.

    Create a main tunnel extending 200+ blocks in a cardinal direction.

    Every 3 blocks, dig perpendicular branches extending 20-30 blocks on each side.

    This spacing prevents missing veins while avoiding redundant coverage.

    Actual Mining Process

    Walk slowly through your branches scanning for ancient debris.

    The dark brown/black ore with gold specks is distinctive.

    Break each ancient debris block with your pickaxe.

    Collect the drops immediately (they float but can be lost).

    Mark mined areas with torches to avoid revisiting.

    Bed Mining Method (Fastest Technique)

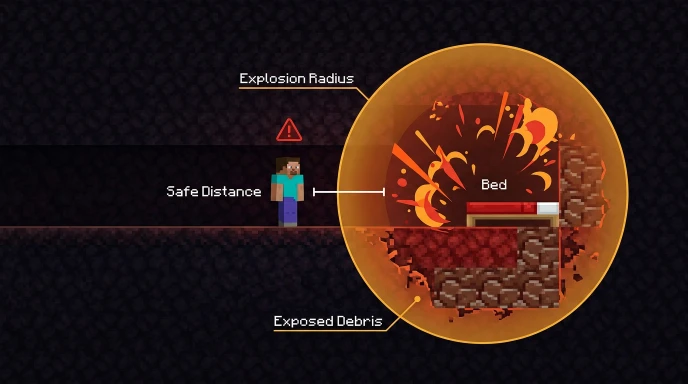
    Bed mining explosion technique diagram showing safe distance and debris exposure in Minecraft Nether

    Bed explosions instantly expose large underground areas without mining blocks.

    How Bed Mining Works

    Place beds at the end of your tunnel.

    Stand 2-3 blocks back from the bed.

    Right-click the bed to trigger an explosion.

    The blast reveals hidden ancient debris in surrounding blocks.

    Requirements and Safety

    Bring wool and wood for continuous bed crafting.

    Keep safe distance or the explosion damages you severely.

    Beds require immediate re-crafting after each use (wool + planks).

    This method is 2-3x faster than pickaxe mining.

    TNT Mining Alternative

    TNT works similarly to beds but requires different resources.

    TNT Mining Process

    Place TNT in your mining tunnel.

    Light it with redstone or flint and steel.

    Retreat to a safe distance before the explosion.

    Collect ancient debris from exposed areas.

    When to Use TNT

    Use TNT if you have creeper farms producing gunpowder.

    Otherwise, bed mining is more resource-efficient.

    Both methods work, but beds are faster for most players.

    Mining Ancient Debris Efficiently

    Avoid These Mistakes

    Mining above Y22 or below Y-32 wastes time with minimal results.

    Random cave exploration covers less ground than systematic tunneling.

    Not bringing water buckets risks losing all your debris to lava.

    Breaking ancient debris without proper tools takes 15+ seconds per block.

    Ignoring Y-coordinates and drifting causes you to miss the optimal range.

    What Actually Works

    Strip mining at Y15 yields 1-3 ancient debris per 100 blocks mined.

    Bed mining finds debris twice as fast but costs resources.

    Staying exactly at Y15 prevents wasted effort in lower-yield zones.

    Mining Speed Comparison

    MethodSpeedSafetyResource CostBest For
    Pickaxe Strip MiningSlowSafeLowBeginners
    Bed MiningFastMediumMediumExperienced
    TNT MiningVery FastLowHighPowder-rich
    Cave ExplorationMediumLowLowFinding debris

    Strip mining at Y15 is the most reliable method.

    Lava Management While Mining

    Lava lakes are extremely common at Y15 and below.

    Safe Lava Handling

    Keep water buckets in your hotbar at all times.

    Pour water on lava before mining near it.

    Build a block barrier before breaking into lava pockets.

    Never mine directly into unknown areas.

    Lava immunity potions make this risk vanish completely.

    Using OreFinder to Find Ancient Debris

    Manual mining can take 10+ hours for full netherite gear.

    Ore Finder maps exact ancient debris locations using your Nether seed.

    Enter your seed and select ancient debris as the ore type.

    The tool shows every debris vein with precise X, Y, Z coordinates.

    Navigate directly to debris-rich chunks instead of mining blind.

    This approach cuts your mining time by 60-70%.

    For more details on ancient debris spawn mechanics, check our complete Y-level guide.

    How Much Ancient Debris Do You Need

    For one netherite ingot: 4 ancient debris blocks minimum.

    Full netherite armor set: 24 netherite ingots = 96 ancient debris blocks.

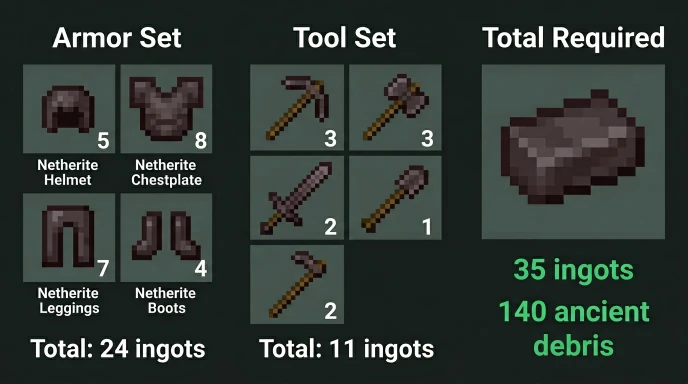
    Complete tools and armor: 35+ netherite ingots = 140+ ancient debris blocks.

    Most players need 50-100 ancient debris for essential gear.

    Biome-Specific Mining Considerations

    Ancient debris spawns identically in all Nether biomes.

    Nether Wastes: Sparse desert-like terrain, easy navigation.

    Crimson Forest: Dense trees, difficult to navigate, harder mining.

    Warped Forest: Similar to crimson, confusing purple trees.

    Soul Sand Valley: Slow walking speed, oppressive atmosphere.

    Basalt Deltas: Hardened material makes mining slower.

    Choose biomes based on navigation ease, not debris concentration.

    Preserving Your Ancient Debris

    Ancient debris floats in lava (doesn’t burn).

    If you accidentally drop it in lava, it floats safely.

    Retrieve it before leaving the mining area.

    Consider dropping items in water buckets for safekeeping during long sessions.

    FAQ

    How do you mine ancient debris in Minecraft?

    Mine with a diamond or netherite pickaxe at Y15 in the Nether. Strip mine systematically or use bed mining for speed. Ancient debris appears in veins of 1-3 blocks. Bring water buckets for lava safety. One pickaxe stroke breaks each block dropping the debris.

    What’s the fastest way to mine ancient debris?

    Bed mining is fastest, exposing debris 2-3x quicker than pickaxes. Requires beds (wool + wood) and managing explosion damage. TNT mining works similarly but requires more resources. Strip mining at Y15 is the slowest but safest for beginners.

    How much ancient debris do you need for full netherite?

    You need 96 ancient debris blocks for full netherite armor (24 ingots × 4 scraps each). Add tools and weapons for 120-150 total. This requires significant Nether mining or multiple sessions.

    Can you mine ancient debris with a stone pickaxe?

    No. Stone pickaxes break ancient debris without dropping it. You need an iron pickaxe minimum, but a diamond pickaxe is recommended. Netherite pickaxe is the fastest but requires ancient debris first.

    Where do you find ancient debris to mine?

    Ancient debris spawns only in the Nether between Y8 and Y119. Peak concentration is at Y15. Mine systematically at this Y-level for maximum efficiency. Use Ore Finder to find exact debris coordinates.

    Mine Ancient Debris Efficiently

    Ancient debris mining requires preparation, patience, and the right technique.

    Y15 is your target level for maximum yield.

    Use systematic strip mining or bed mining based on your resources.

    Get your seed to OreFinder.io and skip random mining entirely.

    Start mining today and get netherite gear faster than ever.

  • How to Make Netherite Tools in Minecraft: Complete Upgrade Guide

    How to Make Netherite Tools in Minecraft: Complete Upgrade Guide

    Netherite tools are stronger and more durable than diamond gear.

    But you can’t craft them directly—you must upgrade diamond tools first.

    Quick Answer: How to Make Netherite Tools

    Use a smithing table to upgrade diamond tools with Netherite ingots. Place a diamond tool and 1 netherite ingot in the smithing table to create the netherite version. Your enchantments and durability percentage carry over to the upgraded tool.

    Understanding Netherite Tools vs Diamond Tools

    Netherite tools cannot be crafted from scratch like diamond tools.

    Every netherite tool requires a diamond version first, plus 1 netherite ingot per tool.

    The upgrade process preserves all enchantments, custom names, and durability percentages from the original diamond gear.

    This means:

    • Fortune III pickaxe stays Fortune III after upgrade
    • Custom names transfer completely
    • Durability doesn’t reset
    • All previous enchantments remain intact

    This upgrade system is unique to Netherite and makes it special.

    Step-by-Step Process for Making Netherite Tools

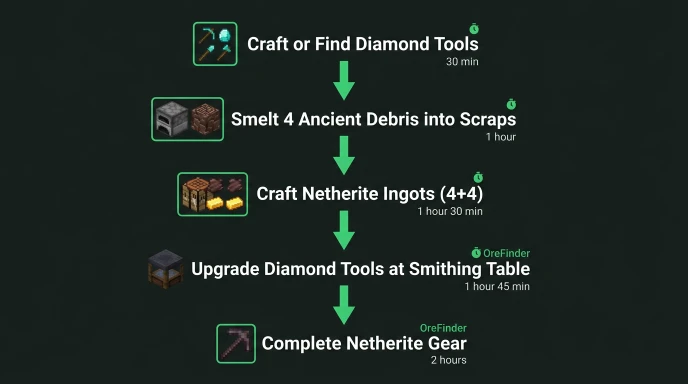
    Complete flowchart showing steps to make netherite tools from gathering ancient debris to final upgrade

    Step 1: Get Diamond Tools

    Craft or find diamond tools first. You need them to upgrade.

    Diamond tool recipes:

    • Pickaxe: 3 diamonds + 2 sticks
    • Axe: 3 diamonds + 2 sticks (different shapes)
    • Shovel: 1 diamond + 2 sticks
    • Hoe: 2 diamonds + 2 sticks
    • Sword: 2 diamonds + 1 stick

    Mine diamonds at Y-59 for the fastest collection. Check our diamond location guide for exact coordinates.

    Step 2: Craft Netherite Ingots

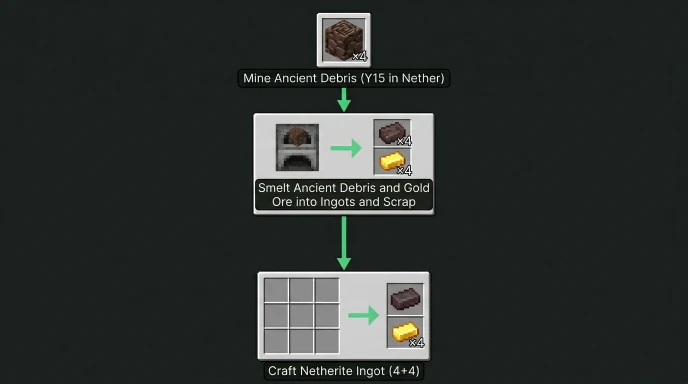
    Smelt 4 ancient debris into netherite scraps.

    Combine 4 netherite scraps with 4 gold ingots in a crafting table.

    You get 1 netherite ingot per craft. You need 1 ingot per tool.

    See our netherite ingot guide for detailed crafting instructions.

    Step 3: Build Smithing Table

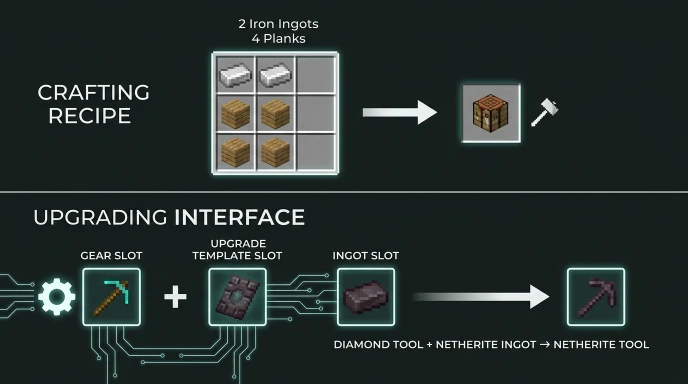
    Smithing table crafting recipe and upgrade interface guide for making netherite tools

    Craft a smithing table using 2 iron ingots and 4 planks.

    Place it down and right-click to open the interface.

    Smithing tables are permanent and reusable for unlimited upgrades.

    Step 4: Upgrade Tools at Smithing Table

    Place your diamond tool in the left input slot.

    Place 1 netherite ingot in the right input slot.

    (In version 1.20+: Add netherite upgrade template in the template slot first)

    The upgraded netherite tool appears in the output slot.

    Take your new netherite tool and repeat for other tools.

    Complete Netherite Tools Upgrade Table

    Tool TypeDiamond Version RequiredNetherite Ingots NeededResult
    Pickaxe1 diamond pickaxe1 ingotNetherite pickaxe
    Axe1 diamond axe1 ingotNetherite axe
    Shovel1 diamond shovel1 ingotNetherite shovel
    Hoe1 diamond hoe1 ingotNetherite hoe
    Sword1 diamond sword1 ingotNetherite sword
    Full Set + Tools5 tools + armor11 ingotsComplete netherite gear

    What You Need Before Upgrading

    Materials Required

    • Diamond tools (craft or find)
    • Netherite ingots (crafted from ancient debris)
    • Smithing table (craft with iron ingots)
    • Netherite upgrade template in 1.20+ (find in bastion remnants)

    Where to Get Ancient Debris

    Mine ancient debris at Y15 in the Nether. Check our ancient debris guide for exact spawn locations and mining strategies.

    You need 4 ancient debris per netherite ingot.

    Smithing Template Requirements (1.20+)

    Starting in version 1.20, you need Netherite upgrade smithing templates.

    Find them in bastion remnants in the Nether.

    You only need 1 template to create 2 more templates:

    • 1 netherite upgrade template
    • 7 diamonds
    • 1 netherrack

    Craft these together for unlimited template duplication.

    Preserving Tool Enchantments

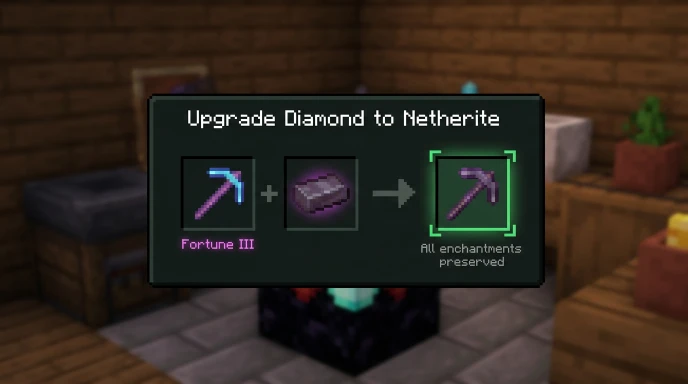
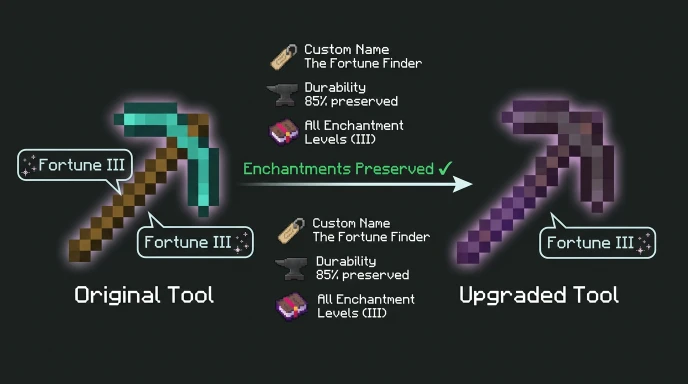
    Visual guide showing how enchantments are preserved when upgrading diamond tools to netherite

    All enchantments transfer to the upgraded tool perfectly.

    Example: Fortune III diamond pickaxe becomes Fortune III netherite pickaxe.

    You don’t lose any enchantments, levels, or custom names during the upgrade.

    This makes upgrading tools with good enchantments extremely valuable.

    Netherite Tool Stats vs Diamond

    StatDiamondNetheriteImprovement
    Durability1561 uses2031 uses+30%
    Attack Speed1.21.2Same
    DamageTool-specific+1Better
    Mining SpeedFastFaster+8-12%
    KnockbackNo10% per itemYes
    Fire ResistanceNoYesFloats in lava

    The lava immunity alone makes netherite tools invaluable for Nether work.

    Practical Tips for Making Netherite Tools

    Prioritize Your First Tool

    Netherite pickaxe with Fortune III is the best first upgrade.

    This tool pays for itself by finding more diamonds and redstone.

    Upgrade your sword second for combat advantage.

    Batch Your Upgrades

    Don’t upgrade one tool at a time if possible.

    Mine all your ancient debris first, craft all ingots, then upgrade everything.

    This saves time walking between locations.

    Use Bedrock Edition Faster Crafting

    Bedrock crafts items faster than Java Edition by default.

    If you have both versions, use Bedrock for rapid ingot crafting.

    Use OreFinder for Ancient Debris

    Finding ancient debris manually takes hours per ingot.

    OreFinder maps exact ancient debris locations using your Nether seed.

    Enter your seed and get coordinates for every debris vein instantly.

    Navigate directly to clusters instead of mining randomly.

    This cuts your tool-making time significantly.

    Common Mistakes When Making Netherite Tools

    Trying to craft netherite tools directly won’t work. You must upgrade diamond tools.

    Using the wrong Y-level for ancient debris mining (check Y15 optimal).

    Not bringing fire resistance potions for Nether mining.

    Forgetting to keep diamond tools before upgrading them.

    Losing ancient debris to lava without water buckets.

    Time Estimate for Full Netherite Tool Set

    Complete netherite setup with enchantments:

    • Gather materials: 3-5 hours
    • Craft diamond tools: 30 minutes
    • Mine ancient debris: 2-3 hours
    • Craft netherite ingots: 20 minutes
    • Upgrade all tools: 10 minutes

    Total: 6-9 hours of playtime for experienced players.

    Use OreFinder to reduce mining time by 60%.

    FAQ

    How do you make netherite tools in Minecraft?

    Upgrade diamond tools using a smithing table and netherite ingots. Place the diamond tool in the left slot, the netherite ingot in the right slot. The upgraded netherite tool appears in the output. All enchantments, durability, and custom names transfer to the upgraded tool.

    Can you craft netherite tools without diamonds?

    No. Netherite tools require diamond versions to upgrade. You cannot craft netherite tools directly. Every netherite tool must start as a diamond tool first. This system is unique to Netherite gear in Minecraft.

    How many netherite ingots do you need for all tools?

    You need 11 netherite ingots total for full tools: pickaxe (1), axe (1), shovel (1), hoe (1), sword (1), and boots through helmet (5). This requires a minimum of 44 ancient debris blocks since each ingot needs 4 scraps.

    Do enchantments transfer when upgrading to netherite?

    Yes. All enchantments transfer perfectly to the upgraded netherite tool. Fortune III pickaxe becomes Fortune III netherite pickaxe. Custom names, durability percentages, and all modifiers carry over completely unchanged.

    What’s the best netherite tool to make first?

    Netherite pickaxe with Fortune III is the best first tool. It pays for itself by finding more diamonds and resources quickly. Upgrade your sword second for combat advantage. Then work on other tools based on your building needs.

    Upgrade Your Gear to Netherite

    Netherite tools require diamond versions and Netherite ingots for upgrading.

    All enchantments transfer to the upgraded tool unchanged.

    Use OreFinder to find ancient debris fast and reduce crafting time.

    Start gathering ancient debris today and get your netherite tools set up.

  • What Level Does Redstone Spawn in Minecraft: Best Y Coordinates

    What Level Does Redstone Spawn in Minecraft: Best Y Coordinates

    Redstone ore is essential for circuits, contraptions, and automated farms.

    Mining at the wrong Y-levels wastes time when you need large quantities fast.

    Quick Answer: What Level Does Redstone Spawn?

    Redstone ore spawns from Y-64 to Y16 in all Overworld biomes. The best level for redstone is Y-59, where redstone generates at the highest concentration alongside diamonds.

    This level gives you maximum redstone ore per hour of mining.

    Minecraft Redstone Ore Distribution

    Redstone uses a triangle distribution pattern from Y-64 up to Y16.

    Spawn rates increase as you approach Y-59 from above or below.

    The concentration peaks at Y-59, then decreases as you move higher toward Y16.

    Key spawn details:

    • Spawns in stone below Y0
    • Spawns in deepslate below Y0
    • Higher frequency below Y0 than above
    • No spawning above Y16
    • Generates in veins of 4-8 blocks

    Redstone appears far more commonly than diamonds at the same levels.

    Redstone Level Minecraft: Complete Breakdown

    Y-Level RangeRedstone Spawn RateMining PriorityNotes
    Y-64 to Y-32Very HighExcellentDeepslate layer
    Y-32 to Y-16HighGoodBelow old Y11 meta
    Y-16 to Y-1MediumDecentDecreasing rate
    Y-1 to Y8Medium-LowBackup optionAbove old Y11
    Y8 to Y16LowSkipMinimal spawns
    Above Y16NoneN/ARedstone doesn’t spawn

    Y-59 sits in the optimal range for both redstone and diamond mining.

    Best Mining Strategy for Redstone Ore

    Strip Mining at Y-59

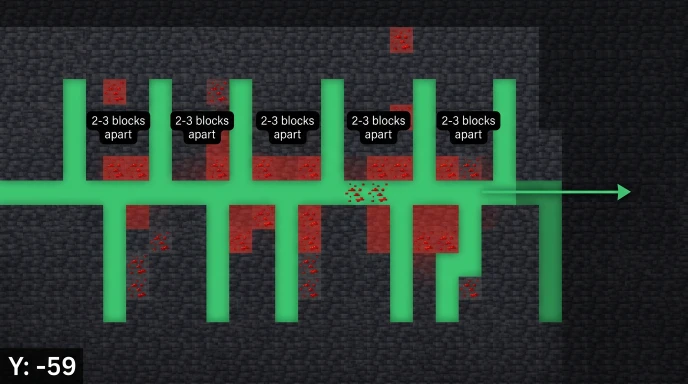
    Strip mining pattern at Y-59 for efficient redstone ore collection in Minecraft

    Create horizontal tunnels at Y-59 with branches every 2-3 blocks.

    This exposes maximum ore blocks in the highest concentration zone.

    Use an iron pickaxe minimum. Stone pickaxes don’t work on redstone ore.

    Cave Exploration Below Y0

    Large cave systems below Y0 expose thousands of blocks naturally.

    Redstone appears on cave walls, ceilings, and floors constantly.

    Bring torches and mark your path to avoid getting lost.

    Branch Mining Pattern

    Dig a main tunnel at Y-59 extending 100+ blocks.

    Every 2-3 blocks, create perpendicular branches extending 20-30 blocks.

    This systematic approach prevents missing ore veins while avoiding wasted effort.

    Redstone Ore vs Deepslate Redstone Ore

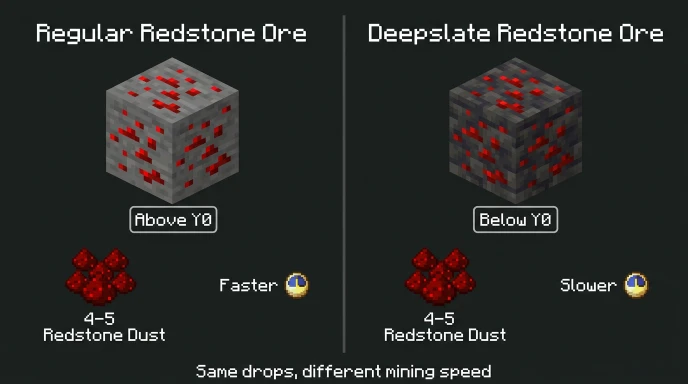
    Comparison of regular redstone ore and deepslate redstone ore in Minecraft

    Regular redstone ore appears in stone above Y0.

    Deepslate redstone ore generates in deepslate below Y0.

    Both drop 4-5 redstone dust when mined. The only difference is the mining speed.

    Deepslate variants take slightly longer to break but give identical resources.

    Fortune Enchantment on Redstone

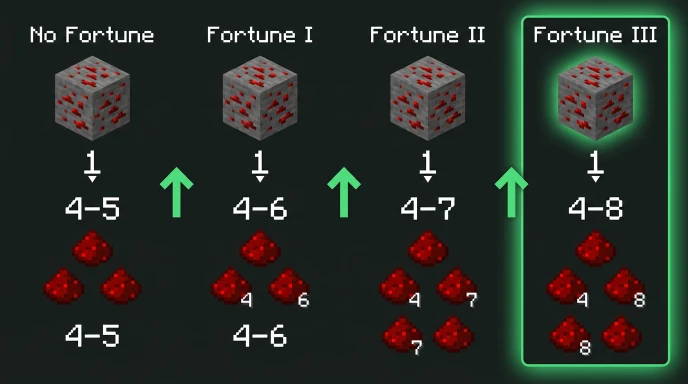
    Fortune enchantment effect on redstone ore showing increased dust drops in Minecraft

    Fortune significantly increases redstone dust drops from each ore block.

    Drop rates by enchantment level:

    • No Fortune: 4-5 redstone dust
    • Fortune I: 4-6 redstone dust
    • Fortune II: 4-7 redstone dust
    • Fortune III: 4-8 redstone dust

    Fortune III can triple your redstone collection from the same amount of mining.

    Always use Fortune III pickaxes when mining redstone for maximum efficiency.

    What You Need Redstone For

    Redstone is the core component for all automation and mechanical systems.

    Common redstone uses:

    • Redstone torches, repeaters, comparators
    • Pistons and sticky pistons
    • Observers and dispensers
    • Redstone lamps for lighting
    • Note blocks for music
    • Powered rails for minecart systems
    • Brewing stands (requires 1 redstone)
    • Clocks and compasses

    Complex contraptions like automatic farms require hundreds of redstone dust.

    How Much Redstone You Actually Need

    Early game: 20-40 redstone for basic circuits and powered rails.

    Mid game: 100-200 redstone for piston doors, farms, and lighting systems.

    Late game: 500+ redstone for complex contraptions, sorting systems, and mega builds.

    Redstone is renewable through witch farms but mining is faster initially.

    Using OreFinder for Redstone Locations

    Manual strip mining works but takes hours for large quantities.

    OreFinder shows exact redstone vein locations using your world seed.
    Enter your seed and select redstone ore from the ore types.

    The tool maps every redstone vein with precise X, Y, Z coordinates.

    Navigate directly to redstone-rich chunks instead of mining randomly.

    This cuts your mining time significantly when you need specific quantities.

    For players also gathering other ores, check our guides on diamond coordinates and iron mining levels.

    Redstone Mining Tips and Tricks

    Check Your Y-Coordinate

    Press F3 (Java) to see coordinates. The middle number is your Y-level.

    Enable “Show Coordinates” in settings (Bedrock) for constant display.

    Stay at Y-59 for optimal results. Drifting to Y-50 or Y-70 reduces spawns.

    Bring the Right Tools

    Iron pickaxe minimum. Stone pickaxes can’t mine redstone ore.

    Fortune III enchantment for 2-3x more redstone dust per ore.

    Multiple pickaxes for extended mining sessions.

    Light Your Tunnels

    Place torches every 8 blocks to prevent mob spawns.

    Redstone ore emits light when clicked but this doesn’t prevent spawns.

    Water Bucket Safety

    Carry water buckets for unexpected lava encounters.

    Lava appears frequently at Y-59 and lower levels.

    Pour water on lava before mining near it to avoid deaths.

    Common Redstone Mining Mistakes

    Mining above Y16 produces zero redstone. That’s the hard cutoff.

    Not using Fortune III wastes 50-70% of potential redstone drops.

    Breaking redstone ore without Silk Touch drops dust immediately. This is intended.

    Confusing redstone ore brightness with being active. Redstone ore glows when walked on but doesn’t affect mining.

    Random cave exploration covers less ground than systematic strip mining.

    Redstone Ore Appearance

    Redstone ore is stone with red specks throughout.

    It emits subtle light particles when walked on or clicked.

    The glow fades after a few seconds.

    Visual identification:

    • Red dots scattered across gray stone
    • Slight red glow when active
    • Deepslate version has darker background
    • More common than diamonds but rarer than coal

    The red specks make it easy to spot in dark caves.

    Silk Touch on Redstone Ore

    Silk Touch picks up redstone ore blocks instead of dust.

    This is useful for decoration or relocating ore for later mining.

    Mining Silk Touch ore later with Fortune III still gives the multiplied drops.

    Some players collect redstone ore blocks for builds before mining them.

    Y-Level Changes in Different Versions

    Redstone distribution changed in Minecraft 1.18 (Caves & Cliffs).

    Pre-1.18: Redstone spawned from Y16 down to bedrock with different patterns.

    Post-1.18 (current): Y-64 to Y16 with peak at Y-59.

    Always verify your Minecraft version before following Y-level guides.

    Biome-Specific Redstone Generation

    Redstone spawns identically in all Overworld biomes at the same Y-levels.

    Desert, forest, plains, ocean, and mountain biomes have equal redstone rates.

    Biome type doesn’t affect ore distribution. Only Y-level matters.

    FAQ

    What level does redstone spawn in Minecraft?

    Redstone ore spawns from Y-64 to Y16 in all Overworld biomes. The best Y-level for redstone mining is Y-59, where spawn rates peak. Redstone appears in both stone and deepslate variants, with higher concentration below Y0 than above.

    Does Fortune work on redstone ore?

    Yes. Fortune enchantment increases redstone dust drops significantly. Fortune III yields 4-8 redstone dust per ore block instead of the base 4-5. This makes Fortune III essential for efficient redstone collection, potentially doubling your total dust from the same mining effort.

    Can you mine redstone ore with a stone pickaxe?

    No. Redstone ore requires an iron pickaxe minimum. Stone, wooden, and gold pickaxes break the ore but drop nothing. Use iron, diamond, or netherite pickaxes. Add Fortune III enchantment for maximum redstone dust drops per ore block.

    What is the best Y-level for redstone in Minecraft?

    Y-59 is the best Y-level for redstone ore mining. This level has the highest spawn concentration and also peaks for diamonds. Strip mine at Y-59 with Fortune III for maximum efficiency. The Y-64 to Y-32 range overall provides excellent redstone rates.

    Where do you find redstone ore in Minecraft?

    Find redstone ore underground between Y-64 and Y16 in any Overworld biome. Mine at Y-59 for best results. Redstone appears in stone above Y0 and deepslate below Y0. Large caves below Y0 expose abundant redstone on walls and ceilings.

    Mine Redstone at Y-59

    Redstone ore spawns from Y-64 to Y16 with peak concentration at Y-59.

    Use Fortune III for maximum redstone dust drops from each ore block.

    Stop mining randomly and use OreFinder to locate redstone-rich veins.

    Get exact coordinates for every redstone deposit in your world and mine efficiently.

  • How to Find Minecraft Seed on Server, Realm & Without Commands

    How to Find Minecraft Seed on Server, Realm & Without Commands

    You need the world seed to use structure finders and biome locators.

    But getting the seed on servers and realms isn’t as simple as single-player worlds.

    Quick Answer: How to Find the Seed of a Minecraft World

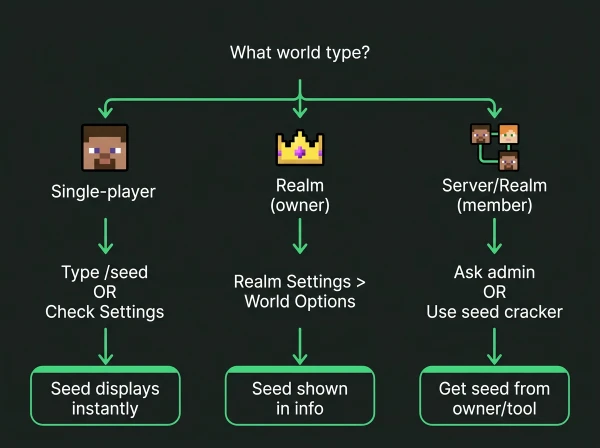
    Single-player: Use /seed command or check world settings. Servers: Ask the admin or use third-party seed crackers. Realms: Java owners see it in settings; Bedrock members need permission or seed crackers.

    Each method depends on your access level and game edition.

    Finding Seed in Your Own Worlds

    Flowchart showing different methods to find Minecraft seed based on world type

    Java Edition Single-Player

    Press T to open chat and type /seed

    The seed displays instantly in chat as a long number.

    Copy the full number, including the negative sign if present.

    Bedrock Edition Single-Player

    Open Settings > Game > scroll to the “Seed” field

    The seed shows without needing commands or cheats.

    Works even in worlds where cheats are disabled.

    Alternative Method for Both Editions

    Pause game > Settings > World settings > look for the Seed section

    The seed appears in world information regardless of cheat settings.

    How to Find the Seed of Minecraft Realm

    Minecraft Java Edition Realms settings showing where to find world seed

    Realms have different permission systems for seed access.

    Java Edition Realms (Owner)

    1. Open the Realms menu from the main screen
    2. Click your Realm
    3. Click “Configure”
    4. Select “World Options”
    5. The seed displays in the world information section

    Java Edition Realms (Member)

    Members cannot see the seed through Realm settings.

    Ask the Realm owner to share it.

    Alternatively, use seed cracking tools (explained below).

    Bedrock Edition Realms

    Bedrock Realms don’t display seeds in settings, even for owners.

    The Realm owner must download the world, open it locally, then check seed in settings.

    Members need permission to download or must use seed crackers.

    How to Find Minecraft Seed on Server

    Server seeds depend entirely on admin permissions.

    If You Have Operator/Admin Access

    Type /seed in chat.

    The command works identically to single-player.

    If You’re a Regular Player

    The /seed command is usually disabled for non-ops.

    Ask server administrators to share the seed.

    Most public servers don’t share seeds to prevent structure-hunting exploits.

    Third-Party Servers

    Large multiplayer servers often use custom world generators.

    These servers may not have traditional seeds or may refuse to share them.

    Finding Seed Without Commands or Permission

    Seed cracking uses visible coordinates and structures to calculate the seed.

    Tools That Crack Seeds

    • SeedCrackerX (Java mod)
    • Seed Finder tools (online)
    • ChunkBase seed finder (uses structure data)

    How Seed Cracking Works

    1. Gather data from the world (coordinates, structures, biomes)
    2. Input data into seed cracking software
    3. Software calculates possible seed matches
    4. Verify seed by comparing world features

    Data You Need to Collect

    • Exact coordinates of multiple structures (strongholds, villages, temples)
    • Biome locations and boundaries
    • Dungeon or spawner coordinates
    • At least 3-5 structure locations for accuracy

    This method takes time but works on any world where you can explore.

    Do Minecraft Realms Have Seeds?

    Yes, absolutely. Every Minecraft world including Realms generates from a seed.

    Realms are just hosted worlds. They follow the same generation rules as local worlds.

    The seed determines terrain, biomes, structures, and ore placement identically to offline worlds.

    Bedrock Realms simply don’t display the seed publicly in settings.

    Using Seeds with OreFinder

    Once you have your world seed, use it to find any structure or ore.

    OreFinder maps your entire world using the seed.

    Enter the seed and select what you’re looking for:

    • Diamond ore locations
    • Ancient debris coordinates
    • Village positions
    • Stronghold locations
    • Biome boundaries

    You get exact X, Y, Z coordinates for every feature in your world.

    This works for seeds from single-player worlds, Realms, and servers.

    For players hunting specific resources, check our guides on finding diamonds and ancient debris coordinates.

    Seed Format and Compatibility

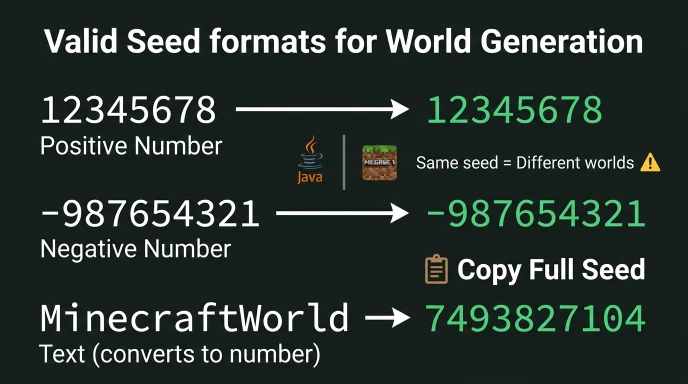
    Examples of valid Minecraft seed formats including positive, negative, and text seeds

    Seeds are numerical values (positive or negative integers).

    Valid Seed Formats

    • Numbers: 12345678
    • Negative: -987654321
    • Text: converts to numerical seed internally

    Edition Compatibility

    Java and Bedrock use the same seed format but generate different worlds.

    A seed that works in Java Edition creates a completely different world in Bedrock.

    Always specify which edition when sharing seeds.

    Finding Someone Else’s Minecraft Seed

    You can only get someone else’s seed through:

    1. Permission: They share it directly
    2. Server access: You have operator permissions
    3. Seed cracking: You gather structure data and calculate it

    Attempting to access server files without permission violates most server rules.

    Seed cracking from publicly visible structures is generally acceptable.

    Common Seed Finding Mistakes

    Confusing Java and Bedrock Seeds

    The same numerical seed creates different worlds between editions.

    Always verify which edition the seed is for.

    Not Copying the Full Seed

    Seeds can be 15+ digits long. Copy the entire number.

    Missing even one digit changes the world completely.

    Assuming All Commands Work Everywhere

    /seed command requires operator permissions on servers and doesn’t work for Realm members.

    Expecting Bedrock Realms to Show Seeds

    Bedrock Realm owners must download the world to local storage first.

    Seed Information Table

    World TypeAccess MethodRequires CheatsRequires Permission
    Java Single-player/seed or settingsNoNo
    Bedrock Single-playerSettings onlyNoNo
    Java Realm (owner)Realm settingsNoOwner only
    Java Realm (member)Ask ownerN/AYes
    Bedrock Realm (owner)Download worldNoOwner only
    Bedrock Realm (member)Ask ownerN/AYes
    Server (op)/seed commandNoOp required
    Server (player)Ask adminN/AYes

    Why You Need Your World Seed

    Seeds unlock every location-finding tool available.

    With Your Seed You Can:

    • Find strongholds without Eyes of Ender
    • Locate rare biomes without exploring
    • Get exact ore coordinates for efficient mining
    • Plan bases near multiple biomes
    • Share your world with others

    Minecraft Ore Finder requires your seed to show these locations.

    The tool can’t help without the seed because every world is unique.

    FAQ

    How do you find the seed of a Minecraft Realm?

    Java Realm owners: Configure > World Options > Seed. Bedrock Realm owners: Download world to device, then check Settings > Game > Seed. Realm members must ask the owner for the seed or use seed cracking tools by gathering structure coordinates.

    Can you find a Minecraft seed without the /seed command?

    Yes. Use seed cracking tools by collecting coordinates of multiple structures like villages, temples, or strongholds. Input these coordinates into seed finder software which calculates possible seeds. Verify by comparing world features. This works on servers and Realms where /seed is disabled.

    Do Minecraft Realms have seeds?

    Yes. Every Minecraft world including Realms generates from a seed. Realms follow identical generation rules as local worlds. The seed determines all terrain, biomes, structures, and ore locations. Bedrock Realms simply don’t display seeds in settings without downloading the world first.

    How to find seed on Minecraft server?

    If you have operator/admin permissions, use /seed command. Regular players must ask server administrators to share the seed. Many public servers don’t share seeds to prevent exploits. Alternatively, use seed cracking by gathering structure coordinates and calculating the seed with third-party tools.

    Where do you find the seed in Minecraft Bedrock?

    Open Settings > Game > scroll to the “Seed” field. The seed displays without requiring cheats or commands. This works for single-player worlds. For Bedrock Realms, the owner must download the world to their device first, then check the seed in local world settings.

    Get Your Seed and Start Finding

    World seeds unlock every structure and ore location in your world.

    Use /seed in single-player, check Realm settings, or ask server admins.

    Once you have the seed, use Ore Finder to map your entire world instantly.

    Stop exploring blindly and start navigating to exact coordinates for every resource you need.

  • How to Craft Netherite Ingot in Minecraft: Complete Recipe Guide

    How to Craft Netherite Ingot in Minecraft: Complete Recipe Guide

    Netherite ingots are the strongest material in Minecraft for armor and tools.

    Crafting them requires specific materials and the right crafting recipe.

    Quick Answer: How to Craft Netherite Ingot in Minecraft

    Combine 4 netherite scraps with 4 gold ingots in a crafting table. Arrange them in any pattern to craft one netherite ingot.

    You get netherite scraps by smelting ancient debris in a furnace or blast furnace.

    Netherite Ingot Crafting Recipe

    The recipe requires two main ingredients in equal quantities.

    Materials needed:

    • 4 netherite scraps
    • 4 gold ingots

    Place all 8 items in a crafting table in any pattern. The arrangement doesn’t matter.

    You can mix the scraps and gold ingots randomly across the 3×3 grid.

    The output is always 1 netherite ingot per craft.

    Step-by-Step Netherite Ingot Process

    Step-by-step flowchart showing how to craft netherite ingot from ancient debris in Minecraft

    Step 1: Mine Ancient Debris

    Ancient debris spawns in the Nether between Y8 and Y119.

    The best level is Y15 for maximum ancient debris concentration.

    You need 4 ancient debris blocks to make 1 netherite ingot.

    See our guide on where ancient debris spawns for exact coordinates and mining strategies.

    Step 2: Smelt Ancient Debris

    Place ancient debris in a furnace or blast furnace.

    Each ancient debris block smelts into 1 netherite scrap.

    Blast furnaces smelt twice as fast as regular furnaces.

    Step 3: Gather Gold Ingots

    Mine gold ore in the Overworld or Nether.

    Smelt gold ore into gold ingots (9 gold nuggets = 1 gold ingot).

    You need 4 gold ingots per netherite ingot.

    Step 4: Craft Netherite Ingot

    Open a crafting table.

    Place 4 netherite scraps and 4 gold ingots anywhere in the grid.

    Take your netherite ingot from the output slot.

    Netherite Ingot Requirements Table

    Item NeededQuantitySource
    Ancient Debris4 blocksNether (Y15 optimal)
    Netherite Scraps4 scrapsSmelt ancient debris
    Gold Ingots4 ingotsSmelt gold ore or combine nuggets
    Crafting Table1Craft with 4 planks

    Each netherite ingot requires significant resource gathering in the Nether.

    What You Can Make with Netherite Ingots

    Netherite ingots don’t craft items directly. They upgrade diamond equipment.

    Uses for netherite ingots:

    • Upgrade diamond tools at the smithing table
    • Upgrade diamond armor at the smithing table
    • Craft lodestone (1 netherite ingot + 8 chiseled stone bricks)

    You cannot craft netherite tools or armor directly from ingots.

    The upgrade system preserves enchantments from diamond gear.

    How Many Netherite Ingots Do You Need

    Netherite ingot requirements chart showing 24 for armor and 11 for tools in Minecraft

    Full netherite armor set: 24 netherite ingots

    • Helmet: 5 ingots
    • Chestplate: 8 ingots
    • Leggings: 7 ingots
    • Boots: 4 ingots

    Complete tool set: 11 netherite ingots

    • Pickaxe: 3 ingots
    • Axe: 3 ingots
    • Shovel: 1 ingot
    • Hoe: 2 ingots
    • Sword: 2 ingots

    Total for everything: 35 netherite ingots minimum (140 ancient debris blocks)

    This assumes you already have diamond gear to upgrade.

    Finding Ancient Debris Efficiently

    Manual Nether mining at Y15 takes hours per ingot.

    OreFinder shows exact ancient debris locations using your world seed.

    Enter your seed and select the Nether dimension.

    The tool maps every ancient debris vein with precise coordinates.

    Navigate directly to debris-rich chunks instead of mining randomly.

    This cuts your mining time by 60-70% compared to blind strip mining.

    Upgrading Diamond Gear to Netherite

    Smithing table interface showing how to upgrade diamond pickaxe to netherite in Minecraft

    Requirements:

    • Smithing table (craft with 2 iron ingots + 4 planks)
    • Diamond item
    • 1 netherite ingot
    • Netherite upgrade smithing template (optional in 1.20+)

    Process:

    Place the smithing table and right-click it.

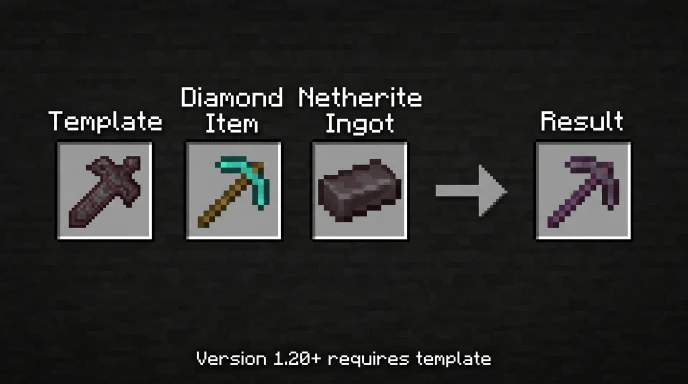
    In 1.19 and earlier: Put diamond item in first slot, netherite ingot in second slot.

    In 1.20+: Add netherite upgrade template, diamond item, then netherite ingot.

    The upgraded item keeps all enchantments, durability percentage, and custom names.

    Netherite vs Diamond Comparison

    PropertyDiamondNetheriteImprovement
    Durability1561 uses2031 uses+30%
    Mining SpeedFastFaster+8-12%
    Damage7 (sword)8 (sword)+1 damage
    Armor Points20 total20 totalSame
    Knockback Resistance0%10% per pieceUp to 40%
    Fire/Lava ImmunityNoYesMajor

    Netherite items float in lava and don’t burn. Diamond items are destroyed.

    This alone makes netherite worth the effort for hardcore players.

    Common Crafting Mistakes

    Trying to craft netherite tools directly

    You can’t craft netherite pickaxes or swords from scratch. You must upgrade the diamond gear.

    Wrong ingredient ratio

    The recipe always requires exactly 4 scraps and 4 gold. Using 3 of each doesn’t work.

    Forgetting the smithing template in 1.20+

    Netherite upgrade templates drop from bastion remnants. You need one per upgrade.

    Not using a blast furnace

    Regular furnaces work, but blast furnaces smelt ancient debris twice as fast.

    Getting Netherite Upgrade Templates

    From version 1.20 onward, you need netherite upgrade smithing templates.

    Where to find them:

    • Bastion remnants (Nether structures)
    • Treasure chest in the bastion treasure rooms
    • Bridge chest in bastion bridge sections

    Once you have one template, duplicate it using these materials:

    • 1 netherite upgrade template
    • 7 diamonds
    • 1 netherrack

    This creates 2 templates, allowing unlimited upgrades.

    Fastest Route to First Netherite Ingot

    Time estimate: 2-4 hours for experienced players

    1. Mine 4 ancient debris at Y15 in the Nether (1-2 hours)
    2. Gather 4 gold ore in Overworld or Nether (20-30 minutes)
    3. Smelt both materials (10-15 minutes)
    4. Craft the netherite ingot (instant)
    5. Find netherite upgrade template in bastion (30-60 minutes)
    6. Upgrade your first diamond item (instant)

    Use Ore Finder to skip the random mining and find ancient debris coordinates directly.

    FAQ

    How do you craft a netherite ingot in Minecraft?

    Place 4 netherite scraps and 4 gold ingots in a crafting table in any pattern. You get 1 netherite ingot as output. Netherite scraps come from smelting ancient debris found in the Nether at Y15. Gold ingots come from smelting gold ore or combining 9 gold nuggets.

    Can you craft netherite tools without diamonds?

    No. Netherite tools and armor cannot be crafted directly. You must first craft or obtain diamond gear, then upgrade it using netherite ingots at a smithing table. The upgrade system is the only way to create netherite equipment in survival mode.

    How many ancient debris do you need for one netherite ingot?

    You need 4 ancient debris blocks for one netherite ingot. Each ancient debris smelts into 1 netherite scrap. Four scraps plus 4 gold ingots craft 1 netherite ingot. For full armor and tools, you need 140 ancient debris blocks total.

    Where do you find netherite scraps in Minecraft?

    Netherite scraps don’t spawn naturally. You create them by smelting ancient debris in a furnace or blast furnace. Ancient debris spawns in the Nether between Y8 and Y119, with peak concentration at Y15. Each debris block produces 1 netherite scrap when smelted.

    Do you need a smithing template to craft netherite ingots?

    No. Smithing templates are only required for upgrading diamond items to netherite at the smithing table (in version 1.20+). Crafting the netherite ingot itself only needs 4 netherite scraps and 4 gold ingots in a crafting table, no template required.

    Start Crafting Netherite Ingots

    Netherite ingots require 4 netherite scraps and 4 gold ingots in a crafting table.

    The hardest part is finding ancient debris at Y15 in the Nether.

    Use Ore Finder to locate ancient debris coordinates in your world seed.
    Stop mining randomly and start crafting netherite ingots with exact debris locations.

  • How to Find the Closest Biomes in Minecraft: Nearest Biome Finder Guide

    How to Find the Closest Biomes in Minecraft: Nearest Biome Finder Guide

    Finding specific biomes near your base takes hours of random exploration.

    You need the fastest method to locate the two nearest biomes without wandering aimlessly.

    Quick Answer: How to Find the Closest Biomes in Minecraft

    Use /locate biome [biome_name] command to find the nearest biome of any type. Run the command twice with different biome names to find your two closest biomes.

    Alternatively, use a biome finder tool with your world seed for instant results.

    Understanding Biome Proximity in Minecraft

    Biomes generate based on temperature, humidity, and terrain algorithms.

    Some biomes naturally spawn next to each other. Others never border each other.

    Common biome neighbors:

    • Plains → Forest, Sunflower Plains
    • Desert → Savanna, Badlands
    • Ocean → Beach, any coastal biome
    • Taiga → Snowy Plains, Mountains
    • Jungle → Bamboo Jungle, Sparse Jungle

    Spawn points usually generate in temperate biomes like plains or forests.

    The two closest biomes depend entirely on your spawn location and world seed.
    Using /locate biome Command

    The locate command finds the nearest biome of a specific type.

    Enable cheats in world settings or when creating your world.

    Command format:

    /locate biome minecraft:[biome_name]

    Examples:

    /locate biome minecraft:jungle
    /locate biome minecraft:desert
    /locate biome minecraft:cherry_grove

    The command returns coordinates with distance in blocks.

    Click coordinates in chat to auto-generate a teleport command.

    Finding Your Two Nearest Biomes Step-by-Step

    Method 1: Using commands

    1. Note your current spawn coordinates (press F3 on Java or check coordinates on Bedrock)
    2. Run /locate the biome for your first target biome
    3. Write down the distance shown
    4. Run /locate the biome for your second target biome
    5. Compare distances to determine which two are closest

    Method 2: Manual exploration

    Enable coordinates and walk in each cardinal direction (north, south, east, west).

    Note which biomes you encounter first in each direction.

    The two with the shortest distances are your closest biomes.

    Method 3: Using OreFinder

    Enter your world seed at OreFinder.

    View the complete biome map showing all biomes around spawn.

    Identify the two nearest biomes visually without any commands or walking.

    Get exact coordinates for both biomes instantly.

    Common Biome Pairs Near Spawn

    Spawn BiomeTypical Nearest Biome 1Typical Nearest Biome 2
    PlainsForestRiver
    ForestPlainsBirch Forest
    DesertSavannaBadlands
    TaigaSnowy TaigaMountains
    SavannaPlainsAcacia Savanna
    OceanBeachCoastal biome

    These patterns repeat across most worlds but vary by seed.

    Biome Distance Calculation

    Minecraft measures biome distance in blocks from your current position.

    The /locate command shows the exact block count to the biome center.

    Distance examples:

    • “243 blocks away” = very close (2-3 minutes walking)
    • “1,847 blocks away” = medium distance (15-20 minutes walking)
    • “5,623 blocks away” = far (requires Nether travel or elytra)

    Closer than 500 blocks = easily accessible on foot.

    1000-3000 blocks = consider using Nether for 8x faster travel.

    Use the Nether Calculator to convert Overworld coordinates for portal placement.

    Why Finding Nearest Biomes Matters

    Different biomes provide unique resources unavailable elsewhere.

    Resource-specific biomes:

    • Jungle – bamboo, cocoa beans, pandas, parrots
    • Desert – sand, cacti, desert temples, suspicious sand
    • Mangrove Swamp – mangrove wood, mud blocks, frogs
    • Badlands – terracotta, gold ore (higher spawn rate)
    • Cherry Grove – cherry wood, pink petals

    Knowing the nearest biomes helps you plan efficient resource runs.

    Building near biome borders gives access to multiple resource types quickly.

    Complete List of Locatable Biomes

    Overworld biomes for /locate command:

    • minecraft:plains
    • minecraft:forest
    • minecraft:taiga
    • minecraft:swamp
    • minecraft:mangrove_swamp
    • minecraft:jungle
    • minecraft:desert
    • minecraft:savanna
    • minecraft:badlands
    • minecraft:mushroom_fields
    • minecraft:ice_spikes
    • minecraft:cherry_grove
    • minecraft:deep_dark
    • minecraft:meadow
    • minecraft:grove
    • minecraft:snowy_slopes

    This list works for Java and Bedrock editions.

    Finding Rare Biomes Near You

    Some biomes are extremely rare and might not exist within 10,000 blocks.

    Rare biomes:

    • Mushroom Fields
    • Ice Spikes
    • Bamboo Jungle
    • Eroded Badlands
    • Modified Jungle Edge (removed in 1.18+)

    Use /locate biome to check if rare biomes exist near spawn.

    If the command returns 15,000+ blocks, the biome is extremely distant.

    OreFinder shows whether rare biomes exist in your world at all.

    The tool maps the entire world, revealing if certain biomes generated or not.

    Biomes That Never Spawn Together

    Minecraft’s biome generation prevents certain combinations.

    Biomes that don’t border each other:

    • Ice Spikes + Jungle (opposite temperature zones)
    • Desert + Snowy Taiga (conflicting climates)
    • Mushroom Fields + any biome (always isolated by ocean)
    • Deep Dark + surface biomes (underground only)

    Understanding these rules helps you identify realistic biome searches.

    Using Coordinates to Track Biome Locations

    Write down coordinates when you find important biomes.

    Create a biome coordinate list:

    • Desert: X=450, Z=-230 (380 blocks from spawn)
    • Jungle: X=-890, Z=120 (920 blocks from spawn)
    • Mangrove: X=200, Z=600 (630 blocks from spawn)

    Use teleport commands to return to biomes instantly.

    Save these coordinates in a text file or notebook for quick reference.

    Common Mistakes When Finding Biomes

    Searching in wrong temperature zones wastes time.

    Looking for jungle in snowy areas never works. Biomes follow climate rules.

    Not using coordinates makes it impossible to track which direction you’ve searched.

    Exploring randomly without a plan covers less ground than systematic cardinal direction checks.

    Ignoring biome finder tools when you have your world seed available.

    Best Exploration Strategy for Multiple Biomes

    Start at spawn and check all four cardinal directions first.

    Walk 500 blocks north, note biomes. Return to spawn.

    Walk 500 blocks east, note biomes. Return to spawn.

    Repeat for south and west.

    This systematic approach covers a 1000×1000 block area around spawn efficiently.

    Mark explored areas with torches or pillars to avoid rechecking.

    FAQ

    How do you find the nearest biome in Minecraft?

    Use /locate biome minecraft:[biome_name] command with cheats enabled. The command returns coordinates and distance to the nearest instance of that biome. Click coordinates in chat to create a teleport command. Works on Java and Bedrock editions for all locatable biomes.

    What biomes spawn closest to plains?

    Forest, river, sunflower plains, and flower forest typically border plains biomes. Plains are temperate biomes that neighbor other temperate zones. Desert and savanna can border plains in transition zones. Snowy biomes and jungles never directly touch plains due to climate differences.

    Can you find two biomes at once in Minecraft?

    No single command finds multiple biomes simultaneously. Run /locate biome twice with different biome names to find two separate biomes. Compare returned distances to determine which are closest. Use biome finder tools like OreFinder to view all nearby biomes on one map instantly.

    How far apart are biomes in Minecraft?

    Biome size varies from 100 to 3000+ blocks. Small biomes like rivers span 50-100 blocks. Large biomes like oceans extend 5000+ blocks. The /locate command shows exact distance in blocks to each biome’s nearest point from your position.

    Do all biomes spawn in every Minecraft world?

    No. Rare biomes like mushroom fields, ice spikes, and bamboo jungle don’t generate in every seed. Common biomes like plains, forest, ocean, desert, and taiga appear in all worlds. Use OreFinder with your seed to check which biomes exist before searching.

    Find Your Nearest Biomes Fast

    The two closest biomes depend on your spawn point and world seed.
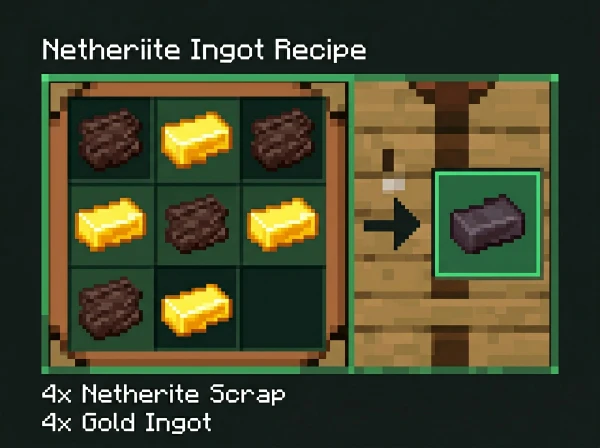
    Use /locate biome commands or systematic exploration to identify them.

    Stop wandering randomly and use OreFinder to see all nearby biomes instantly.

    Enter your seed, view the map, and navigate directly to any biome you need.