Blog

  • Minecraft Coal Level: Best Y Coordinates for Finding Coal Ore

    Minecraft Coal Level: Best Y Coordinates for Finding Coal Ore

    Coal is the most common ore in Minecraft, but mining at the wrong levels wastes time.

    You need to know exact spawn heights to maximize coal per hour.

    Quick Answer: What Level Does Coal Spawn in Minecraft?

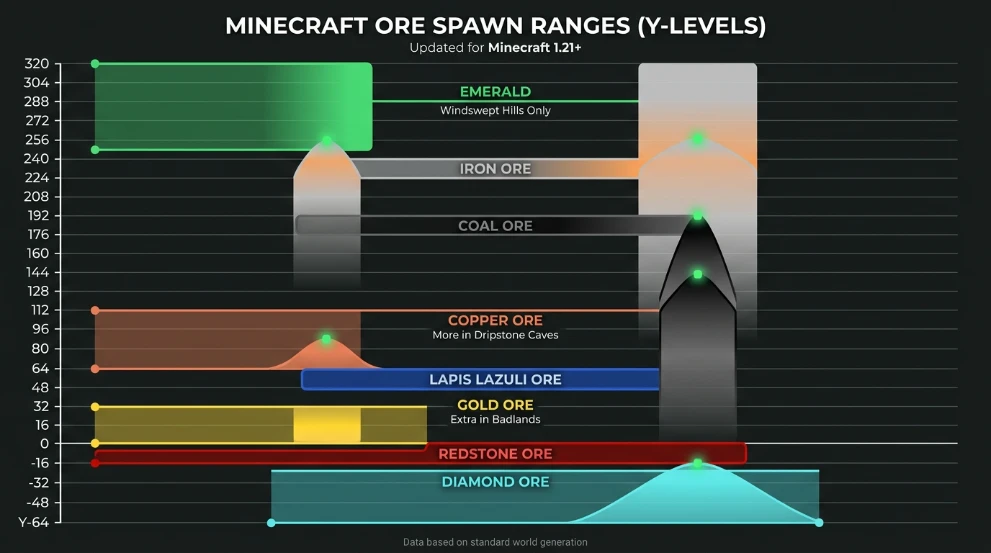
    Coal ore spawns from Y0 to Y256 in all biomes. The best Y level for coal is Y96, where coal generates at the highest concentration in the game.

    Surface mining and cave exploration at this height yield maximum coal.

    Understanding Coal Ore Distribution

    Coal uses a triangle distribution pattern centered at Y96.

    The spawn rate increases as you approach Y96 from above or below, then decreases as you move away.

    Coal generates more abundantly than any other ore in Minecraft. You’ll find it in massive veins throughout mountains and underground.

    Unlike diamonds or ancient debris, coal has an extremely wide spawn range across nearly all height levels.

    Complete Breakdown Of Coal Levels In MC

    Here’s the exact coal spawn data by height:

    Y-Level RangeCoal Spawn RateMining MethodNotes
    Y0 to Y50MediumCave miningBelow sea level
    Y50 to Y96IncreasingSurface/cave miningApproaching peak
    Y96HighestMountain miningOptimal level
    Y96 to Y136HighMountain miningStrong spawn rate
    Y136 to Y192DecreasingHigh altitude miningStill viable
    Y192 to Y256LowMountain peaks onlyReduced rate

    Coal appears in exposed cliff faces, making it the easiest ore to spot visually.

    Coal ore spawn distribution chart showing Y96 as optimal level in Minecraft

    Y Level for Coal: Why Y96 Works Best

    The triangle distribution algorithm peaks exactly at Y96.

    Mojang designed coal to spawn abundantly at higher elevations compared to other ores.

    Y96 sits at roughly mountain height in most terrain. You can surface mine instead of tunneling deep underground.

    Mining one level above or below Y96 reduces your coal finds by approximately 10-15%.

    Where Does Coal Spawn in Minecraft?

    Coal generates in all Overworld biomes without restrictions.

    Surface exposure: Coal veins often appear on cliff faces, mountainsides, and cave walls. This makes visual scanning effective.

    Underground generation: Coal spawns in stone below Y96 down to the bedrock level (Y-64 in current versions).

    Mountain biomes: Mountains naturally reach Y96-Y150, making them ideal for coal collection.

    Cave systems: Large caves at any height contain exposed coal veins on walls and ceilings.

    Plains, forests, deserts, and oceans have identical coal spawn rates at the same Y-levels.

    Best Mining Strategy for Coal

    Surface mining strategy for coal at Y96 in Minecraft mountain biome

    Mountain surface mining at Y96 is the fastest method.

    Find a mountain biome and mine horizontally at Y96. Coal veins expose themselves constantly.

    You don’t need to dig extensive tunnel networks. Just follow the mountain contours at the correct height.

    Cave exploration between Y50-Y136 also works well.

    Large cave systems expose thousands of blocks. Coal appears on every surface.

    Bring torches and explore thoroughly. You’ll collect stacks of coal in minutes.

    Strip mining is unnecessary for coal, unlike diamonds or ancient debris.

    Coal is so common that targeted mining wastes more time than simple exploration.

    How to Find Coal in Minecraft Efficiently?

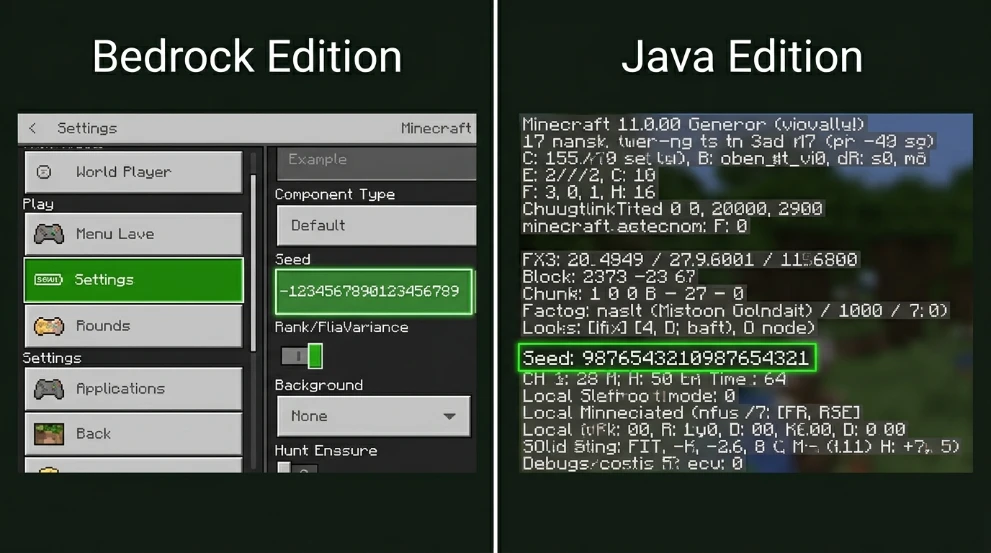
    Press F3 (Java Edition) to check your current Y-coordinate.

    Look for the Y value in the XYZ coordinates on the left side of the debug screen.

    On Bedrock Edition, enable “Show Coordinates” in world settings.

    Your Y position displays continuously at the top of the screen.

    Navigate to Y96 and begin mining or exploring at that exact height.

    Coal vs Other Ores: Spawn Comparison

    Coal is uniquely abundant compared to rare ores.

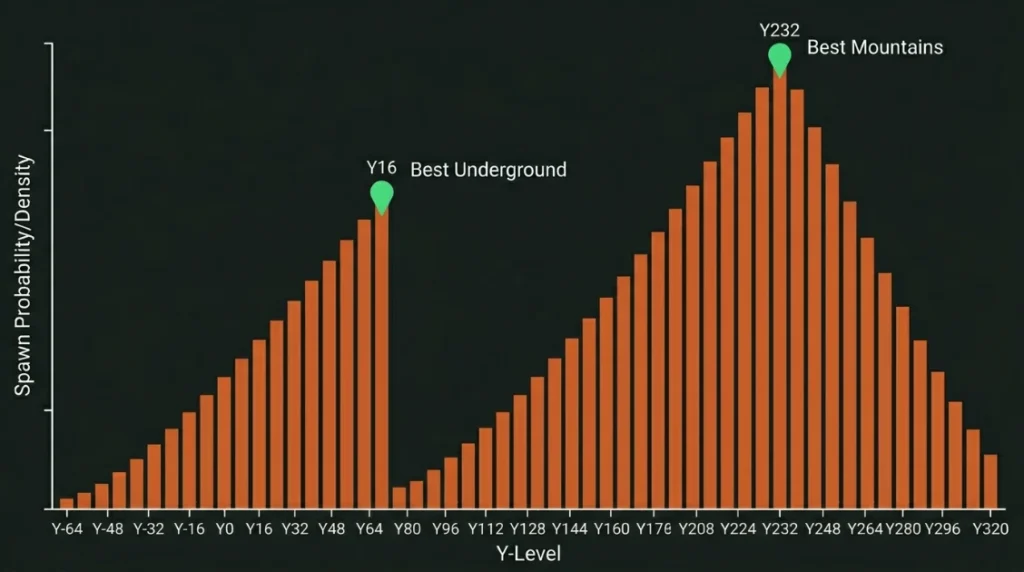
    Diamond peaks at Y-59 with very limited veins. Coal peaks at Y96 with massive veins everywhere.

    Iron has two peaks at Y16 and Y232. Coal has one clear peak at Y96 but spawns across 256 levels.

    Ancient debris only appears in the Nether. Coal is Overworld-exclusive and far more common.

    You’ll find 50-100x more coal than diamonds while mining at any level.

    Where Is Coal Most Common in Minecraft?

    Coal appears most frequently in exposed mountain ranges between Y80-Y120.

    The combination of high altitude and natural terrain exposure creates perfect conditions.

    Extreme hills biomes contain the most visible coal veins per chunk.

    Windswept hills and mountain peaks sit at ideal Y-levels naturally.

    Cave systems at Y96 provide the highest concentration if you prefer underground mining.

    Flat biomes like plains require digging up to Y96, reducing efficiency.

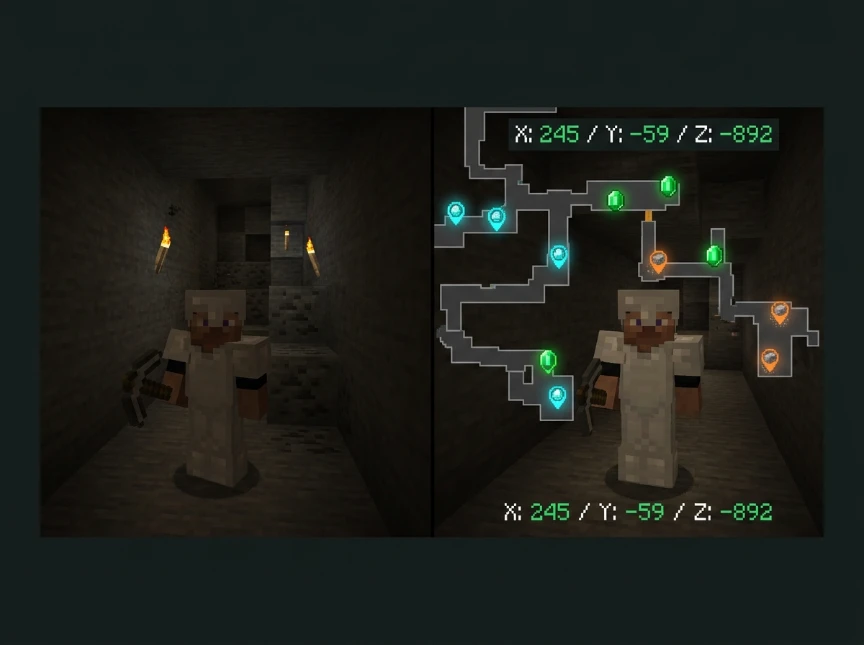
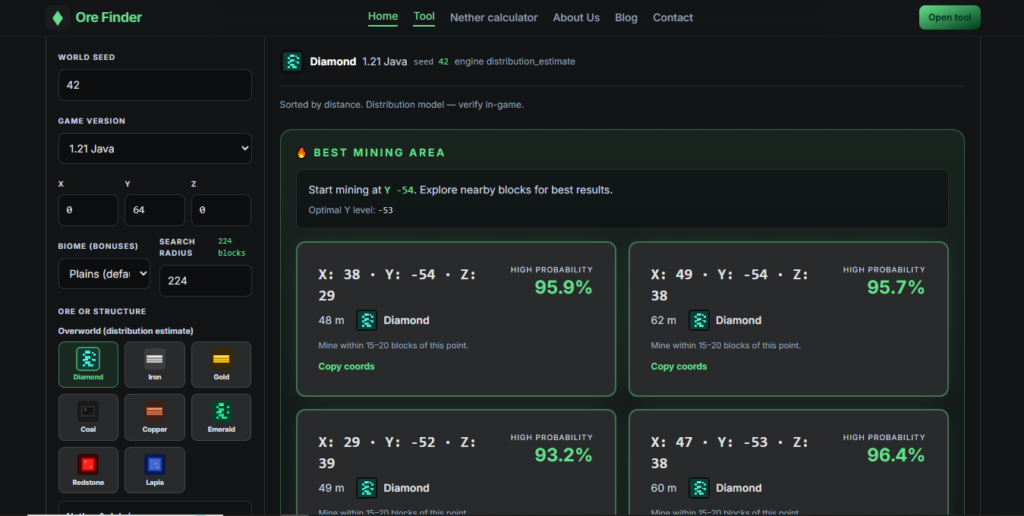
    Using Ore Finder for Coal Locations

    While coal is abundant, finding coal-rich chunks saves time on large projects.

    Ore Finder maps coal vein locations based on your world seed.

    Enter your seed to see an interactive map showing dense coal clusters.

    You can identify mountains with the highest coal concentration before traveling.

    This helps when you need thousands of coal for fuel or torch production.

    For players also gathering other ores during the same trip, check our guides on the best coordinates for iron and where to find diamonds.

    Coal Ore vs Deepslate Coal Ore

    Regular coal ore appears in stone above Y0.

    Deepslate coal ore generates in deepslate below Y0.

    Both drop the same coal item when mined. The only difference is visual and mining speed.

    Deepslate variants take slightly longer to break but give identical resources.

    Fortune Enchantment on Coal

    Fortune III enchantment effect on coal ore showing increased drops in Minecraft

    Fortune significantly increases coal drops from coal ore.

    No Fortune: 1 coal per ore block

    Fortune I: 1-2 coal per ore block

    Fortune II: 1-3 coal per ore block

    Fortune III: 1-4 coal per ore block

    Always use Fortune III when mining coal for maximum yield.

    A single coal ore can drop up to 4 coal with Fortune III, quadrupling your efficiency.

    How Much Coal Do You Actually Need?

    Early game: 20-40 coal for basic smelting and torches.

    Mid-game: 200-500 coal for extensive torch placement and furnace operations.

    Late game: 1000+ coal for beacon fuel, mass smelting, or decorative coal blocks.

    Automated farms and charcoal production will eventually reduce coal mining needs.

    Coal for Fuel vs Charcoal Alternative

    Coal ore mining provides direct fuel without processing.

    Charcoal requires smelting logs, which consumes fuel to create fuel.

    Coal is more efficient in the early game. Charcoal works better with tree farms later.

    Both burn for 80 seconds in furnaces. They’re functionally identical as fuel sources.

    Common Coal Mining Mistakes

    Mining below Y50 for coal reduces spawn rates compared to higher levels.

    Ignoring mountains and focusing only on caves misses the easiest surface coal.

    Not using Fortune III wastes 50-75% of the potential coal drops from each ore.

    Strip mining for coal is inefficient. The ore is too common to justify systematic tunneling.

    FAQ

    Does Fortune work on coal ore in Minecraft?

    Yes. Fortune enchantment increases coal drops significantly. Fortune III yields 1-4 coal per ore block instead of the base 1 coal. This makes Fortune III essential for efficient coal mining, potentially quadrupling your coal collection from the same veins.

    Can you find coal in all Minecraft biomes?

    Yes. Coal generates in every Overworld biome with identical spawn rates at the same Y-levels. Desert, forest, plains, ocean, and mountain biomes all contain coal from Y0 to Y256. Biome type doesn’t affect coal distribution, only terrain height matters.

    Mine Smart for Coal

    Coal spawns everywhere, but Y96 gives you maximum efficiency.

    Head to the mountains and mine at the optimal level for the fastest collection.

    Use Fortune III to multiply your coal drops from every ore block.

    Stop mining randomly and start targeting Y96 for the coal you actually need.

  • Best Free Ore Finder for Minecraft: Locate Emeralds, Diamonds & More

    Best Free Ore Finder for Minecraft: Locate Emeralds, Diamonds & More

    Finding specific ores in Minecraft takes hours of random mining.

    You need a reliable ore finder that shows exact coordinates without guessing.

    Quick Answer: Is There an Ore Finder in Minecraft?

    Vanilla Minecraft doesn’t have a built-in ore finder tool. However, seed-based ore finders like Ore Finder show exact ore locations by reading your world seed and displaying coordinates for emeralds, diamonds, iron, and ancient debris.

    These tools work for both Java and Bedrock editions.

    How Ore Finders Work in Minecraft

    Minecraft generates worlds using numerical seeds. Every seed creates an identical ore placement.

    Ore finder tools read your world seed and calculate where ores spawn using Minecraft’s generation algorithms.

    You get an interactive map showing exact X, Y, Z coordinates for every ore vein in your world.

    This works because ore generation is deterministic. The same seed always produces the same ore locations.

    Best Free Ore Finder for Minecraft Bedrock

    Ore finder tool interface showing diamond and emerald locations on Minecraft world map

    Ore Finder supports both Bedrock and Java editions with full ore mapping.

    Enter your world seed (found in world settings on Bedrock). The tool generates a complete ore distribution map.

    You can filter by ore type: diamonds, emeralds, iron, gold, coal, redstone, lapis, or ancient debris.

    Click any ore cluster to see the exact coordinates. Navigate directly to rich ore veins instead of mining randomly.

    Bedrock Edition works identically across mobile, console, Xbox, PlayStation, Switch, and Windows 10.

    Best Free Ore Finder for Minecraft Java

    Java Edition ore finders use the same seed-based mapping as Bedrock.

    Press F3 in Java to view your world seed. Copy it into an ore finder tool.

    The tool displays ore coordinates for your specific Java world generation.

    Java and Bedrock use different generation engines, so always specify your edition when using ore finders.

    OreFinder automatically detects your Minecraft version and applies the correct ore distribution algorithms.

    How to Get Ore Finding Tools in Minecraft

    You cannot install them as in-game mods or plugins in vanilla Minecraft.

    Other finders are external web tools or applications you use outside the game.

    Steps to use an ore finder:

    1. Find your world seed in game settings
    2. Enter the seed at OreFinder.io
    3. Select your Minecraft version (Java or Bedrock)
    4. Choose which ore type to locate
    5. View the interactive map with exact coordinates
    6. Write down coordinates and navigate in-game

    No mods, downloads, or installations required. Everything runs in your browser.

    Free Emerald Ore Finder for Minecraft

    Emeralds only spawn in mountain biomes at specific Y-levels.

    Finding them manually requires extensive mountain exploration and mining.

    An emerald ore finder shows every emerald vein location in mountain biomes across your world.

    Emerald spawn details:

    • Only generates in mountain, windswept hills, and grove biomes
    • Spawns from Y-32 to Y256
    • Peaks around Y224 in mountain peaks
    • Very rare compared to other ores

    Using OreFinder for emeralds saves hours of searching mountain ranges randomly.

    Filter the map to show only emerald ore. Navigate to coordinates with confirmed emerald veins.

    Ore Finder Support for Minecraft 1.20 and 1.21

    Ore distribution changed significantly in Minecraft 1.18 (Caves & Cliffs update).

    Older ore finders using pre-1.18 algorithms give wrong coordinates for current versions.

    OreFinder supports:

    • Minecraft 1.20 Bedrock Edition (all platforms)
    • Minecraft 1.21 Bedrock Edition (all platforms)
    • Minecraft 1.20+ Java Edition
    • Legacy versions with different ore distributions

    Always verify your ore finder supports your exact Minecraft version. Outdated tools send you to empty coordinates.

    What Ores Can You Find?

    Comprehensive ore finders map all major ores:

    Ore TypeY-Level RangePeak ConcentrationBiome Specific
    Diamond-64 to 16Y-59All biomes
    Emerald-16 to 256Y224Mountains only
    Iron-64 to 320Y16 & Y232All biomes
    Gold-64 to 32Y-16All biomes
    Copper-16 to 112Y48All biomes
    Lapis-64 to 64Y0All biomes
    Redstone-64 to 16Y-59All biomes
    Coal0 to 256Y96All biomes

    Ancient debris (netherite) works differently since it spawns in the Nether dimension at Y8-Y119.

    Complete ore spawn chart showing Y-levels for all Minecraft ores including diamonds and emeralds

    Using Coordinates from Ore Finders

    Ore finders give you three numbers: X (east/west), Y (height), Z (north/south).

    On Java Edition: Press F3 to see your current coordinates. Navigate until your XYZ matches the ore finder coordinates.

    On Bedrock Edition: Enable “Show Coordinates” in world settings. Your position displays at the top of the screen.

    Mine at the exact coordinates provided. Ore veins extend 2-8 blocks in any direction from the center point.

    Ore Finder vs Manual Mining Efficiency

    Random strip mining at optimal Y-levels finds ores eventually but wastes time.

    Ore finders eliminate guesswork by showing you exactly where rich ore veins exist.

    Time comparison:

    • Manual diamond mining: 2-4 hours for 20+ diamonds
    • Ore finder navigation: 20-40 minutes for 20+ diamonds
    • Manual emerald searching: 3-6 hours for 10 emeralds
    • Ore finder emerald locations: 30-60 minutes for 10 emeralds

    You spend less time mining and more time building or exploring.

    Do Ore Finders Work on Servers?

    Ore finders work on any world where you know the seed.

    Single-player worlds: You control the world and can always view the seed.

    Multiplayer servers: You need the seed from the server owner. Most public servers don’t share seeds to prevent Ore Finder usage.

    Realms: Realm owners can view and share the seed with players.

    Private servers with friends typically share seeds freely for collaborative mining.

    Ore Finder Limitations

    Ore finders show where ores generate at world creation, not their current state.

    If another player has already mined a vein, it won’t show as gone on the ore finder map.

    Ore regeneration doesn’t exist in vanilla Minecraft. Once mined, ore veins don’t respawn.

    Ore finders also can’t detect ores in already-generated chunks that were created with different world generation settings.

    Alternative to Ore Finders: Manual Mining

    If you can’t access your world seed, manual mining at optimal Y-levels works.

    Check our guides for the best coordinates:

    These manual methods take longer but work without seed access.

    FAQ

    Is there a free ore finder for Minecraft Bedrock Edition?

    Yes. OreFinder.io is completely free for Bedrock Edition across all platforms (mobile, Xbox, PlayStation, Switch, Windows 10). Enter your world seed to view ore locations. No downloads or payments required. Works for Minecraft 1.20 and 1.21 Bedrock versions with accurate ore coordinates.

    How do I find my world seed in Minecraft?

    How to find world seed in Minecraft Bedrock and Java Edition settings

    On Bedrock, open Settings > Game > scroll down to see your Seed number. On Java Edition, use the /seed command (requires cheats) or press F3 and look for the Seed line. Copy the entire number and paste it into an ore finder tool for coordinate mapping.

    Does the best ore finder work for Minecraft Java Edition?

    Yes. OreFinder supports both Java and Bedrock editions. Java Edition players can enter their world seed to view ore distributions. The tool uses version-specific generation algorithms to provide accurate coordinates for Java worlds. Works with Minecraft 1.18+,u including current versions.

    Can I use ore finders without mods or cheats?

    Yes. Ore finders are external web tools, not mods or cheats. They don’t modify your game or require downloads. You only need your world seed (visible in world settings without cheats on Bedrock, or with /seed on Java). Using ore finders doesn’t affect achievements or violate vanilla gameplay.

    What’s the best free ore finder for finding emeralds in Minecraft?

    OreFinder.io provides free emerald location mapping for both Java and Bedrock. Filter the ore map to show only emerald veins in mountain biomes. You get exact X, Y, Z coordinates for every emerald cluster in your world, eliminating hours of random mountain exploration and mining.

    Find Ores Faster with the Right Tools

    Vanilla Minecraft doesn’t include built-in ore finders.

    Seed-based ore mapping tools show exact coordinates for every ore type in your world.

    Stop mining randomly and start navigating directly to rich ore veins.

    Use Ore Finder to locate diamonds, emeralds, iron, and ancient debris in minutes instead of hours.

  • Y Coordinate for Netherite in Minecraft: Best Levels to Find Ancient Debris

    Y Coordinate for Netherite in Minecraft: Best Levels to Find Ancient Debris

    Ancient debris is called the rarest ore in Minecraft.

    Mining for it at random Nether levels is a waste of time.

    What Y Coordinate Is Netherite Found?

    Ancient debris usually spawns between Y8 & Y119 in the Nether. It is often smelted into the netherite scraps. For Netherite, the best coordinate is Y15 with a lot of ancient debris.

    Additionally, for deep Nether miners, there exists a secondary peak at Y-119.

    Understanding The Mechanics of the Ancient Debris Spawn Process

    You will not find ancient debris in the Overworld. Its only a thing of the Nether dimension.

    The ore has two distinct distribution patterns across different height ranges.

    Primary distribution: Ancient debris spawns between Y8 & Y22. Concentration is the highest at Y15. This range is known for the largest amount of ancient debris.

    Secondary distribution: Between Y8 and Y119, too, some quantity of it is generated. Thus, creating a bonus layer at lower levels around Y-119.

    For higher success rates, mine between Y8 and Y22.

    Best Cords for Netherite Mining

    Here’s the complete breakdown by Y-level:

    Y-Level RangeSpawn RateMining PriorityNotes
    Y8 to Y13Medium-HighGood optionAbove lava lakes
    Y15HighestBest levelOptimal strip mine
    Y15 to Y22HighExcellent rangePrimary spawn zone
    Y22 to Y119Very LowSkipWaste of time
    Y-119MediumSecondary optionDeep Nether mining

    Mine at Y15. It gives you the most exposure to ancient debris per hour of mining.

    Ancient debris spawn distribution chart showing Y15 as best coordinate in Nether

    The 8-block range from Y13 to Y21 contains over 90% of all ancient debris in the Nether.

    Why Y15 Specifically for Ancient Debris?

    The primary distribution blob peaks exactly at Y15.

    For some predictability, ancient debris is designed with concentrated spawn zones. Additionally, Y15 is high enough to avoid lava lakes but low enough to have peak spawn rates.

    Be aware that mining even one or two levels above or below Y15 reduces ancient debris by 15-20%.

    Checking Your Y Coordinate in the Nether

    Press F3 (Java Edition) to view coordinates. The Y value appears in the XYZ line.

    On Bedrock Edition, enable “Show Coordinates” in world settings before entering the Nether.

    Your Y coordinate displays at the top of the screen continuously.

    The Nether uses the same Y-level system as the Overworld. Y15 in the Nether equals Y15 in coordinate terms.

    Strip Mining Strategy at Y15

    Strip mining pattern at Y15 for efficient ancient debris and netherite farming

    Dig a portal in the Overworld and enter the Nether. Use our Nether Calculator to convert Overworld coordinates and plan portal placement.

    Once in the Nether, dig down or build up to exactly Y15.

    Create a main tunnel at Y15 extending 200+ blocks in one direction.

    Every 3-4 blocks, dig perpendicular branch tunnels extending 20-30 blocks on each side.

    Ancient debris generates in small veins of 1-3 blocks. Spacing tunnels 3-4 blocks apart prevents missing veins.

    Light your tunnels minimally. Netherrack doesn’t spawn hostile mobs, so excessive torches waste inventory.

    Bed Mining Method for Ancient Debris

    Bed explosions instantly expose large areas around Y15.

    Bed mining explosion technique for finding ancient debris in Minecraft Nether

    Place a bed at the end of your tunnel. Right-click the bed to trigger an explosion.

    The blast reveals hidden ancient debris in the surrounding blocks.

    Dig 2-3 blocks forward, place another bed, and repeat.

    This method is faster than manual mining but requires wool and wood to craft beds continuously.

    Always leave 1-2 blocks between you and the bed before clicking. The explosion deals massive damage.

    TNT Mining Alternative

    TNT works similarly to beds but requires more resources.

    Place TNT, light it, and retreat. The explosion exposes ancient debris in a radius.

    TNT is less resource-efficient than beds for most players.

    Use TNT only if you have a creeper farm or excess gunpowder stockpiles.

    Common Netherite Mining Mistakes

    Mining above Y22 drastically reduces the number of ancient debris finds. The primary spawn zone ends here.

    Random branch mining at Y60 or Y80 wastes time with minimal results.

    Not bringing fire resistance potions causes deaths from lava exposure. Always carry multiple potions.

    Breaking ancient debris with a wooden or stone pickaxe destroys it. You need a diamond or netherite pickaxe minimum.

    Forgetting to bring building blocks traps you when you break into lava pockets.

    Lava Lake Considerations

    Massive lava lakes generate at Y31 and below in the Nether.

    Mining at Y15 puts you below most major lava lakes but above the lava ocean at Y10 and lower.

    Always carry a fire resistance potion when mining near Y8-Y10.

    Placing blocks quickly to seal lava breaches saves your life more than any armor.

    How Much Ancient Debris for Full Netherite?

    Full netherite armor requires 24 netherite ingots total.

    Each netherite ingot needs 4 netherite scraps plus 4 gold ingots.

    You need 96 netherite scraps for full armor, which means 96 ancient debris blocks minimum.

    Add tools, and you’re looking at 120-150 ancient debris total for a complete netherite loadout.

    At Y15, expect to find 1-2 ancient debris per 200-300 blocks mined.

    Using Ore Finder for Ancient Debris Locations

    Manual strip mining at Y15 works but takes dozens of hours.

    Ore Finder shows exact ancient debris locations in your Nether based on your world seed.

    Enter your seed and dimension (Nether). The tool maps every ancient debris vein with precise coordinates.

    You can navigate directly to debris-rich chunks instead of mining randomly.

    This cuts your mining time by 60-70% compared to blind exploration.

    Nether vs Overworld Coordinate Conversion

    One block in the Nether equals eight blocks in the Overworld horizontally.

    If you find ancient debris at Nether coordinates X100, Z200, the equivalent Overworld position is X800, Z1600.

    Y-levels remain identical between dimensions. Y15 in the Nether is still Y15 in coordinate terms.

    Use the Nether Calculator to convert coordinates when planning portal networks near debris-rich zones.

    Biome-Specific Ancient Debris Generation

    Ancient debris spawns identically across all Nether biomes.

    Crimson forest, warped forest, basalt deltas, and soul sand valleys have the same debris rates.

    Basalt deltas have more difficult terrain but identical ore distribution at Y15.

    Choose biomes based on mining ease, not ore concentration.

    Fortune Enchantment on Ancient Debris

    Fortune does not affect ancient debris drops.

    Each block drops exactly one ancient debris regardless of enchantments.

    Save Fortune pickaxes for Overworld ores. Use any diamond pickaxe for debris mining.

    Efficiency V helps mining speed but doesn’t increase drops.

    FAQ

    What is the best Y coordinate for netherite in Minecraft?

    Y15 is the best coordinate for finding ancient debris, which becomes netherite. Ancient debris spawns mostly at Y15 in the Nether dimension. Mining at this level exposes maximum debris veins per hour. A secondary concentration exists at Y-119 for deep miners.

    What are the best cords for netherite mining?

    Mine between Y8 and Y22 with Y15 as the optimal level. This range contains over 90% of ancient debris in the Nether. Strip mine horizontally at Y15 with branch tunnels every 3-4 blocks for maximum efficiency and debris exposure.

    Does ancient debris spawn at all Y-levels in the Nether?

    No. Ancient debris only spawns between Y8 and Y119. The primary concentration is Y8 to Y22, peaking at Y15. A small secondary distribution exists uniformly from Y8 to Y119. Mining above Y22 yields extremely low debris rates.

    Can you use Fortune on ancient debris?

    Fortune enchantment does not work on ancient debris. Each block drops exactly one ancient debris regardless of pickaxe enchantments. You need a diamond or netherite pickaxe to mine it. Efficiency enchantment speeds mining but doesn’t increase drops.

    How many ancient debris do you need for full netherite armor?

    You need 24 netherite ingots for full armor (helmet, chestplate, leggings, boots). Each ingot requires 4 netherite scraps from ancient debris. This means 96 ancient debris blocks minimum for armor alone. Add tools and weapons for 120-150 total debris needed.

    Start Mining at Y15

    Ancient debris only spawns in the Nether at specific coordinates.

    Y15 gives you the highest debris concentration in the game.

    Stop wasting time at random heights and mine where netherite actually generates.

    Use Ore Finder to locate debris-rich chunks and start upgrading to netherite gear faster.

  • Best Coordinates for Diamonds in Minecraft 1.20 Bedrock Edition

    Best Coordinates for Diamonds in Minecraft 1.20 Bedrock Edition

    Bedrock Edition has different coordinate displays and mechanics than Java.

    Finding the right Y-level for diamonds matters even more in 1.20 Bedrock.

    Quick Answer: Best Diamond Coordinates in 1.20 Bedrock

    The best coordinates for diamonds in Minecraft 1.20 Bedrock Edition are Y-59. Diamonds spawn from Y-64 to Y16, but Y-59 has the highest concentration in all Bedrock worlds.

    This coordinate works identically across all Bedrock platforms: mobile, console, and Windows 10.

    How 1.20 Bedrock Diamond Generation Works

    Minecraft 1.20 Bedrock uses the same ore distribution as Java Edition for diamonds.

    Diamonds generate in two blob patterns per chunk. The first spreads thinly from Y16 down to Y-64.

    The second blob concentrates between Y-64 and Y-54, with Y-59 as the absolute peak.

    Unlike older versions, mining at Y-11 no longer works efficiently. That changed in the 1.18 Caves & Cliffs update.

    Bedrock vs Java Coordinate Differences

    Bedrock Edition shows coordinates differently from Java Edition.

    On Bedrock, you see X / Y / Z at the top of your screen when coordinates are enabled.

    The Y value is always in the middle. This is your vertical position, which determines diamond spawn rates.

    Java Edition requires pressing F3 to see coordinates. Bedrock displays them permanently once enabled in settings.

    Both editions have identical diamond spawn mechanics at the same Y-levels.

    Exact Diamond Spawn Distribution in 1.20

    Here’s the complete breakdown for Bedrock Edition 1.20:

    Y-Level RangeDiamond Spawn RateMining PriorityNotes
    Y16 to Y8Very LowSkipWaste of time
    Y8 to Y0LowBackup optionBelow old meta
    Y0 to Y-16MediumDecentDeepslate starts
    Y-16 to Y-54HighGood rangeIncreasing rate
    Y-59HighestBest levelOptimal strip mine
    Y-60 to Y-64Very HighExcellentSlightly below peak

    Mining anywhere from Y-64 to Y-54 gives you good results. Y-59 is simply the statistical best.

    How to Enable Coordinates on Bedrock

    You need coordinates visible to mine at the correct Y-level.

    How to read Y-coordinate on Minecraft Bedrock Edition for diamond mining

    For new worlds: Toggle “Show Coordinates” ON when creating the world. This setting appears in the game options before world generation.

    For existing worlds without cheats: You cannot enable coordinates without activating cheats. Enable cheats in world settings, which disables achievements permanently.

    For existing worlds with cheats: Open settings, go to Game, and toggle “Show Coordinates” to ON.

    Once enabled, your coordinates display at the top-left corner of your screen constantly.

    Strip Mining Strategy for Y-59 Bedrock

    Optimal strip mining pattern at Y-59 for Bedrock Edition diamond mining

    Dig down to exactly Y-59 using a staircase or water bucket method.

    Check your Y coordinate frequently while descending. Stop when it shows 59.

    Create a main tunnel going in one cardinal direction (north, south, east, or west).

    Every 2-3 blocks, dig a perpendicular branch tunnel extending 50+ blocks.

    This spacing prevents missing diamond veins while avoiding wasted overlap.

    Light every tunnel with torches to prevent mob spawns.

    Bedrock-Specific Mining Tips

    Lava appears more frequently in Bedrock Edition than Java at lower levels.

    Always carry a water bucket. Pour water on lava before mining near it.

    Ore generation is identical across all Bedrock platforms. Pocket Edition, Xbox, PlayStation, Switch, and Windows 10 all use the same seed algorithm.

    Render distance affects performance while mining. Lower it if you experience lag in deep caves.

    Mob spawning feels more aggressive in Bedrock. Light your tunnels thoroughly and carry food for health regeneration.

    Common Bedrock Diamond Mining Mistakes

    Mining at Y-11 or Y-12 is outdated. Those coordinates were optimal before version 1.18.

    Not checking coordinates while mining causes you to drift away from Y-59 into less productive levels.

    Breaking diamond ore without Fortune III gives you only one diamond per ore. Fortune III can yield up to four diamonds per block.

    Mining in random caves below Y16 works but lacks the efficiency of systematic strip mining.

    Ignoring deepslate increases mining time. Deepslate appears below Y0 and takes longer to break than regular stone.

    Why Y-59 Specifically?

    The ore distribution algorithm peaks at Y-59 for diamond concentration.

    Mojang designed the system with a triangle distribution. Spawn rates increase as you approach Y-59 from above or below.

    Y-58, Y-60, or Y-61 work almost as well. But Y-59 gives you the mathematically highest chance.

    One Y-level difference seems minor, but over hundreds of blocks mined, it adds up to 10-15% more diamonds found.

    Using OreFinder.io for Bedrock Seeds

    Manual strip mining at Y-59 works but takes hours to find significant diamonds.

    OreFinder supports Bedrock Edition seeds and shows exact diamond vein locations.

    Enter your Bedrock world seed (found in world settings). The tool generates an interactive map showing every diamond ore cluster.

    You get precise X, Y, Z coordinates for each vein. Navigate directly to diamond-rich chunks instead of mining blind.

    This works across all Bedrock platforms since seeds generate identically.

    Bedrock Seed Parity with Java

    Coordinate display comparison between Bedrock and Java Edition Minecraft

    Bedrock and Java Editions use different world generation engines.

    The same numerical seed produces completely different worlds between editions.

    A Java seed entered into Bedrock creates a different world layout with different ore locations.

    Always use Bedrock-specific tools or specify your edition when looking up seed information.

    Fortune Enchantment on Bedrock

    Fortune III is essential for maximizing diamond yield in Bedrock Edition.

    Each diamond ore block drops 1 diamond normally. Fortune III increases this to 1-4 diamonds per block.

    On average, Fortune III gives you 2.2 diamonds per ore block. That’s more than double the base rate.

    Prioritize enchanting your pickaxe with Fortune III before serious diamond mining sessions.

    FAQ

    What is the best Y-level for diamonds in Minecraft Bedrock 1.20?

    Y-59 is the best Y-level for diamonds in Minecraft Bedrock Edition 1.20. This coordinate has the highest diamond spawn concentration across all Bedrock platforms, including mobile, console, and Windows 10. Strip mine at Y-59 for maximum efficiency and diamond yield per hour.

    Do Bedrock and Java have the same diamond coordinates?

    Yes, both editions have identical diamond spawn mechanics at the same Y-levels. Y-59 is optimal for both Bedrock and Java Edition. However, the same seed number generates completely different worlds between editions, so ore locations differ even though spawn rates match.

    How do I check my coordinates in Bedrock Edition?

    Enable “Show Coordinates” in world settings before or during world creation. For existing worlds, you must activate cheats to enable coordinates, which permanently disables achievements. Once enabled, coordinates display at the top-left corner showing X / Y / Z format continuously.

    Does diamond spawn rate differ between Bedrock platforms?

    No. Diamond spawn rates are identical across all Bedrock platforms: Pocket Edition (mobile), Xbox, PlayStation, Nintendo Switch, and Windows 10. A seed generates the same world with identical ore placement across every Bedrock platform. Y-59 works equally well on all devices.

    Is strip mining at Y-59 better than cave exploration in Bedrock?

    Strip mining at Y-59 is more efficient than random cave exploration. Systematic branch mining exposes more blocks per hour at optimal depth. Cave exploration works but produces inconsistent results depending on cave generation. Strip mining guarantees exposure to high-concentration diamond zones.

    Mine Smart, Not Hard

    Y-59 is the only coordinate you need to remember for Bedrock diamonds.

    Enable coordinates, dig to Y-59, and strip mine systematically.

    Use OreFinder to skip the grind and go straight to diamond-rich chunks in your seed.

    Stop wasting time at outdated Y-levels and start mining where diamonds actually spawn.

  • Where Is Iron Found In Minecraft: Best Y Coordinates

    Where Is Iron Found In Minecraft: Best Y Coordinates

    Iron ore spawns at nearly every height level in Minecraft.

    But mining randomly means you’re finding 50% less iron than you could.

    Quick Answer: What Coordinates Is Iron in Minecraft?

    Iron spawns from Y-64 to Y320. The best Y coordinate for iron is Y232 in mountains (highest rate overall) or Y16 underground (best for strip mining in any biome).

    These two levels have the highest iron concentration in the game.

    What Are The Common Distribution Patterns?

    Iron generates in three distinct patterns across different height ranges.

    Iron ore spawn distribution chart by Y-level showing peaks at Y16 and Y232

    Underground Distribution (Y-64 to Y72): Iron spawns with a triangle distribution peaking at Y16. The closer you get to Y16 from above or below, the more iron appears.

    Mountain Distribution (Y72 to Y320): Iron increases as you climb higher, peaking at Y232. This works only in mountain, hill, and windswept biomes.

    Baseline Distribution: A small amount of iron spawns evenly from Y-64 to Y72. This ensures a consistent minimum regardless of height.

    Here’s the complete breakdown:

    Y-LevelIron Spawn RateMining MethodBiome Requirement
    Y-64 to Y-16IncreasingDeep strip miningAny biome
    Y16Highest (underground)Strip miningAny biome
    Y16 to Y72DecreasingCave miningAny biome
    Y72 to Y232IncreasingMountain miningMountains/hills only
    Y232Highest (overall)Surface miningMountains/hills only
    Y232 to Y320DecreasingHigh altitudeMountains/hills only

    Best Cords for Iron: Y16 vs Y232

    Y16 is the best coordinate for underground iron mining.

    This level works in every biome. You’ll find consistent iron veins every few blocks.

    Dig straight tunnels at Y16. Branch off every 4 blocks to maximize coverage.

    Y232 is the absolute best for iron if you’re in the mountains.

    Find a mountain biome and mine horizontally at this height. Iron veins appear constantly.

    You can often see iron exposed on cliff faces, making it even faster.

    How to Check Your Y Coordinate

    Press F3 (Java Edition) to see your coordinates on screen.

    Look for the “XYZ” line. The middle number is your Y coordinate.

    On Bedrock Edition, enable “Show Coordinates” in settings before creating your world.

    Your Y position appears at the top of the screen while playing.

    Strip Mining for Iron at Y16

    Strip mining pattern at Y16 for maximum iron ore efficiency in Minecraft

    Create a central tunnel at exactly Y16 going in one direction.

    Every 4 blocks, dig a perpendicular branch tunnel extending 50-100 blocks.

    Iron veins are 2-9 blocks in size, so 4-block spacing prevents wasted overlap.

    Light your tunnels with torches every 8 blocks to prevent mob spawns.

    Mark your main tunnel clearly so you don’t get lost in the branch network.

    Mountain Mining for Iron at Y232

    Comparison of iron mining at Y16 underground versus Y232 in mountains

    Locate a mountain or extreme hills biome first.

    Build or dig to Y232 on the mountain face.

    Mine horizontally through the mountain at this exact height.

    You’ll expose iron ore constantly. Many veins are visible without mining.

    This method is faster than underground mining but requires the right biome.

    Common Mistakes That Reduce Iron Yield

    Mining at Y64 is outdated advice from pre-1.18 versions. Don’t use old guides.

    Random cave exploration finds some iron but lacks the efficiency of targeted strip mining.

    Mining above Y232 or below Y-16 drastically reduces iron spawn rates.

    Not tracking your Y coordinate means you drift away from optimal levels.

    Spacing branch tunnels 2 blocks apart wastes time. Iron veins are large enough for 4-block spacing.

    What Tools Do You Need for Iron Mining

    A stone pickaxe is a minimum. Wooden or gold pickaxes break iron but don’t drop it.

    An iron or diamond pickaxe is recommended. These mine faster and last longer.

    Efficiency enchantment speeds up mining. Efficiency III or higher makes a noticeable difference.

    Fortune enchantment doesn’t affect iron ore. It drops raw iron either way.

    Iron Ore vs Deepslate Iron Ore

    Regular iron ore appears in stone above Y0.

    Deepslate iron ore generates in deepslate below Y0.

    Both drop the same raw iron when mined. The only difference is appearance and mining speed.

    Deepslate variants take slightly longer to break but give identical resources.

    Does Biome Affect Iron Spawn?

    Underground iron (Y16 peak) spawns identically in all biomes.

    Desert, forest, ocean, plains, or taiga make no difference below ground.

    Mountain iron (Y232 peak) only works in mountain, hill, and windswept biomes.

    Flat biomes like plains won’t have the Y232 iron bonus.

    Using Coordinates to Plan Iron Runs

    OreFinder shows exact iron vein locations in your world seed.

    Enter your seed and select iron ore. You see every iron deposit on an interactive map.

    This reveals which chunks have dense iron concentration before you start mining.

    You can identify iron-rich mountains or underground areas and mine there first.

    If you need to reach distant iron-rich zones quickly, use Nether Calculator for coords conversion. It converts Overworld coordinates to Nether coordinates for 8x faster travel.

    How the 1.18 Update Changed Iron

    Pre-1.18 iron spawned most commonly around Y64 in a simple distribution.

    The Caves & Cliffs update introduced triangle distributions with two separate peaks.

    Old mining strategies no longer work efficiently in current versions.

    Always check which Minecraft version you’re playing before following mining guides.

    How Much Iron You’ll Need

    Early game: 15-30 iron for basic tools, armor, and a shield.

    Mid-game: 100-200 iron for anvils, buckets, hoppers, and rails.

    Late game: 1000+ iron for iron blocks, beacons, and automated farm components.

    Iron farms provide infinite iron but require significant redstone knowledge and resources.

    Manual mining at optimal coordinates works perfectly for most players.

    FAQ

    What is the best Y coordinate for iron in Minecraft?

    Y16 is the best coordinate for underground iron mining in any biome. For mountain biomes, Y232 offers even higher iron spawn rates. Both coordinates provide significantly more iron than other levels. Strip mine at Y16 for consistent results regardless of location.

    What coordinates is iron in Minecraft?

    Iron spawns from Y-64 to Y320 across all heights. The highest concentrations appear at Y16 (underground peak) and Y232 (mountain peak). Iron is generated in every biome but follows different distribution patterns based on height. Mining between Y10 and Y20 gives consistent underground results.

    Where is iron found most commonly?

    Iron is found most commonly at Y232 in mountain biomes and at Y16 in underground areas. These two coordinates have the highest iron spawn rates in the game. Y232 requires mountains or hills, while Y16 works anywhere. Both levels contain 2-3x more iron than random mining.

    What are the best cords for iron mining?

    The best cords for iron are Y16 for underground mining and Y232 for mountain mining. Y16 works in every biome and provides excellent iron rates below ground. Y232 only functions in mountainous terrain but offers the absolute highest spawn rate. Choose based on your biome.

    Does Fortune work on iron ore in Minecraft?

    Fortune enchantment does not affect iron ore drops. Iron ore always drops one raw iron regardless of enchantments. Fortune works on coal, diamond, emerald, lapis, and redstone ores, but not iron. Use Efficiency instead to mine iron faster, rather than Fortune for more drops.

    Final Tips

    Iron spawns everywhere, but smart miners target Y16 or Y232.

    Stop wasting time at Y64 or random cave levels.

    Use coordinates to stay at optimal heights while strip mining.

    Check your world seed with OreFinder to find the richest iron deposits before you start.

    Mine efficiently, and you’ll never run out of iron again.

  • Where to Find Diamonds in Minecraft: Best Levels, Coordinates & Fast Methods

    Where to Find Diamonds in Minecraft: Best Levels, Coordinates & Fast Methods

    Looking for diamonds but keep mining in the wrong spots?

    You’re wasting time if you don’t know the exact levels where diamonds spawn.

    Quick Answer: Where Are Diamonds in Minecraft?

    Diamonds spawn between Y-levels -64 and 16 in the Overworld. The best level to mine for diamonds is Y-level -59, where diamond ore concentration is highest.

    Strip mining at this level gives you the most diamonds per hour.

    Diamond Spawn Levels and Distribution

    Diamonds don’t spawn evenly across all depths.

    They generate in two separate blobs per chunk. The first blob spawns between Y-16 and Y-64 (with reduced frequency). The second blob spawns from Y-63 down to the bedrock layer at Y-64.

    The sweet spot is between Y-64 and Y-54.

    Mining higher than Y-16 or in mountain biomes won’t give you diamonds. Caves above sea level are a complete waste of time if you’re hunting diamonds.

    Here’s the breakdown by level:

    Y-Level RangeDiamond Spawn RateMining Strategy
    Y-16 to Y-0LowAvoid this range
    Y-0 to Y-15MediumBackup option
    Y-16 to Y-54DecreasingStill viable
    Y-59HighestBest level overall
    Y-64 to Y-60Very HighGood range

    How to Check Your Current Y-Level

    Press F3 on Java Edition to open the debug screen.

    How to read Y-level coordinates on Minecraft F3 debug screen

    Look for the “XYZ” coordinates on the left side. The middle number is your Y-level.

    On Bedrock Edition, enable “Show Coordinates” in world settings. Your Y-level appears on screen at all times.

    If you’re already deep underground, dig down carefully until you hit Y-59.

    Best Mining Methods for Finding Diamonds

    Efficient strip mining pattern for finding diamonds in Minecraft at Y-59

    Strip Mining at Y-59 is the most efficient method.

    Dig a main tunnel at Y-59, then create side tunnels every 2-3 blocks. This exposes the most blocks while avoiding overlap.

    Mine in straight lines. Don’t dig randomly.

    Cave Exploration works if you find a deep cave system below Y-16. You’ll cover more ground faster, but it’s less predictable than strip mining.

    Bring torches and mark your path. Deep caves connect to lava lakes and ancient cities.

    Branch Mining is similar to strip mining but uses a central hub with branches going in all directions. Less efficient than strip mining but easier to navigate.

    Avoid mining at Y-11 like old guides suggest. That was for pre-1.18 versions. Diamond distribution changed completely in the Caves & Cliffs update.

    Common Mistakes That Waste Time

    Mining too high is the biggest error. If you’re above Y-16, you won’t find any diamonds.

    Random digging doesn’t work. You need a systematic approach to expose enough blocks.

    Ignoring lava is dangerous but avoidable. Keep water buckets in your hotbar. Pour water on lava before mining near it.

    Not using Fortune III on your pickaxe means fewer diamonds per ore. A Fortune III pickaxe can give you up to 4 diamonds from a single ore block.

    What You Need Before Mining

    Essential items checklist for diamond mining in Minecraft

    Bring multiple iron or diamond pickaxes. Stone pickaxes won’t work on diamond ore.

    Pack at least 64 torches to light your tunnels and prevent mob spawns.

    Carry food (cooked meat or golden carrots work best) to restore hunger.

    Bring a water bucket for lava and a shield for unexpected creepers.

    Optional but helpful: Potion of Night Vision makes mining easier without placing torches everywhere.

    Use OreFinder to Locate Diamonds Faster

    Manually checking every cave and tunnel takes hours.

    OreFinder shows you exactly where diamond ore generates in your world. Enter your seed and get instant ore locations, cave systems, and optimal mining coordinates.

    This saves you from digging in the wrong places or missing diamond-rich areas.

    If you’re planning a Nether mining trip after collecting diamonds, use the Nether Calculator to convert your Overworld coordinates. One block in the Nether equals eight in the Overworld, so you can build portals exactly where you need them.

    Biomes Don’t Affect Diamond Spawns

    Diamonds spawn the same in every Overworld biome.

    Desert, forest, ocean, or mountain—it doesn’t matter. The Y-level determines spawn rates, not the biome.

    Deep dark biomes have the same diamond distribution as everywhere else. You’re just more likely to trigger a Warden while mining there.

    FAQ

    What is the best Y-level to find diamonds in Minecraft?

    Y-level -59 has the highest diamond concentration. Strip mine at this level for maximum efficiency. Diamonds spawn from Y-64 to Y16, but -59 gives you the best results per hour spent mining.

    Can you find diamonds above ground in Minecraft?

    No. Diamonds only generate below Y-level 16. Surface mining in mountains or extreme hills won’t produce any diamonds. You must dig deep underground to reach diamond ore layers.

    How many diamonds do you need for full armor and tools?

    You need 24 diamonds total: 5 for a helmet, 8 for a chestplate, 7 for leggings, 4 for boots, 3 for a pickaxe, 3 for an axe, 2 for a sword, and 2 for a shovel. A full set of armor and tools requires 24 diamonds minimum.

    Do diamonds spawn near lava in Minecraft?

    Diamonds don’t spawn more frequently near lava. However, lava pools are common at lower Y-levels where diamonds also generate. This creates the illusion of a connection. Always mine cautiously around lava to avoid losing your diamonds.

    What’s the fastest way to get diamonds in Minecraft?

    Strip mining at Y-59 with a Fortune III pickaxe is the fastest method. Create a main tunnel and branch tunnels every 2-3 blocks. This systematic approach exposes the most diamond ore in the shortest time.

    Final Tips

    Diamonds spawn deep. Get to Y-59 and mine systematically.

    Don’t waste time on outdated guides that recommend Y-11. The game changed.

    Use Fortune III to maximize your haul. Each ore can drop up to 4 diamonds instead of one.

    Check your coordinates often and stick to the optimal range.

    Start mining and upgrade your gear faster than everyone else on your server.

  • How to Find Suspicious Sand in Minecraft: Locations & Brush Guide

    How to Find Suspicious Sand in Minecraft: Locations & Brush Guide

    Suspicious sand looks identical to regular sand but hides rare loot inside.

    You’ll walk right past it unless you know exactly where to look.

    Quick Answer: Where Is Suspicious Sand in Minecraft?

    Suspicious sand spawns in desert pyramids, desert wells, warm ocean ruins, and trail ruins. It appears as normal sand but has a slightly different texture with darker pixels.

    You need a brush to extract items from it.

    What Makes Suspicious Sand Different?

    Texture comparison between regular sand and suspicious sand in Minecraft showing darker crack pixels

    Suspicious sand has a unique cracked texture pattern that regular sand doesn’t have.

    The cracks are subtle. Most players miss them completely.

    Regular sand falls when you break the block underneath it. Suspicious sand also falls, but it converts to regular sand and destroys the loot inside.

    Never dig directly under suspicious sand. Always brush it from the side or top.

    Suspicious Sand Spawn Locations

    Suspicious sand only generates in four structure types.

    Four structure locations where suspicious sand spawns in Minecraft with block counts

    Desert Pyramids are the most common location. Check the floor of the treasure room and the suspicious sand room (if present). Each pyramid can have 1-2 suspicious sand blocks.

    Desert Wells are rare stone structures in deserts. Suspicious sand spawns underneath the well in the sand layers below. Dig carefully around the base.

    Warm Ocean Ruins generate in warm ocean biomes. Suspicious sand appears inside the ruined structures mixed with regular sand blocks. Look for the texture difference.

    Trail Ruins are underground structures added in 1.20. They contain the most suspicious sand blocks per structure (up to 16 blocks). These ruins generate in various biomes, including taigas, snowy taigas, and old-growth biomes.

    Here’s what you can find in each location:

    LocationSuspicious Sand CountBest Loot
    Desert Pyramid1-2 blocksDiamonds, Emeralds, TNT
    Desert Well1-3 blocksBrick, Suspicious Stew, Arms Up Pottery Sherd
    Warm Ocean Ruins1-2 blocksSniffer Egg, Pottery Sherds, Iron Axe
    Trail Ruins4-16 blocksMusic Discs, Pottery Sherds, Rare Banners

    How to Brush Suspicious Sand

    Craft a brush using 1 feather, 1 copper ingot, and 1 stick.

    Minecraft brush crafting recipe showing feather, copper ingot, and stick placemen

    Place the feather on top, copper in the middle, and stick at the bottom in a crafting table.

    Equip the brush and hold right-click (or your interact button) on suspicious sand. The brushing animation takes about 3 seconds.

    Don’t release the button early, or you’ll reset the progress.

    The block breaks after brushing and drops one item. The suspicious sand block itself is destroyed and cannot be collected with Silk Touch.

    Common Mistakes to Avoid

    Breaking suspicious sand with a shovel destroys the loot. You get nothing.

    Letting suspicious sand fall also destroys the hidden item. Always support blocks underneath before brushing.

    Using the wrong tool wastes time. Only brushes work on suspicious sand and suspicious gravel.

    Brushing too fast doesn’t help. The animation has a fixed duration regardless of how fast you click.

    Best Strategy for Finding Suspicious Sand

    Focus on the desert pyramids first. They’re easy to spot and always contain suspicious sand.

    Use the /locate structure desert_pyramid command if you have cheats enabled. This gives you exact coordinates.

    For trail ruins, look in taiga and snowy taiga biomes. These structures are underground, so watch for exposed terrain or suspicious terrain generation.

    Warm ocean ruins require underwater exploration. Bring a Potion of Water Breathing or a turtle shell helmet.

    Desert wells are extremely rare. Don’t specifically hunt for them unless you stumble across one.

    Loot Table and Why It Matters

    Suspicious sand in warm ocean ruins is the only source of sniffer eggs in the entire game.

    Trail ruins drop exclusive music discs you can’t get anywhere else.

    Pottery sherds from suspicious sand are decorative items used in pottery. Each location drops different sherd patterns.

    Diamond and emerald drops from desert pyramids are bonus rewards, but not the primary reason to hunt suspicious sand.

    Use Ore Finder to Locate Structures Fast

    Manually searching deserts and oceans takes hours.

    Ore Finder shows you exactly where desert pyramids, ocean ruins, and trail ruins spawn in your world seed. You get precise coordinates for every structure.

    Enter your seed and select the structure type you want. The tool highlights all spawn locations on an interactive map.

    This saves you from wandering randomly and missing structures entirely.

    Texture Pack Method (Optional)

    Some texture packs highlight suspicious sand and gravel with brighter colors.

    This makes them easier to spot, but it isn’t necessary if you know what to look for.

    Vanilla suspicious sand has small, darker pixels in a cracked pattern. Train your eyes to spot this texture.

    How Suspicious Sand Works in Different Versions

    Suspicious sand was added in Minecraft 1.20 (Trails & Tales update).

    It doesn’t exist in versions before 1.20. Older desert pyramids won’t have it. You may need other ways to find ores, like diamonds.

    Bedrock Edition and Java Edition have identical suspicious sand mechanics and loot tables.

    Mining Suspicious Sand vs Brushing

    You cannot mine suspicious sand and move it to another location.

    Breaking it with any tool converts it to regular sand. The loot is lost.

    Pistons also break suspicious sand. Don’t try to move it with redstone contraptions.

    The only way to get the loot is by brushing it in place where it spawned.

    FAQ

    What is suspicious sand used for in Minecraft?

    Suspicious sand contains hidden loot that you extract with a brush. Each block drops one item, like pottery sherds, diamonds, emeralds, or sniffer eggs. It’s the only way to obtain certain rare items like sniffer eggs from warm ocean ruins and exclusive music discs from trail ruins.

    Can you pick up suspicious sand with Silk Touch?

    No. Silk Touch doesn’t work on suspicious sand. Breaking it with any tool, including a Silk Touch enchanted shovel, converts it to regular sand and destroys the loot inside. You must brush it in place to get the item.

    Where do you find suspicious sand in desert temples?

    Suspicious sand spawns on the floor of desert pyramid treasure rooms and in dedicated suspicious sand chambers (if the pyramid was generated with one). Check all sand blocks on the floor carefully for the cracked texture pattern. Each pyramid has 1-2 suspicious sand blocks.

    What happens if suspicious sand falls?

    Falling suspicious sand converts to regular sand and destroys the loot inside. The hidden item is lost permanently. Always ensure blocks underneath are secure before brushing. Support the sand from below if necessary.

    How do you get a sniffer egg in Minecraft?

    Brush suspicious sand in warm ocean ruins. This is the only location where sniffer eggs spawn. Warm ocean ruins generate in lukewarm and warm ocean biomes. Look for stone brick structures underwater with suspicious sand mixed among regular sand blocks.

    Final Tips

    Suspicious sand is rare but worth hunting for exclusive items.

    Focus on desert pyramids and warm ocean ruins for the best rewards.

    Always use a brush. Never break suspicious sand with tools.

    Check the structure coordinates with OreFinder before you start exploring.

    Get your sniffer egg and pottery sherds before other players on your server find them first.