Category: Blog

  • How to Make Netherite Tools in Minecraft: Complete Upgrade Guide

    How to Make Netherite Tools in Minecraft: Complete Upgrade Guide

    Netherite tools are stronger and more durable than diamond gear.

    But you can’t craft them directly—you must upgrade diamond tools first.

    Quick Answer: How to Make Netherite Tools

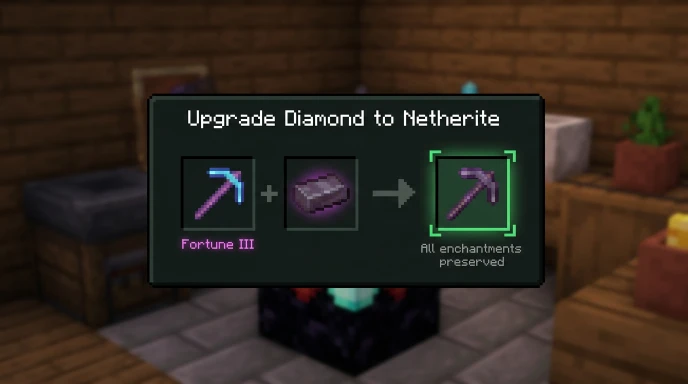
    Use a smithing table to upgrade diamond tools with Netherite ingots. Place a diamond tool and 1 netherite ingot in the smithing table to create the netherite version. Your enchantments and durability percentage carry over to the upgraded tool.

    Understanding Netherite Tools vs Diamond Tools

    Netherite tools cannot be crafted from scratch like diamond tools.

    Every netherite tool requires a diamond version first, plus 1 netherite ingot per tool.

    The upgrade process preserves all enchantments, custom names, and durability percentages from the original diamond gear.

    This means:

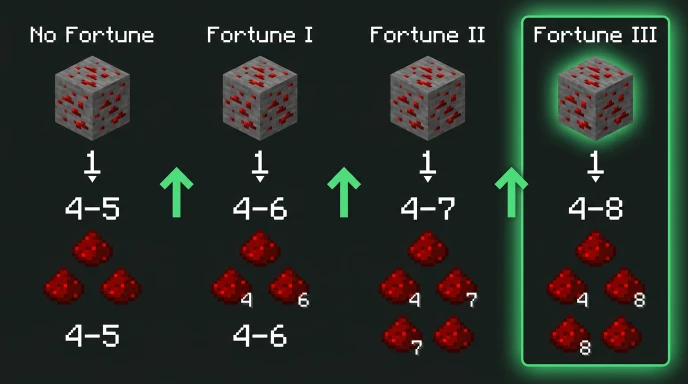
    • Fortune III pickaxe stays Fortune III after upgrade
    • Custom names transfer completely
    • Durability doesn’t reset
    • All previous enchantments remain intact

    This upgrade system is unique to Netherite and makes it special.

    Step-by-Step Process for Making Netherite Tools

    Complete flowchart showing steps to make netherite tools from gathering ancient debris to final upgrade

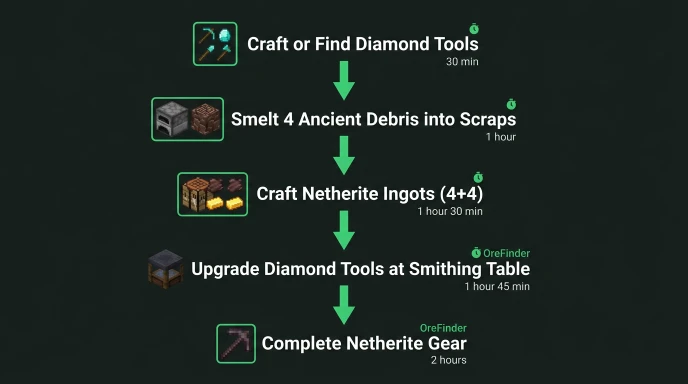
    Step 1: Get Diamond Tools

    Craft or find diamond tools first. You need them to upgrade.

    Diamond tool recipes:

    • Pickaxe: 3 diamonds + 2 sticks
    • Axe: 3 diamonds + 2 sticks (different shapes)
    • Shovel: 1 diamond + 2 sticks
    • Hoe: 2 diamonds + 2 sticks
    • Sword: 2 diamonds + 1 stick

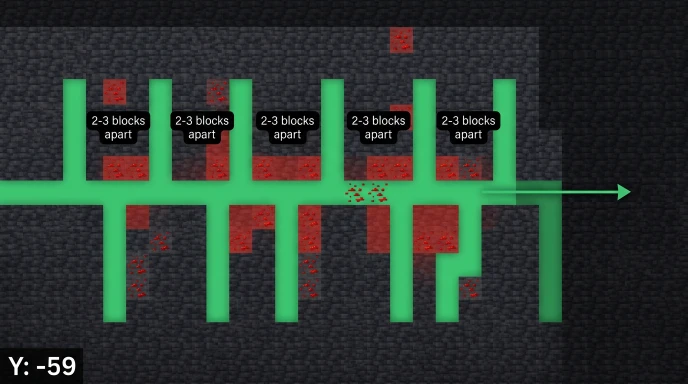
    Mine diamonds at Y-59 for the fastest collection. Check our diamond location guide for exact coordinates.

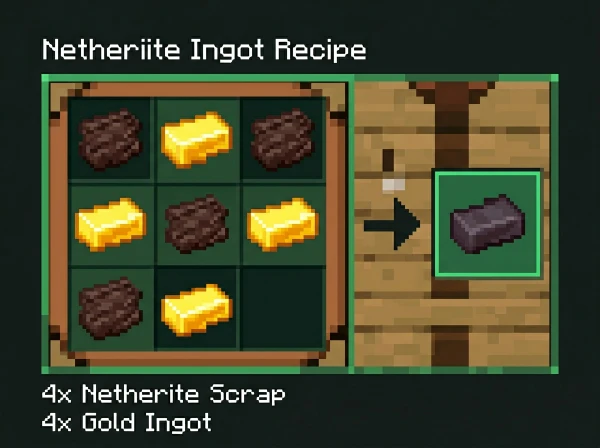
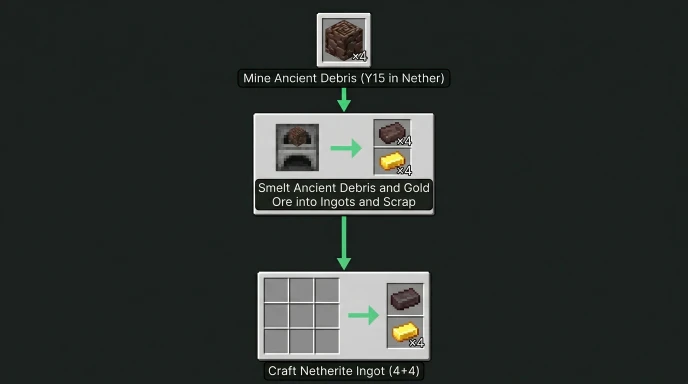
    Step 2: Craft Netherite Ingots

    Smelt 4 ancient debris into netherite scraps.

    Combine 4 netherite scraps with 4 gold ingots in a crafting table.

    You get 1 netherite ingot per craft. You need 1 ingot per tool.

    See our netherite ingot guide for detailed crafting instructions.

    Step 3: Build Smithing Table

    Smithing table crafting recipe and upgrade interface guide for making netherite tools

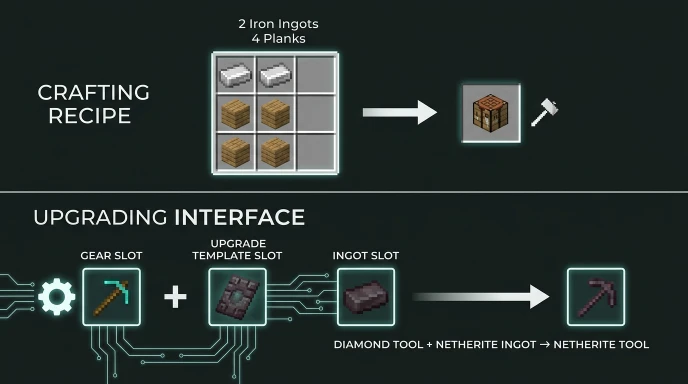
    Craft a smithing table using 2 iron ingots and 4 planks.

    Place it down and right-click to open the interface.

    Smithing tables are permanent and reusable for unlimited upgrades.

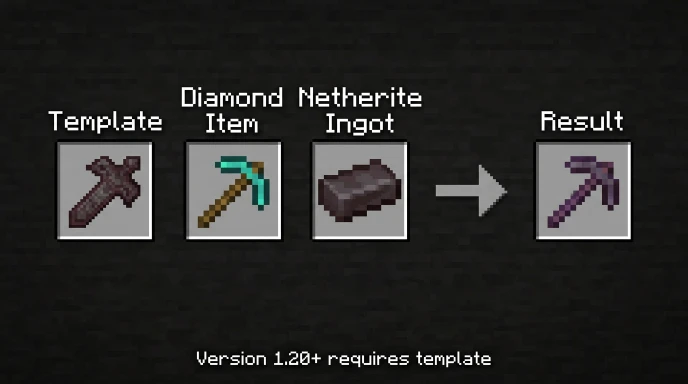
    Step 4: Upgrade Tools at Smithing Table

    Place your diamond tool in the left input slot.

    Place 1 netherite ingot in the right input slot.

    (In version 1.20+: Add netherite upgrade template in the template slot first)

    The upgraded netherite tool appears in the output slot.

    Take your new netherite tool and repeat for other tools.

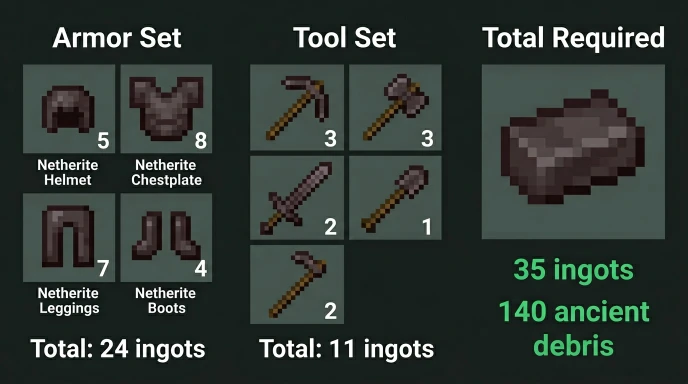
    Complete Netherite Tools Upgrade Table

    Tool TypeDiamond Version RequiredNetherite Ingots NeededResult
    Pickaxe1 diamond pickaxe1 ingotNetherite pickaxe
    Axe1 diamond axe1 ingotNetherite axe
    Shovel1 diamond shovel1 ingotNetherite shovel
    Hoe1 diamond hoe1 ingotNetherite hoe
    Sword1 diamond sword1 ingotNetherite sword
    Full Set + Tools5 tools + armor11 ingotsComplete netherite gear

    What You Need Before Upgrading

    Materials Required

    • Diamond tools (craft or find)
    • Netherite ingots (crafted from ancient debris)
    • Smithing table (craft with iron ingots)
    • Netherite upgrade template in 1.20+ (find in bastion remnants)

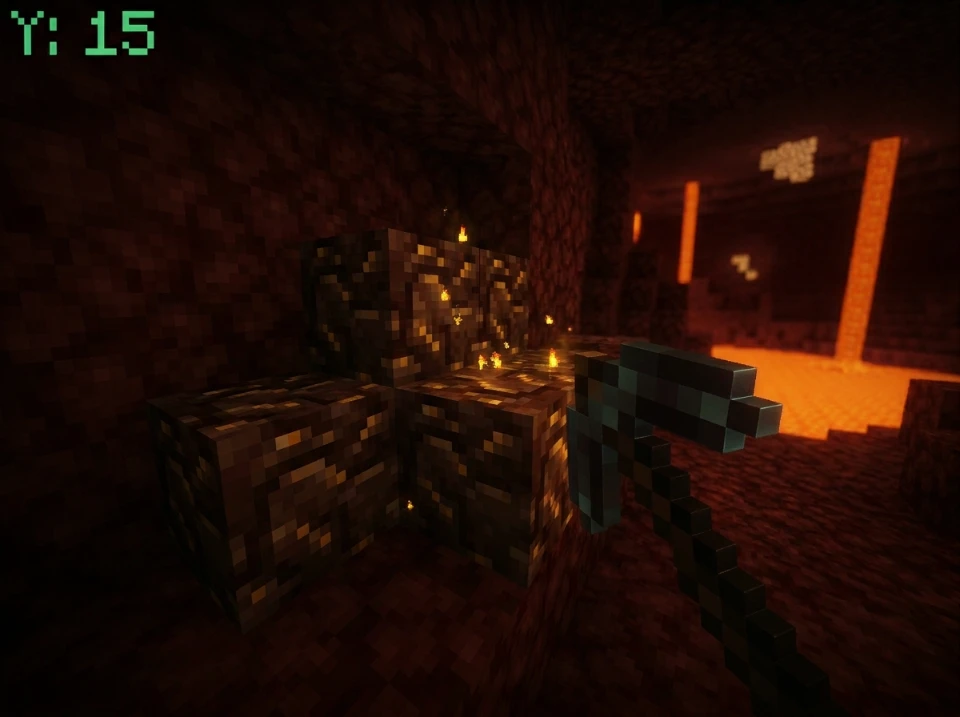
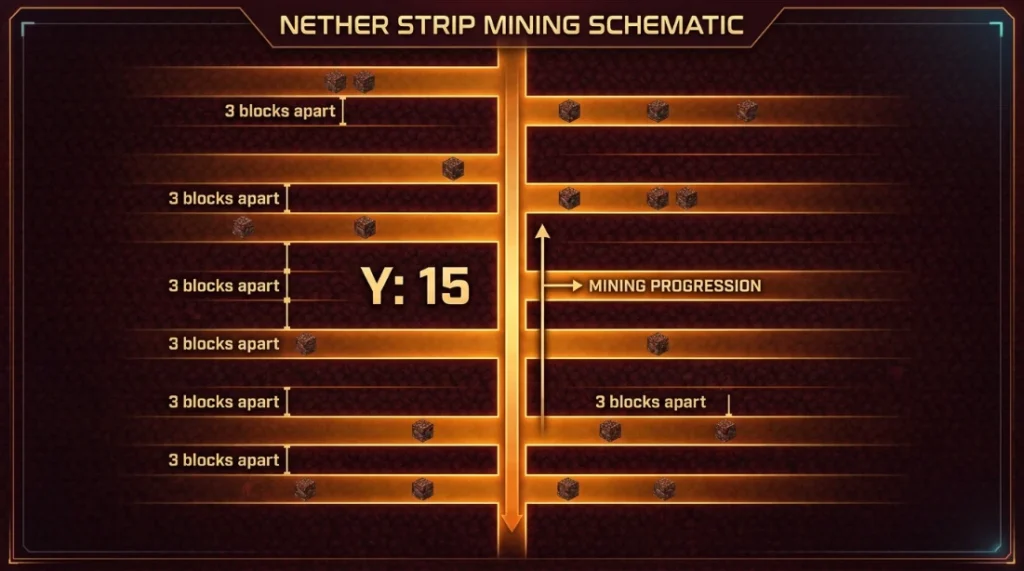
    Where to Get Ancient Debris

    Mine ancient debris at Y15 in the Nether. Check our ancient debris guide for exact spawn locations and mining strategies.

    You need 4 ancient debris per netherite ingot.

    Smithing Template Requirements (1.20+)

    Starting in version 1.20, you need Netherite upgrade smithing templates.

    Find them in bastion remnants in the Nether.

    You only need 1 template to create 2 more templates:

    • 1 netherite upgrade template
    • 7 diamonds
    • 1 netherrack

    Craft these together for unlimited template duplication.

    Preserving Tool Enchantments

    Visual guide showing how enchantments are preserved when upgrading diamond tools to netherite

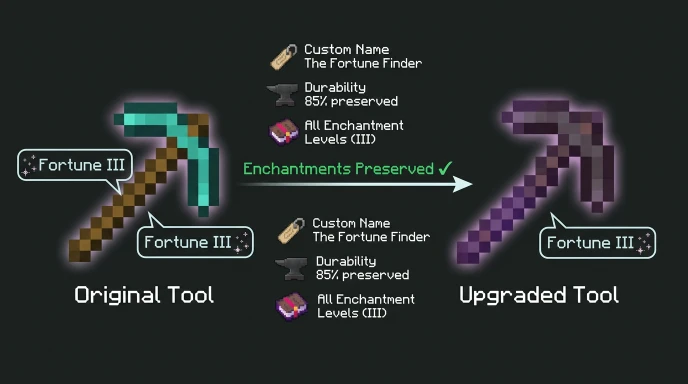
    All enchantments transfer to the upgraded tool perfectly.

    Example: Fortune III diamond pickaxe becomes Fortune III netherite pickaxe.

    You don’t lose any enchantments, levels, or custom names during the upgrade.

    This makes upgrading tools with good enchantments extremely valuable.

    Netherite Tool Stats vs Diamond

    StatDiamondNetheriteImprovement
    Durability1561 uses2031 uses+30%
    Attack Speed1.21.2Same
    DamageTool-specific+1Better
    Mining SpeedFastFaster+8-12%
    KnockbackNo10% per itemYes
    Fire ResistanceNoYesFloats in lava

    The lava immunity alone makes netherite tools invaluable for Nether work.

    Practical Tips for Making Netherite Tools

    Prioritize Your First Tool

    Netherite pickaxe with Fortune III is the best first upgrade.

    This tool pays for itself by finding more diamonds and redstone.

    Upgrade your sword second for combat advantage.

    Batch Your Upgrades

    Don’t upgrade one tool at a time if possible.

    Mine all your ancient debris first, craft all ingots, then upgrade everything.

    This saves time walking between locations.

    Use Bedrock Edition Faster Crafting

    Bedrock crafts items faster than Java Edition by default.

    If you have both versions, use Bedrock for rapid ingot crafting.

    Use OreFinder for Ancient Debris

    Finding ancient debris manually takes hours per ingot.

    OreFinder maps exact ancient debris locations using your Nether seed.

    Enter your seed and get coordinates for every debris vein instantly.

    Navigate directly to clusters instead of mining randomly.

    This cuts your tool-making time significantly.

    Common Mistakes When Making Netherite Tools

    Trying to craft netherite tools directly won’t work. You must upgrade diamond tools.

    Using the wrong Y-level for ancient debris mining (check Y15 optimal).

    Not bringing fire resistance potions for Nether mining.

    Forgetting to keep diamond tools before upgrading them.

    Losing ancient debris to lava without water buckets.

    Time Estimate for Full Netherite Tool Set

    Complete netherite setup with enchantments:

    • Gather materials: 3-5 hours
    • Craft diamond tools: 30 minutes
    • Mine ancient debris: 2-3 hours
    • Craft netherite ingots: 20 minutes
    • Upgrade all tools: 10 minutes

    Total: 6-9 hours of playtime for experienced players.

    Use OreFinder to reduce mining time by 60%.

    FAQ

    How do you make netherite tools in Minecraft?

    Upgrade diamond tools using a smithing table and netherite ingots. Place the diamond tool in the left slot, the netherite ingot in the right slot. The upgraded netherite tool appears in the output. All enchantments, durability, and custom names transfer to the upgraded tool.

    Can you craft netherite tools without diamonds?

    No. Netherite tools require diamond versions to upgrade. You cannot craft netherite tools directly. Every netherite tool must start as a diamond tool first. This system is unique to Netherite gear in Minecraft.

    How many netherite ingots do you need for all tools?

    You need 11 netherite ingots total for full tools: pickaxe (1), axe (1), shovel (1), hoe (1), sword (1), and boots through helmet (5). This requires a minimum of 44 ancient debris blocks since each ingot needs 4 scraps.

    Do enchantments transfer when upgrading to netherite?

    Yes. All enchantments transfer perfectly to the upgraded netherite tool. Fortune III pickaxe becomes Fortune III netherite pickaxe. Custom names, durability percentages, and all modifiers carry over completely unchanged.

    What’s the best netherite tool to make first?

    Netherite pickaxe with Fortune III is the best first tool. It pays for itself by finding more diamonds and resources quickly. Upgrade your sword second for combat advantage. Then work on other tools based on your building needs.

    Upgrade Your Gear to Netherite

    Netherite tools require diamond versions and Netherite ingots for upgrading.

    All enchantments transfer to the upgraded tool unchanged.

    Use OreFinder to find ancient debris fast and reduce crafting time.

    Start gathering ancient debris today and get your netherite tools set up.

  • What Level Does Redstone Spawn in Minecraft: Best Y Coordinates

    What Level Does Redstone Spawn in Minecraft: Best Y Coordinates

    Redstone ore is essential for circuits, contraptions, and automated farms.

    Mining at the wrong Y-levels wastes time when you need large quantities fast.

    Quick Answer: What Level Does Redstone Spawn?

    Redstone ore spawns from Y-64 to Y16 in all Overworld biomes. The best level for redstone is Y-59, where redstone generates at the highest concentration alongside diamonds.

    This level gives you maximum redstone ore per hour of mining.

    Minecraft Redstone Ore Distribution

    Redstone uses a triangle distribution pattern from Y-64 up to Y16.

    Spawn rates increase as you approach Y-59 from above or below.

    The concentration peaks at Y-59, then decreases as you move higher toward Y16.

    Key spawn details:

    • Spawns in stone below Y0
    • Spawns in deepslate below Y0
    • Higher frequency below Y0 than above
    • No spawning above Y16
    • Generates in veins of 4-8 blocks

    Redstone appears far more commonly than diamonds at the same levels.

    Redstone Level Minecraft: Complete Breakdown

    Y-Level RangeRedstone Spawn RateMining PriorityNotes
    Y-64 to Y-32Very HighExcellentDeepslate layer
    Y-32 to Y-16HighGoodBelow old Y11 meta
    Y-16 to Y-1MediumDecentDecreasing rate
    Y-1 to Y8Medium-LowBackup optionAbove old Y11
    Y8 to Y16LowSkipMinimal spawns
    Above Y16NoneN/ARedstone doesn’t spawn

    Y-59 sits in the optimal range for both redstone and diamond mining.

    Best Mining Strategy for Redstone Ore

    Strip Mining at Y-59

    Strip mining pattern at Y-59 for efficient redstone ore collection in Minecraft

    Create horizontal tunnels at Y-59 with branches every 2-3 blocks.

    This exposes maximum ore blocks in the highest concentration zone.

    Use an iron pickaxe minimum. Stone pickaxes don’t work on redstone ore.

    Cave Exploration Below Y0

    Large cave systems below Y0 expose thousands of blocks naturally.

    Redstone appears on cave walls, ceilings, and floors constantly.

    Bring torches and mark your path to avoid getting lost.

    Branch Mining Pattern

    Dig a main tunnel at Y-59 extending 100+ blocks.

    Every 2-3 blocks, create perpendicular branches extending 20-30 blocks.

    This systematic approach prevents missing ore veins while avoiding wasted effort.

    Redstone Ore vs Deepslate Redstone Ore

    Comparison of regular redstone ore and deepslate redstone ore in Minecraft

    Regular redstone ore appears in stone above Y0.

    Deepslate redstone ore generates in deepslate below Y0.

    Both drop 4-5 redstone dust when mined. The only difference is the mining speed.

    Deepslate variants take slightly longer to break but give identical resources.

    Fortune Enchantment on Redstone

    Fortune enchantment effect on redstone ore showing increased dust drops in Minecraft

    Fortune significantly increases redstone dust drops from each ore block.

    Drop rates by enchantment level:

    • No Fortune: 4-5 redstone dust
    • Fortune I: 4-6 redstone dust
    • Fortune II: 4-7 redstone dust
    • Fortune III: 4-8 redstone dust

    Fortune III can triple your redstone collection from the same amount of mining.

    Always use Fortune III pickaxes when mining redstone for maximum efficiency.

    What You Need Redstone For

    Redstone is the core component for all automation and mechanical systems.

    Common redstone uses:

    • Redstone torches, repeaters, comparators
    • Pistons and sticky pistons
    • Observers and dispensers
    • Redstone lamps for lighting
    • Note blocks for music
    • Powered rails for minecart systems
    • Brewing stands (requires 1 redstone)
    • Clocks and compasses

    Complex contraptions like automatic farms require hundreds of redstone dust.

    How Much Redstone You Actually Need

    Early game: 20-40 redstone for basic circuits and powered rails.

    Mid game: 100-200 redstone for piston doors, farms, and lighting systems.

    Late game: 500+ redstone for complex contraptions, sorting systems, and mega builds.

    Redstone is renewable through witch farms but mining is faster initially.

    Using OreFinder for Redstone Locations

    Manual strip mining works but takes hours for large quantities.

    OreFinder shows exact redstone vein locations using your world seed.

    Enter your seed and select redstone ore from the ore types.

    The tool maps every redstone vein with precise X, Y, Z coordinates.

    Navigate directly to redstone-rich chunks instead of mining randomly.

    This cuts your mining time significantly when you need specific quantities.

    For players also gathering other ores, check our guides on diamond coordinates and iron mining levels.

    Redstone Mining Tips and Tricks

    Check Your Y-Coordinate

    Press F3 (Java) to see coordinates. The middle number is your Y-level.

    Enable “Show Coordinates” in settings (Bedrock) for constant display.

    Stay at Y-59 for optimal results. Drifting to Y-50 or Y-70 reduces spawns.

    Bring the Right Tools

    Iron pickaxe minimum. Stone pickaxes can’t mine redstone ore.

    Fortune III enchantment for 2-3x more redstone dust per ore.

    Multiple pickaxes for extended mining sessions.

    Light Your Tunnels

    Place torches every 8 blocks to prevent mob spawns.

    Redstone ore emits light when clicked but this doesn’t prevent spawns.

    Water Bucket Safety

    Carry water buckets for unexpected lava encounters.

    Lava appears frequently at Y-59 and lower levels.

    Pour water on lava before mining near it to avoid deaths.

    Common Redstone Mining Mistakes

    Mining above Y16 produces zero redstone. That’s the hard cutoff.

    Not using Fortune III wastes 50-70% of potential redstone drops.

    Breaking redstone ore without Silk Touch drops dust immediately. This is intended.

    Confusing redstone ore brightness with being active. Redstone ore glows when walked on but doesn’t affect mining.

    Random cave exploration covers less ground than systematic strip mining.

    Redstone Ore Appearance

    Redstone ore is stone with red specks throughout.

    It emits subtle light particles when walked on or clicked.

    The glow fades after a few seconds.

    Visual identification:

    • Red dots scattered across gray stone
    • Slight red glow when active
    • Deepslate version has darker background
    • More common than diamonds but rarer than coal

    The red specks make it easy to spot in dark caves.

    Silk Touch on Redstone Ore

    Silk Touch picks up redstone ore blocks instead of dust.

    This is useful for decoration or relocating ore for later mining.

    Mining Silk Touch ore later with Fortune III still gives the multiplied drops.

    Some players collect redstone ore blocks for builds before mining them.

    Y-Level Changes in Different Versions

    Redstone distribution changed in Minecraft 1.18 (Caves & Cliffs).

    Pre-1.18: Redstone spawned from Y16 down to bedrock with different patterns.

    Post-1.18 (current): Y-64 to Y16 with peak at Y-59.

    Always verify your Minecraft version before following Y-level guides.

    Biome-Specific Redstone Generation

    Redstone spawns identically in all Overworld biomes at the same Y-levels.

    Desert, forest, plains, ocean, and mountain biomes have equal redstone rates.

    Biome type doesn’t affect ore distribution. Only Y-level matters.

    FAQ

    What level does redstone spawn in Minecraft?

    Redstone ore spawns from Y-64 to Y16 in all Overworld biomes. The best Y-level for redstone mining is Y-59, where spawn rates peak. Redstone appears in both stone and deepslate variants, with higher concentration below Y0 than above.

    Does Fortune work on redstone ore?

    Yes. Fortune enchantment increases redstone dust drops significantly. Fortune III yields 4-8 redstone dust per ore block instead of the base 4-5. This makes Fortune III essential for efficient redstone collection, potentially doubling your total dust from the same mining effort.

    Can you mine redstone ore with a stone pickaxe?

    No. Redstone ore requires an iron pickaxe minimum. Stone, wooden, and gold pickaxes break the ore but drop nothing. Use iron, diamond, or netherite pickaxes. Add Fortune III enchantment for maximum redstone dust drops per ore block.

    What is the best Y-level for redstone in Minecraft?

    Y-59 is the best Y-level for redstone ore mining. This level has the highest spawn concentration and also peaks for diamonds. Strip mine at Y-59 with Fortune III for maximum efficiency. The Y-64 to Y-32 range overall provides excellent redstone rates.

    Where do you find redstone ore in Minecraft?

    Find redstone ore underground between Y-64 and Y16 in any Overworld biome. Mine at Y-59 for best results. Redstone appears in stone above Y0 and deepslate below Y0. Large caves below Y0 expose abundant redstone on walls and ceilings.

    Mine Redstone at Y-59

    Redstone ore spawns from Y-64 to Y16 with peak concentration at Y-59.

    Use Fortune III for maximum redstone dust drops from each ore block.

    Stop mining randomly and use OreFinder to locate redstone-rich veins.

    Get exact coordinates for every redstone deposit in your world and mine efficiently.

  • How to Find Minecraft Seed on Server, Realm & Without Commands

    How to Find Minecraft Seed on Server, Realm & Without Commands

    You need the world seed to use structure finders and biome locators.

    But getting the seed on servers and realms isn’t as simple as single-player worlds.

    Quick Answer: How to Find the Seed of a Minecraft World

    Single-player: Use /seed command or check world settings. Servers: Ask the admin or use third-party seed crackers. Realms: Java owners see it in settings; Bedrock members need permission or seed crackers.

    Each method depends on your access level and game edition.

    Finding Seed in Your Own Worlds

    Flowchart showing different methods to find Minecraft seed based on world type

    Java Edition Single-Player

    Press T to open chat and type /seed

    The seed displays instantly in chat as a long number.

    Copy the full number, including the negative sign if present.

    Bedrock Edition Single-Player

    Open Settings > Game > scroll to the “Seed” field

    The seed shows without needing commands or cheats.

    Works even in worlds where cheats are disabled.

    Alternative Method for Both Editions

    Pause game > Settings > World settings > look for the Seed section

    The seed appears in world information regardless of cheat settings.

    How to Find the Seed of Minecraft Realm

    Minecraft Java Edition Realms settings showing where to find world seed

    Realms have different permission systems for seed access.

    Java Edition Realms (Owner)

    1. Open the Realms menu from the main screen
    2. Click your Realm
    3. Click “Configure”
    4. Select “World Options”
    5. The seed displays in the world information section

    Java Edition Realms (Member)

    Members cannot see the seed through Realm settings.

    Ask the Realm owner to share it.

    Alternatively, use seed cracking tools (explained below).

    Bedrock Edition Realms

    Bedrock Realms don’t display seeds in settings, even for owners.

    The Realm owner must download the world, open it locally, then check seed in settings.

    Members need permission to download or must use seed crackers.

    How to Find Minecraft Seed on Server

    Server seeds depend entirely on admin permissions.

    If You Have Operator/Admin Access

    Type /seed in chat.

    The command works identically to single-player.

    If You’re a Regular Player

    The /seed command is usually disabled for non-ops.

    Ask server administrators to share the seed.

    Most public servers don’t share seeds to prevent structure-hunting exploits.

    Third-Party Servers

    Large multiplayer servers often use custom world generators.

    These servers may not have traditional seeds or may refuse to share them.

    Finding Seed Without Commands or Permission

    Seed cracking uses visible coordinates and structures to calculate the seed.

    Tools That Crack Seeds

    • SeedCrackerX (Java mod)
    • Seed Finder tools (online)
    • ChunkBase seed finder (uses structure data)

    How Seed Cracking Works

    1. Gather data from the world (coordinates, structures, biomes)
    2. Input data into seed cracking software
    3. Software calculates possible seed matches
    4. Verify seed by comparing world features

    Data You Need to Collect

    • Exact coordinates of multiple structures (strongholds, villages, temples)
    • Biome locations and boundaries
    • Dungeon or spawner coordinates
    • At least 3-5 structure locations for accuracy

    This method takes time but works on any world where you can explore.

    Do Minecraft Realms Have Seeds?

    Yes, absolutely. Every Minecraft world including Realms generates from a seed.

    Realms are just hosted worlds. They follow the same generation rules as local worlds.

    The seed determines terrain, biomes, structures, and ore placement identically to offline worlds.

    Bedrock Realms simply don’t display the seed publicly in settings.

    Using Seeds with OreFinder

    Once you have your world seed, use it to find any structure or ore.

    OreFinder maps your entire world using the seed.

    Enter the seed and select what you’re looking for:

    • Diamond ore locations
    • Ancient debris coordinates
    • Village positions
    • Stronghold locations
    • Biome boundaries

    You get exact X, Y, Z coordinates for every feature in your world.

    This works for seeds from single-player worlds, Realms, and servers.

    For players hunting specific resources, check our guides on finding diamonds and ancient debris coordinates.

    Seed Format and Compatibility

    Examples of valid Minecraft seed formats including positive, negative, and text seeds

    Seeds are numerical values (positive or negative integers).

    Valid Seed Formats

    • Numbers: 12345678
    • Negative: -987654321
    • Text: converts to numerical seed internally

    Edition Compatibility

    Java and Bedrock use the same seed format but generate different worlds.

    A seed that works in Java Edition creates a completely different world in Bedrock.

    Always specify which edition when sharing seeds.

    Finding Someone Else’s Minecraft Seed

    You can only get someone else’s seed through:

    1. Permission: They share it directly
    2. Server access: You have operator permissions
    3. Seed cracking: You gather structure data and calculate it

    Attempting to access server files without permission violates most server rules.

    Seed cracking from publicly visible structures is generally acceptable.

    Common Seed Finding Mistakes

    Confusing Java and Bedrock Seeds

    The same numerical seed creates different worlds between editions.

    Always verify which edition the seed is for.

    Not Copying the Full Seed

    Seeds can be 15+ digits long. Copy the entire number.

    Missing even one digit changes the world completely.

    Assuming All Commands Work Everywhere

    /seed command requires operator permissions on servers and doesn’t work for Realm members.

    Expecting Bedrock Realms to Show Seeds

    Bedrock Realm owners must download the world to local storage first.

    Seed Information Table

    World TypeAccess MethodRequires CheatsRequires Permission
    Java Single-player/seed or settingsNoNo
    Bedrock Single-playerSettings onlyNoNo
    Java Realm (owner)Realm settingsNoOwner only
    Java Realm (member)Ask ownerN/AYes
    Bedrock Realm (owner)Download worldNoOwner only
    Bedrock Realm (member)Ask ownerN/AYes
    Server (op)/seed commandNoOp required
    Server (player)Ask adminN/AYes

    Why You Need Your World Seed

    Seeds unlock every location-finding tool available.

    With Your Seed You Can:

    • Find strongholds without Eyes of Ender
    • Locate rare biomes without exploring
    • Get exact ore coordinates for efficient mining
    • Plan bases near multiple biomes
    • Share your world with others

    Minecraft Ore Finder requires your seed to show these locations.

    The tool can’t help without the seed because every world is unique.

    FAQ

    How do you find the seed of a Minecraft Realm?

    Java Realm owners: Configure > World Options > Seed. Bedrock Realm owners: Download world to device, then check Settings > Game > Seed. Realm members must ask the owner for the seed or use seed cracking tools by gathering structure coordinates.

    Can you find a Minecraft seed without the /seed command?

    Yes. Use seed cracking tools by collecting coordinates of multiple structures like villages, temples, or strongholds. Input these coordinates into seed finder software which calculates possible seeds. Verify by comparing world features. This works on servers and Realms where /seed is disabled.

    Do Minecraft Realms have seeds?

    Yes. Every Minecraft world including Realms generates from a seed. Realms follow identical generation rules as local worlds. The seed determines all terrain, biomes, structures, and ore locations. Bedrock Realms simply don’t display seeds in settings without downloading the world first.

    How to find seed on Minecraft server?

    If you have operator/admin permissions, use /seed command. Regular players must ask server administrators to share the seed. Many public servers don’t share seeds to prevent exploits. Alternatively, use seed cracking by gathering structure coordinates and calculating the seed with third-party tools.

    Where do you find the seed in Minecraft Bedrock?

    Open Settings > Game > scroll to the “Seed” field. The seed displays without requiring cheats or commands. This works for single-player worlds. For Bedrock Realms, the owner must download the world to their device first, then check the seed in local world settings.

    Get Your Seed and Start Finding

    World seeds unlock every structure and ore location in your world.

    Use /seed in single-player, check Realm settings, or ask server admins.

    Once you have the seed, use Ore Finder to map your entire world instantly.

    Stop exploring blindly and start navigating to exact coordinates for every resource you need.

  • How to Craft Netherite Ingot in Minecraft: Complete Recipe Guide

    How to Craft Netherite Ingot in Minecraft: Complete Recipe Guide

    Netherite ingots are the strongest material in Minecraft for armor and tools.

    Crafting them requires specific materials and the right crafting recipe.

    Quick Answer: How to Craft Netherite Ingot in Minecraft

    Combine 4 netherite scraps with 4 gold ingots in a crafting table. Arrange them in any pattern to craft one netherite ingot.

    You get netherite scraps by smelting ancient debris in a furnace or blast furnace.

    Netherite Ingot Crafting Recipe

    The recipe requires two main ingredients in equal quantities.

    Materials needed:

    • 4 netherite scraps
    • 4 gold ingots

    Place all 8 items in a crafting table in any pattern. The arrangement doesn’t matter.

    You can mix the scraps and gold ingots randomly across the 3×3 grid.

    The output is always 1 netherite ingot per craft.

    Step-by-Step Netherite Ingot Process

    Step-by-step flowchart showing how to craft netherite ingot from ancient debris in Minecraft

    Step 1: Mine Ancient Debris

    Ancient debris spawns in the Nether between Y8 and Y119.

    The best level is Y15 for maximum ancient debris concentration.

    You need 4 ancient debris blocks to make 1 netherite ingot.

    See our guide on where ancient debris spawns for exact coordinates and mining strategies.

    Step 2: Smelt Ancient Debris

    Place ancient debris in a furnace or blast furnace.

    Each ancient debris block smelts into 1 netherite scrap.

    Blast furnaces smelt twice as fast as regular furnaces.

    Step 3: Gather Gold Ingots

    Mine gold ore in the Overworld or Nether.

    Smelt gold ore into gold ingots (9 gold nuggets = 1 gold ingot).

    You need 4 gold ingots per netherite ingot.

    Step 4: Craft Netherite Ingot

    Open a crafting table.

    Place 4 netherite scraps and 4 gold ingots anywhere in the grid.

    Take your netherite ingot from the output slot.

    Netherite Ingot Requirements Table

    Item NeededQuantitySource
    Ancient Debris4 blocksNether (Y15 optimal)
    Netherite Scraps4 scrapsSmelt ancient debris
    Gold Ingots4 ingotsSmelt gold ore or combine nuggets
    Crafting Table1Craft with 4 planks

    Each netherite ingot requires significant resource gathering in the Nether.

    What You Can Make with Netherite Ingots

    Netherite ingots don’t craft items directly. They upgrade diamond equipment.

    Uses for netherite ingots:

    • Upgrade diamond tools at the smithing table
    • Upgrade diamond armor at the smithing table
    • Craft lodestone (1 netherite ingot + 8 chiseled stone bricks)

    You cannot craft netherite tools or armor directly from ingots.

    The upgrade system preserves enchantments from diamond gear.

    How Many Netherite Ingots Do You Need

    Netherite ingot requirements chart showing 24 for armor and 11 for tools in Minecraft

    Full netherite armor set: 24 netherite ingots

    • Helmet: 5 ingots
    • Chestplate: 8 ingots
    • Leggings: 7 ingots
    • Boots: 4 ingots

    Complete tool set: 11 netherite ingots

    • Pickaxe: 3 ingots
    • Axe: 3 ingots
    • Shovel: 1 ingot
    • Hoe: 2 ingots
    • Sword: 2 ingots

    Total for everything: 35 netherite ingots minimum (140 ancient debris blocks)

    This assumes you already have diamond gear to upgrade.

    Finding Ancient Debris Efficiently

    Manual Nether mining at Y15 takes hours per ingot.

    OreFinder shows exact ancient debris locations using your world seed.

    Enter your seed and select the Nether dimension.

    The tool maps every ancient debris vein with precise coordinates.

    Navigate directly to debris-rich chunks instead of mining randomly.

    This cuts your mining time by 60-70% compared to blind strip mining.

    Upgrading Diamond Gear to Netherite

    Smithing table interface showing how to upgrade diamond pickaxe to netherite in Minecraft

    Requirements:

    • Smithing table (craft with 2 iron ingots + 4 planks)
    • Diamond item
    • 1 netherite ingot
    • Netherite upgrade smithing template (optional in 1.20+)

    Process:

    Place the smithing table and right-click it.

    In 1.19 and earlier: Put diamond item in first slot, netherite ingot in second slot.

    In 1.20+: Add netherite upgrade template, diamond item, then netherite ingot.

    The upgraded item keeps all enchantments, durability percentage, and custom names.

    Netherite vs Diamond Comparison

    PropertyDiamondNetheriteImprovement
    Durability1561 uses2031 uses+30%
    Mining SpeedFastFaster+8-12%
    Damage7 (sword)8 (sword)+1 damage
    Armor Points20 total20 totalSame
    Knockback Resistance0%10% per pieceUp to 40%
    Fire/Lava ImmunityNoYesMajor

    Netherite items float in lava and don’t burn. Diamond items are destroyed.

    This alone makes netherite worth the effort for hardcore players.

    Common Crafting Mistakes

    Trying to craft netherite tools directly

    You can’t craft netherite pickaxes or swords from scratch. You must upgrade the diamond gear.

    Wrong ingredient ratio

    The recipe always requires exactly 4 scraps and 4 gold. Using 3 of each doesn’t work.

    Forgetting the smithing template in 1.20+

    Netherite upgrade templates drop from bastion remnants. You need one per upgrade.

    Not using a blast furnace

    Regular furnaces work, but blast furnaces smelt ancient debris twice as fast.

    Getting Netherite Upgrade Templates

    From version 1.20 onward, you need netherite upgrade smithing templates.

    Where to find them:

    • Bastion remnants (Nether structures)
    • Treasure chest in the bastion treasure rooms
    • Bridge chest in bastion bridge sections

    Once you have one template, duplicate it using these materials:

    • 1 netherite upgrade template
    • 7 diamonds
    • 1 netherrack

    This creates 2 templates, allowing unlimited upgrades.

    Fastest Route to First Netherite Ingot

    Time estimate: 2-4 hours for experienced players

    1. Mine 4 ancient debris at Y15 in the Nether (1-2 hours)
    2. Gather 4 gold ore in Overworld or Nether (20-30 minutes)
    3. Smelt both materials (10-15 minutes)
    4. Craft the netherite ingot (instant)
    5. Find netherite upgrade template in bastion (30-60 minutes)
    6. Upgrade your first diamond item (instant)

    Use Ore Finder to skip the random mining and find ancient debris coordinates directly.

    FAQ

    How do you craft a netherite ingot in Minecraft?

    Place 4 netherite scraps and 4 gold ingots in a crafting table in any pattern. You get 1 netherite ingot as output. Netherite scraps come from smelting ancient debris found in the Nether at Y15. Gold ingots come from smelting gold ore or combining 9 gold nuggets.

    Can you craft netherite tools without diamonds?

    No. Netherite tools and armor cannot be crafted directly. You must first craft or obtain diamond gear, then upgrade it using netherite ingots at a smithing table. The upgrade system is the only way to create netherite equipment in survival mode.

    How many ancient debris do you need for one netherite ingot?

    You need 4 ancient debris blocks for one netherite ingot. Each ancient debris smelts into 1 netherite scrap. Four scraps plus 4 gold ingots craft 1 netherite ingot. For full armor and tools, you need 140 ancient debris blocks total.

    Where do you find netherite scraps in Minecraft?

    Netherite scraps don’t spawn naturally. You create them by smelting ancient debris in a furnace or blast furnace. Ancient debris spawns in the Nether between Y8 and Y119, with peak concentration at Y15. Each debris block produces 1 netherite scrap when smelted.

    Do you need a smithing template to craft netherite ingots?

    No. Smithing templates are only required for upgrading diamond items to netherite at the smithing table (in version 1.20+). Crafting the netherite ingot itself only needs 4 netherite scraps and 4 gold ingots in a crafting table, no template required.

    Start Crafting Netherite Ingots

    Netherite ingots require 4 netherite scraps and 4 gold ingots in a crafting table.

    The hardest part is finding ancient debris at Y15 in the Nether.

    Use Ore Finder to locate ancient debris coordinates in your world seed.

    Stop mining randomly and start crafting netherite ingots with exact debris locations.

  • How to Find Trail Ruins in Minecraft: Complete Location Guide

    How to Find Trail Ruins in Minecraft: Complete Location Guide

    Trail ruins are buried underground structures with exclusive pottery sherds and armor trims.

    Finding them without the right strategy means wandering for hours with no results.

    Quick Answer: How to Find Trail Ruins in Minecraft

    Use /locate structure trail_ruins command to find the nearest trail ruins. They spawn underground in taiga, snowy taiga, old-growth birch forest, and old-growth spruce taiga biomes.

    Alternatively, use a structure finder tool with your world seed for exact coordinates.

    What Are Trail Ruins?

    Trail ruins were added in Minecraft 1.20 (Trails & Tales update).

    They’re buried archaeological sites containing suspicious gravel blocks.

    Key features:

    • Generate completely underground
    • No visible surface indicators
    • Contain 4-16 suspicious gravel blocks per structure
    • Drop exclusive pottery sherds and armor trims
    • Found only in specific biomes

    You need trail ruins for raiser armor trim, host armor trim, shaper armor trim, and wayfinder armor trim.

    They also drop unique pottery sherds unavailable anywhere else.

    Where Do Trail Ruins Spawn?

    Biome map showing where trail ruins spawn in taiga and old growth forest biomes in Minecraft

    Trail ruins generate in four specific biome types.

    Trail ruins biomes:

    • Taiga
    • Snowy Taiga
    • Old Growth Birch Forest
    • Old Growth Spruce Taiga

    They spawn between Y-levels -20 and 20 underground.

    Most trail ruins generate around Y0 to Y-10 in typical terrain.

    Trail ruins spawn range showing Y-levels from Y-20 to Y20 with best search depth in Minecraft

    Biomes where trail ruins NEVER spawn:

    • Plains
    • Desert
    • Jungle
    • Swamp
    • Ocean
    • Mountains
    • Any biome not listed above

    Focus your search on taiga and old growth forest biomes.

    Using /locate Command for Trail Ruins

    Enable cheats in world settings or when creating your world.

    Type: /locate structure trail_ruins

    The command returns coordinates of the nearest trail ruins.

    Example output:

    The nearest trail_ruins is at [1245, ~, -892] (1456 blocks away)

    Click coordinates in chat to auto-fill a teleport command.

    Use /tp @s 1245 ~ -892 to teleport there instantly.

    Remember these are underground. Dig down at the coordinates to find them.

    Finding Trail Ruins Without Commands

    Search taiga and old growth forest biomes manually.

    Trail ruins have no surface indicators. You must dig underground to find them.

    Manual search strategy:

    1. Locate a taiga or old growth birch forest biome
    2. Dig down to Y0 to Y-10 in multiple spots
    3. Create a 3×3 tunnel network at these levels
    4. Look for suspicious gravel blocks (darker texture with cracks)
    5. Trail ruins contain stone bricks, gravel, and suspicious gravel

    This method takes hours and isn’t efficient without coordinates.

    Trail Ruins Structure Layout

    Trail ruins don’t have consistent layouts like desert temples or jungle temples.

    Each ruin generates randomly with different room configurations.

    Common structure elements:

    • Stone brick blocks
    • Cobblestone
    • Packed mud
    • Gravel
    • Suspicious gravel (4-16 blocks)
    • Sometimes clay
    • Sometimes mud bricks

    The suspicious gravel blocks are what you’re hunting for.

    Brush them with an archaeology brush to extract items.

    Loot from Trail Ruins Suspicious Gravel

    Item TypeSpecific ItemsRarity
    Pottery SherdsWayfinder, Raiser, Shaper, HostCommon
    Armor TrimsWayfinder, Raiser, Shaper, HostCommon
    Other ItemsBlue, Orange, White DyeCommon
    ResourcesBrick, Coal, Wheat, Beetroot SeedsCommon
    Music DiscsRelic (exclusive to trail ruins)Rare

    The Relic music disc only drops from trail ruins suspicious gravel.

    Each trail ruin contains 4-16 suspicious gravel blocks, so you can get multiple items per structure.

    Using Structure Finders for Trail Ruins

    Manual searching underground is extremely time-consuming.

    OreFinder maps all trail ruins locations using your world seed.

    Find your seed in world settings (Bedrock) or use /seed command (Java).

    Enter the seed into OreFinder. Select “Trail Ruins” as the structure type.

    You get exact X, Y, Z coordinates for every trail ruin in your world.

    Navigate directly to coordinates instead of digging randomly for hours.

    How to Excavate Trail Ruins

    Step-by-step guide for brushing suspicious gravel in trail ruins to get loot

    Bring a brush for suspicious gravel blocks. You can’t mine them with pickaxes.

    Required tools:

    • Brush (craft with 1 feather, 1 copper ingot, 1 stick)
    • Pickaxe for stone and gravel
    • Shovel for dirt and gravel (faster than pickaxe)
    • Torches for lighting

    Suspicious gravel breaks if it falls. Support blocks underneath before brushing.

    Hold right-click on suspicious gravel with the brush equipped.

    The brushing animation takes about 3 seconds. Don’t release early or progress resets.

    Trail Ruins vs Other Archaeology Sites

    Minecraft has three archaeology structure types.

    StructureBiomesSuspicious Block TypeExclusive Items
    Trail RuinsTaiga forestsSuspicious GravelRelic music disc, 4 armor trims
    Desert PyramidDesertSuspicious SandTNT, Diamonds, Emeralds
    Desert WellDesertSuspicious SandArms Up pottery sherd
    Ocean RuinsOceanSuspicious SandSniffer Egg

    Trail ruins contain the most suspicious blocks per structure (4-16 vs 1-4 in other sites).

    They’re the only source for the Relic music disc.

    Common Mistakes When Searching

    Searching in wrong biomes wastes hours. Trail ruins only spawn in taiga and old growth forests.

    Not checking Y-levels properly. Dig to Y0-Y10 range, not surface level.

    Breaking suspicious gravel with tools destroys the loot. Always use a brush.

    Letting suspicious gravel fall converts it to regular gravel and destroys contents.

    Exploring at Y-20 or Y20 reduces your chances. The Y0-Y10 range has highest concentration.

    Best Biomes for Trail Ruins

    Old Growth Spruce Taiga has the highest trail ruins density.

    This biome is rare but generates multiple trail ruins close together.

    Regular Taiga is more common and easier to find.

    Snowy Taiga works but has hostile mobs and snow making excavation harder.

    Old Growth Birch Forest also generates trail ruins but is rarer than regular taiga.

    Start your search in regular taiga biomes for fastest results.

    Using Coordinates to Navigate

    Note your spawn coordinates when starting a world.

    Check coordinates while exploring (F3 on Java, settings toggle on Bedrock).

    Write down trail ruins coordinates from structure finders for multiple sites.

    Use teleport commands to return to trail ruins quickly.

    Build portals near trail ruins clusters for repeated excavation trips.

    Trail Ruins in Different Versions

    Trail ruins were added in 1.20 and exist in all versions since.

    Pre-1.20 worlds need new chunk generation for trail ruins to appear.

    Travel 1000+ blocks from explored areas in old worlds to generate new chunks.

    Bedrock and Java have identical trail ruins generation at the same coordinates for the same seed.

    FAQ

    How do you find trail ruins in Minecraft?

    Use /locate structure trail_ruins command with cheats enabled for instant coordinates. Trail ruins spawn underground in taiga, snowy taiga, old growth birch forest, and old growth spruce taiga biomes between Y-20 and Y20. Use structure finder tools like OreFinder with your world seed for exact locations.

    What biomes have trail ruins in Minecraft?

    Trail ruins spawn only in taiga, snowy taiga, old growth birch forest, and old growth spruce taiga biomes. They don’t generate in plains, desert, jungle, ocean, or mountain biomes. Focus searches on taiga forest areas for best results. Old growth spruce taiga has highest density.

    How deep are trail ruins in Minecraft?

    Trail ruins generate between Y-20 and Y20, with most spawning around Y0 to Y-10. They’re completely underground with no surface indicators. Dig to the Y0-Y10 range in taiga biomes to find them. Check your Y-coordinate with F3 or coordinate display while digging.

    What loot do you get from trail ruins?

    Trail ruins suspicious gravel drops pottery sherds (wayfinder, raiser, shaper, host), armor trims (same four types), Relic music disc (exclusive), and common items like bricks, coal, dyes, and seeds. Each trail ruin has 4-16 suspicious gravel blocks. Relic music disc is rare.

    Can you find trail ruins without cheats?

    Yes. Use structure finder tools like OreFinder by entering your world seed (found in settings without cheats). The tool shows all trail ruins coordinates. Manually search by digging underground in taiga biomes at Y0-Y10, though this takes significantly longer than using coordinates from tools.

    Start Finding Trail Ruins

    Trail ruins spawn underground in taiga and old growth forest biomes.

    Use structure finders for exact coordinates instead of random underground exploration.

    Stop digging blindly and navigate directly to trail ruins with the right tools.

    Find your seed, use OreFinder, and get every trail ruins location in seconds.

  • How to Find the Closest Biomes in Minecraft: Nearest Biome Finder Guide

    How to Find the Closest Biomes in Minecraft: Nearest Biome Finder Guide

    Finding specific biomes near your base takes hours of random exploration.

    You need the fastest method to locate the two nearest biomes without wandering aimlessly.

    Quick Answer: How to Find the Closest Biomes in Minecraft

    Use /locate biome [biome_name] command to find the nearest biome of any type. Run the command twice with different biome names to find your two closest biomes.

    Alternatively, use a biome finder tool with your world seed for instant results.

    Understanding Biome Proximity in Minecraft

    Biomes generate based on temperature, humidity, and terrain algorithms.

    Some biomes naturally spawn next to each other. Others never border each other.

    Common biome neighbors:

    • Plains → Forest, Sunflower Plains
    • Desert → Savanna, Badlands
    • Ocean → Beach, any coastal biome
    • Taiga → Snowy Plains, Mountains
    • Jungle → Bamboo Jungle, Sparse Jungle

    Spawn points usually generate in temperate biomes like plains or forests.

    The two closest biomes depend entirely on your spawn location and world seed.

    Using /locate biome Command

    The locate command finds the nearest biome of a specific type.

    Enable cheats in world settings or when creating your world.

    Command format:

    /locate biome minecraft:[biome_name]

    Examples:

    /locate biome minecraft:jungle
    /locate biome minecraft:desert
    /locate biome minecraft:cherry_grove

    The command returns coordinates with distance in blocks.

    Click coordinates in chat to auto-generate a teleport command.

    Finding Your Two Nearest Biomes Step-by-Step

    Method 1: Using commands

    1. Note your current spawn coordinates (press F3 on Java or check coordinates on Bedrock)
    2. Run /locate the biome for your first target biome
    3. Write down the distance shown
    4. Run /locate the biome for your second target biome
    5. Compare distances to determine which two are closest

    Method 2: Manual exploration

    Enable coordinates and walk in each cardinal direction (north, south, east, west).

    Note which biomes you encounter first in each direction.

    The two with the shortest distances are your closest biomes.

    Method 3: Using OreFinder

    Enter your world seed at OreFinder.

    View the complete biome map showing all biomes around spawn.

    Identify the two nearest biomes visually without any commands or walking.

    Get exact coordinates for both biomes instantly.

    Common Biome Pairs Near Spawn

    Spawn BiomeTypical Nearest Biome 1Typical Nearest Biome 2
    PlainsForestRiver
    ForestPlainsBirch Forest
    DesertSavannaBadlands
    TaigaSnowy TaigaMountains
    SavannaPlainsAcacia Savanna
    OceanBeachCoastal biome

    These patterns repeat across most worlds but vary by seed.

    Biome Distance Calculation

    Minecraft measures biome distance in blocks from your current position.

    The /locate command shows the exact block count to the biome center.

    Distance examples:

    • “243 blocks away” = very close (2-3 minutes walking)
    • “1,847 blocks away” = medium distance (15-20 minutes walking)
    • “5,623 blocks away” = far (requires Nether travel or elytra)

    Closer than 500 blocks = easily accessible on foot.

    1000-3000 blocks = consider using Nether for 8x faster travel.

    Use the Nether Calculator to convert Overworld coordinates for portal placement.

    Why Finding Nearest Biomes Matters

    Different biomes provide unique resources unavailable elsewhere.

    Resource-specific biomes:

    • Jungle – bamboo, cocoa beans, pandas, parrots
    • Desert – sand, cacti, desert temples, suspicious sand
    • Mangrove Swamp – mangrove wood, mud blocks, frogs
    • Badlands – terracotta, gold ore (higher spawn rate)
    • Cherry Grove – cherry wood, pink petals

    Knowing the nearest biomes helps you plan efficient resource runs.

    Building near biome borders gives access to multiple resource types quickly.

    Complete List of Locatable Biomes

    Overworld biomes for /locate command:

    • minecraft:plains
    • minecraft:forest
    • minecraft:taiga
    • minecraft:swamp
    • minecraft:mangrove_swamp
    • minecraft:jungle
    • minecraft:desert
    • minecraft:savanna
    • minecraft:badlands
    • minecraft:mushroom_fields
    • minecraft:ice_spikes
    • minecraft:cherry_grove
    • minecraft:deep_dark
    • minecraft:meadow
    • minecraft:grove
    • minecraft:snowy_slopes

    This list works for Java and Bedrock editions.

    Finding Rare Biomes Near You

    Some biomes are extremely rare and might not exist within 10,000 blocks.

    Rare biomes:

    • Mushroom Fields
    • Ice Spikes
    • Bamboo Jungle
    • Eroded Badlands
    • Modified Jungle Edge (removed in 1.18+)

    Use /locate biome to check if rare biomes exist near spawn.

    If the command returns 15,000+ blocks, the biome is extremely distant.

    OreFinder shows whether rare biomes exist in your world at all.

    The tool maps the entire world, revealing if certain biomes generated or not.

    Biomes That Never Spawn Together

    Minecraft’s biome generation prevents certain combinations.

    Biomes that don’t border each other:

    • Ice Spikes + Jungle (opposite temperature zones)
    • Desert + Snowy Taiga (conflicting climates)
    • Mushroom Fields + any biome (always isolated by ocean)
    • Deep Dark + surface biomes (underground only)

    Understanding these rules helps you identify realistic biome searches.

    Using Coordinates to Track Biome Locations

    Write down coordinates when you find important biomes.

    Create a biome coordinate list:

    • Desert: X=450, Z=-230 (380 blocks from spawn)
    • Jungle: X=-890, Z=120 (920 blocks from spawn)
    • Mangrove: X=200, Z=600 (630 blocks from spawn)

    Use teleport commands to return to biomes instantly.

    Save these coordinates in a text file or notebook for quick reference.

    Common Mistakes When Finding Biomes

    Searching in wrong temperature zones wastes time.

    Looking for jungle in snowy areas never works. Biomes follow climate rules.

    Not using coordinates makes it impossible to track which direction you’ve searched.

    Exploring randomly without a plan covers less ground than systematic cardinal direction checks.

    Ignoring biome finder tools when you have your world seed available.

    Best Exploration Strategy for Multiple Biomes

    Start at spawn and check all four cardinal directions first.

    Walk 500 blocks north, note biomes. Return to spawn.

    Walk 500 blocks east, note biomes. Return to spawn.

    Repeat for south and west.

    This systematic approach covers a 1000×1000 block area around spawn efficiently.

    Mark explored areas with torches or pillars to avoid rechecking.

    FAQ

    How do you find the nearest biome in Minecraft?

    Use /locate biome minecraft:[biome_name] command with cheats enabled. The command returns coordinates and distance to the nearest instance of that biome. Click coordinates in chat to create a teleport command. Works on Java and Bedrock editions for all locatable biomes.

    What biomes spawn closest to plains?

    Forest, river, sunflower plains, and flower forest typically border plains biomes. Plains are temperate biomes that neighbor other temperate zones. Desert and savanna can border plains in transition zones. Snowy biomes and jungles never directly touch plains due to climate differences.

    Can you find two biomes at once in Minecraft?

    No single command finds multiple biomes simultaneously. Run /locate biome twice with different biome names to find two separate biomes. Compare returned distances to determine which are closest. Use biome finder tools like OreFinder to view all nearby biomes on one map instantly.

    How far apart are biomes in Minecraft?

    Biome size varies from 100 to 3000+ blocks. Small biomes like rivers span 50-100 blocks. Large biomes like oceans extend 5000+ blocks. The /locate command shows exact distance in blocks to each biome’s nearest point from your position.

    Do all biomes spawn in every Minecraft world?

    No. Rare biomes like mushroom fields, ice spikes, and bamboo jungle don’t generate in every seed. Common biomes like plains, forest, ocean, desert, and taiga appear in all worlds. Use OreFinder with your seed to check which biomes exist before searching.

    Find Your Nearest Biomes Fast

    The two closest biomes depend on your spawn point and world seed.

    Use /locate biome commands or systematic exploration to identify them.

    Stop wandering randomly and use OreFinder to see all nearby biomes instantly.

    Enter your seed, view the map, and navigate directly to any biome you need.

  • How to Teleport to Coordinates in Minecraft: Complete Command Guide

    How to Teleport to Coordinates in Minecraft: Complete Command Guide

    Getting to specific coordinates takes forever when walking or flying.

    You need the exact syntax for the teleport command in Java, Bedrock, Xbox, and PlayStation.

    Quick Answer: How to Teleport to Coordinates in Minecraft

    Use /tp @s X Y Z to teleport to coordinates. Replace X, Y, Z with your target coordinates. Enable cheats first in world settings or when creating your world.

    Example: /tp @s 100 64 200 teleports you to X=100, Y=64, Z=200.

    Basic Teleport Command Syntax

    The teleport command works identically on Java Edition, Bedrock Edition, Xbox, PlayStation, Switch, and mobile.

    Standard format:

    /tp @s [X] [Y] [Z]

    @s targets yourself (the player running the command).

    X is your east/west coordinate (positive = east, negative = west).

    Y is your height coordinate (positive = up, negative = down).

    Z is your north/south coordinate (positive = south, negative = north).

    Step-by-Step Teleport Instructions

    1. Enable coordinates display

    Bedrock: Settings > Game > Show Coordinates (toggle ON)

    Java: Press F3 to see the debug screen with coordinates

    2. Enable cheats

    New worlds: Toggle “Allow Cheats” ON during world creation

    Existing worlds: Pause > Open to LAN > Allow Cheats: ON (Java) or enable in world settings (Bedrock)

    3. Open chat/command window

    Java: Press T or /

    Bedrock/Console: Press D-pad right (Xbox/PlayStation) or tap chat button (mobile/Switch)

    4. Type the teleport command

    Format: /tp @s [X] [Y] [Z]

    Example: /tp @s 500 70 -300

    5. Press Enter/Submit

    You teleport instantly to the specified coordinates.

    Teleport Command Variations

    Command FormatWhat It DoesExample
    /tp @s X Y ZTeleport yourself to coordinates/tp @s 100 64 200
    /tp PlayerName X Y ZTeleport another player/tp Steve 100 64 200
    /tp @s ~ ~10 ~Teleport 10 blocks up (relative)/tp @s ~ ~10 ~
    /tp @s @pTeleport to nearest player/tp @s @p

    The tilde (~) represents relative coordinates from your current position.

    ~5 means 5 blocks from your current coordinate in that direction.

    ~ ~ ~ means your exact current position (no movement).

    How to Teleport in Minecraft Xbox and Console

    Xbox, PlayStation, and Switch use Bedrock Edition commands.

    Press the right D-pad button to open the chat/command window.

    Type: /tp @s X Y Z with your target coordinates.

    Xbox-specific tips:

    Enable “Show Coordinates” in settings before starting.

    Use a USB keyboard for faster command typing on the console.

    Commands work identically on Xbox One, Xbox Series X|S, PS4, and PS5.

    Using /locate Commands in Bedrock

    Can you do /locate in Bedrock? Yes, absolutely.

    Bedrock Edition has the /locate command for finding structures and biomes.

    Structure location:

    /locate structure [structure_type]

    Example: /locate structure village

    Biome location:

    /locate biome [biome_name]

    Example: /locate biome minecraft:mangrove_swamp

    The command returns coordinates. Click them in chat to create a teleport command automatically.

    Can You Teleport to a Biome in Minecraft Bedrock?

    Yes, using a two-step process.

    Step 1: Find biome coordinates

    /locate biome minecraft:jungle

    Step 2: Click the coordinates in chat or manually type:

    /tp @s [X] [Y] [Z]

    Replace X, Y, Z with coordinates from the locate command.

    Common biome names for locating:

    • minecraft: desert
    • minecraft: badlands
    • minecraft:cherry_grove
    • minecraft:deep_dark
    • minecraft:mangrove_swamp
    • minecraft:bamboo_jungle

    For faster biome finding, use Ore Finder with your world seed to see all biome locations on an interactive map.

    Finding Coordinates to Teleport To

    Method 1: Using OreFinder

    Enter your world seed at Ore Finder.

    Browse the interactive map for structures, biomes, or ore locations.

    Note the X and Z coordinates of your target destination.

    Use Y=100 for safe height, or adjust based on terrain.

    Method 2: Manual exploration

    Press F3 (Java) or check the coordinates display (Bedrock) while exploring.

    Write down the coordinates of important locations.

    Teleport back to those coordinates anytime using /tp command.

    Method 3: Using /locate command

    Type /locate structure [name] for structures like villages or strongholds.

    Type /locate biome [name] for specific biomes.

    Click returned coordinates to auto-fill teleport command.

    Common Teleport Command Mistakes

    Typing /teleport instead of /tp

    Both work, but /tp is shorter and faster.

    Forgetting to enable cheats

    Commands don’t work without cheats enabled. Enable them in world settings.

    Wrong coordinate format

    Always use X Y Z order. Swapping them teleports you to the wrong locations.

    Teleporting into walls or lava

    Choose Y-coordinates carefully. Y=100 is safe for most overworld locations.

    Using commas between coordinates

    Don’t use commas. Correct: /tp @s 100 64 200 (spaces only)

    Teleporting Between Dimensions

    Overworld to Nether:

    Divide Overworld X and Z coordinates by 8 for Nether coordinates.

    Use the Nether Calculator for automatic conversion.

    Type: /execute in minecraft:the_nether run tp @s X Y Z

    Nether to Overworld:

    Multiply Nether X and Z by 8 for Overworld coordinates.

    Type: /execute in Minecraft: overworld run tp @s X Y Z

    Overworld to End:

    Type: /execute in minecraft:the_end run tp @s X Y Z

    The End uses Overworld coordinate scales.

    Teleporting to Players

    Teleport to a specific player:

    /tp @s PlayerName

    Teleport to nearest player:

    /tp @s @p

    Teleport all players to you:

    /tp @a @s

    Useful for multiplayer servers and realms when coordinating group activities.

    Safe Teleport Height Recommendations

    Location TypeRecommended Y-LevelReason
    Plains/Forest70-80Above trees, below clouds
    Mountains120-150Above peaks
    Ocean64-70Above water surface
    Nether70-90Safe from lava lakes
    End50-70Above void, below islands

    Always teleport to higher Y-levels first, then descend safely.

    Teleporting directly to Y=1 risks spawning in caves or lava.

    Teleporting with Coordinates from Other Tools

    When using biome finders, structure locators, or seed maps, you receive X and Z coordinates only.

    Add your own Y-coordinate for height.

    Example from Biome Finder:

    Tool shows: “Jungle at X: 2456, Z: -1892”

    Your command: /tp @s 2456 100 -1892

    Choose Y=100 for safe arrival above ground.

    FAQ

    How do you teleport to coordinates in Minecraft?

    Use /tp @s X Y Z command with your target coordinates. Enable cheats in world settings first. Open chat (T on Java, D-pad on console), type the command with coordinates, and press Enter. Example: /tp @s 100 64 200 teleports to X=100, Y=64, Z=200.

    How to teleport in Minecraft Xbox?

    Press the right D-pad to open chat. Type /tp @s X Y Z with your coordinates. Example: /tp @s 500 70 -300. Enable “Show Coordinates” in settings and “Allow Cheats” when creating worlds. Commands work identically on Xbox One, Xbox Series X|S, and all Bedrock platforms.

    Can you do /locate in Bedrock Edition?

    Yes. Bedrock has /locate structure and /locate biome commands. Type /locate structure village or /locate biome minecraft: jungle. The command returns coordinates you can click to auto-generate teleport commands. Works on all Bedrock platforms, including Xbox, PlayStation, mobile, Switch, and Windows 10.

    Can you teleport to a biome in Minecraft Bedrock?

    Yes. Use /locate biome Minecraft:[biome_name] to find coordinates, then /tp @s X Y Z to teleport there. Example: /locate biome minecraft: desert, then click coordinates or type /tp command manually. Works for all biomes, including mangrove swamps, cherry groves, and deep dark.

    What happens if you teleport to the wrong coordinates?

    You might spawn inside walls, underground, or above a void. If stuck in blocks, dig out or teleport to safe coordinates. If the above void, quickly teleport to a safe Y-level. Write down your base coordinates before experimenting with teleports for emergency return.

    Navigate Instantly with Teleport Commands

    Teleport commands save hours of travel time in Minecraft.

    Use /tp @s X Y Z format with exact coordinates from tools like OreFinder.

    Stop walking thousands of blocks and start teleporting to your destinations instantly.

    Find coordinates for any biome, structure, or ore location at OreFinder and teleport there in seconds.

  • How to Find Mangrove Swamp in Minecraft: Location & Seed Guide

    How to Find Mangrove Swamp in Minecraft: Location & Seed Guide

    Mangrove swamps are one of the newest biomes in Minecraft.

    Finding them without the right strategy means wandering for hours with no results.

    Quick Answer: How to Find a Mangrove Swamp in Minecraft

    Mangrove swamps spawn in warm, humid regions near oceans and rivers. Use the /locate biome minecraft:mangrove_swamp command (requires cheats) or a biome finder tool with your world seed for exact coordinates.

    They are commonly adjacent to jungles and regular swamps in warmer climates.

    What Are Mangrove Swamps?

    Mangrove swamps were added in Minecraft 1.19 (The Wild Update).

    The biome features unique mangrove trees with exposed roots growing in shallow water.

    Key characteristics:

    • Muddy water pools throughout
    • Mangrove trees with prop roots
    • Mud blocks underwater
    • Frogs spawning naturally
    • Warm-climate biome only

    You need mangrove swamps for mangrove wood, mud blocks, and frog lights.

    Where Do Mangrove Swamps Spawn?

    Climate zone map showing where mangrove swamps spawn in warm biomes in Minecraft

    Mangrove swamps are generated in warm temperature zones only.

    They don’t spawn in cold, frozen, or temperate climate regions.

    Common neighboring biomes:

    • Jungle (most common)
    • Regular swamp
    • Beach
    • Ocean
    • River

    Mangrove swamps appear where land meets water in warm areas.

    They often border oceans, creating distinctive coastline features with mangrove trees in shallow water.

    Biomes where mangrove swamps NEVER spawn:

    • Tundra
    • Taiga
    • Mountains
    • Ice spikes
    • Snowy plains

    Focus your search on tropical and warm regions for best results.

    Using the Locate Command to Find Mangrove Swamps

    Enable cheats when creating your world or open to LAN with cheats enabled.

    Type: /locate biome minecraft:mangrove_swamp

    The command returns the coordinates of the nearest mangrove swamp.

    Example output:

    The nearest minecraft:mangrove_swamp is at [2456, ~, -1892] (3127 blocks away)

    Click the coordinates in chat to automatically fill your teleport command.

    Use /tp @s 2456 ~ -1892 to teleport there instantly.

    Finding Mangrove Swamps Without Commands

    Search warm ocean coastlines and jungle borders.

    Coastal exploration strategy diagram for finding mangrove swamps in Minecraft

    Mangrove swamps appear as dark green areas with visible tree roots from a distance.

    Manual search strategy:

    1. Locate a jungle or warm ocean biome
    2. Follow the coastline or river edges
    3. Look for muddy water and exposed tree roots
    4. Mangrove swamps appear as distinct dark green patches

    Boats speed up coastal exploration significantly.

    Bring a boat and navigate along shorelines in warm biomes for faster searching.

    Using Seed-Based Biome Finders

    Manual searching takes 30-90 minutes, depending on world generation.

    OreFinder maps all biomes, including mangrove swamps, using your world seed.

    Find your seed in world settings (Bedrock) or use the /seed command (Java).

    Enter the seed into OreFinder. The tool displays every mangrove swamp location on an interactive map.

    You get exact X and Z coordinates for the nearest mangrove swamps.

    Navigate directly to coordinates instead of exploring randomly for hours.

    Best Seeds for Mangrove Swamps Near Spawn

    Some seeds generate mangrove swamps within 500 blocks of spawn.

    Popular mangrove swamp seeds:

    SeedEditionDistance from SpawnNotes
    -1232817844Java 1.19+~200 blocksLarge mangrove swamp with village
    7969098068420811454Java 1.19+~400 blocksJungle and mangrove border
    8486672581758651406Bedrock 1.19+~300 blocksOcean-side mangrove swamp

    These seeds guarantee quick access to mangrove swamps for resource gathering.

    What Resources Mangrove Swamps Provide

    Mangrove wood has a unique reddish-brown color unavailable elsewhere.

    Exclusive resources:

    • Mangrove logs and wood
    • Mangrove propagules (saplings)
    • Mud blocks
    • Frogs (warm variant)
    • Frog lights (when frogs eat magma cubes)

    How to harvest efficiently:

    Bring shears for leaves and propagules.

    Use an axe with Efficiency for faster wood collection.

    Dig mud blocks with a shovel. Mud converts to clay when placed above a dripstone block.

    How to Identify Mangrove Swamps from a Distance

    Mangrove trees have distinctive exposed roots above the water level.

    The water appears darker and muddier than regular ocean or river water.

    Trees grow densely packed with roots, creating a tangled appearance.

    From high altitude (Y100+), mangrove swamps appear as dark green coastal patches.

    Regular swamps have oak trees and lighter water. Mangrove swamps have only mangrove trees and muddy water.

    Common Mistakes When Searching

    Searching in cold biomes wastes time. Mangrove swamps only generate in warm climates.

    Confusing regular swamps with mangrove swamps leads to unnecessary exploration.

    Not using a boat for coastal exploration slows your search by 3-4x.

    Ignoring jungle biomes misses the most common mangrove swamp border zones.

    Mangrove Swamp vs Regular Swamp Differences

    FeatureMangrove SwampRegular Swamp
    Tree typeMangrove onlyOak and sometimes dark oak
    Water colorDark muddy brownDark murky green
    Climate zoneWarm onlyAny temperature
    Frog variantWarm (white)Temperate (orange) or cold (green)
    Mud blocksYesNo

    Regular swamps spawn in any climate. Mangrove swamps require warm temperatures.

    Using Coordinates to Navigate

    Note your spawn coordinates when starting a world.

    Check coordinates regularly while exploring (F3 on Java, settings toggle on Bedrock).

    Write down the coordinates when you find a mangrove swamp for future reference.

    Use the Nether Calculator if traveling long distances.

    Build a Nether portal for 8x faster travel to distant mangrove swamps.

    Mangrove Swamp Generation in Different Versions

    Mangrove swamps were added in 1.19 and have existed in all versions since.

    Pre-1.19 worlds need new chunk generation for mangrove swamps to appear.

    Travel 1000+ blocks from explored areas in old worlds to find newly generated chunks.

    Bedrock and Java have identical mangrove swamp generation at the same coordinates for the same seed.

    FAQ

    How do you find a mangrove swamp in Minecraft?

    Use /locate biome Minecraft:mangrove_swamp command with cheats enabled for instant coordinates. Alternatively, use a biome finder tool like OreFinder with your world seed. Manually search warm ocean coastlines and jungle borders. Mangrove swamps appear as dark green patches with exposed tree roots in muddy water.

    What biomes are near mangrove swamps in Minecraft?

    Mangrove swamps most commonly border jungles, regular swamps, warm oceans, beaches, and rivers. They only generate in warm climate zones. You won’t find mangrove swamps near cold biomes like tundra, taiga, or snowy plains. Focus searches on tropical and warm regions for the best results.

    Can you grow mangrove trees outside of mangrove swamps?

    Yes. Collect mangrove propagules (saplings) from mangrove swamp trees. Plant propagules on dirt, grass, mud, or clay blocks. They grow in any biome regardless of temperature. Mangrove trees need at least 5 blocks of vertical space to grow properly. They work in standard tree farms.

    Do mangrove swamps spawn naturally in old worlds?

    Mangrove swamps only generate in new chunks created after updating to 1.19 or later. Existing explored chunks won’t retroactively generate mangrove swamps. Travel 1000+ blocks from previously explored areas in pre-1.19 worlds. New terrain generates with current biome rules, including mangrove swamps.

    What’s the fastest way to find mangrove swamps without cheats?

    Use a biome finder tool like OreFinder by entering your world seed (found in settings without cheats). The tool shows all mangrove swamp locations with exact coordinates. This method requires no commands and works in survival mode. Navigate to the provided coordinates using F3 or the coordinate display.

    Start Your Mangrove Swamp Search

    Mangrove swamps spawn in warm climates near water and jungles.

    Use biome finders for instant coordinates instead of random exploration.

    Stop wandering aimlessly and navigate directly to mangrove swamps with the right tools.

    Find your seed, use OreFinder, and get exact mangrove swamp locations in seconds.

  • How to Find the Stronghold in Minecraft: Portal Room Location Guide

    How to Find the Stronghold in Minecraft: Portal Room Location Guide

    Strongholds are massive underground structures hiding the End Portal.

    Finding them without the right strategy wastes hours of digging and searching.

    Quick Answer: How to Find the Stronghold in Minecraft

    Use Eyes of Ender to locate strongholds. Throw them in the air and follow their direction. They lead you to the nearest stronghold, which spawns between Y-levels -32 and 48 underground.

    The portal room sits somewhere inside the stronghold’s maze of corridors.

    What Y Level Do Strongholds Spawn?

    Stronghold spawn range showing Y-levels from Y-32 to Y48 in Minecraft

    Strongholds generate between Y-32 (deep underground) and Y48 (near surface level).

    Most strongholds concentrate around Y0 to Y-16 in typical terrain.

    The exact Y-level varies per stronghold based on world generation and terrain height.

    Strongholds adapt to terrain. They can be partially exposed in ravines or completely buried under mountains.

    Check your Y-coordinate while searching. Press F3 (Java) or enable coordinates in settings (Bedrock).

    If you’re at Y60 and Eyes of Ender point downward, dig down carefully to the Y20-Y0 range.

    How to Find Strongholds Using Eyes of Ender

    Eye of Ender navigation path diagram for finding stronghold in Minecraft

    Craft Eyes of Ender using blaze powder and ender pearls.

    You need 12-15 Eyes of Ender minimum for a reliable stronghold location.

    Step-by-step process:

    1. Stand in an open area above ground
    2. Right-click to throw an Eye of Ender into the air
    3. Watch which direction it floats before falling
    4. Walk 10-20 blocks in that direction
    5. Throw another Eye of Ender
    6. Repeat until the Eye goes downward instead of forward

    When Eyes of Ender fly down into the ground, you’re directly above the stronghold.

    Mark these coordinates. Dig straight down (never directly down without precautions) to find the structure.

    Stronghold Minecraft Finder Tools

    Manual searching with Eyes of Ender takes 30-60 minutes per stronghold.

    OreFinder shows exact stronghold coordinates using your world seed.

    Enter your world seed (found in settings or with /seed command). The tool maps all stronghold locations.

    You get precise X, Y, Z coordinates for each stronghold’s center point.

    Navigate directly to stronghold locations instead of throwing Eyes of Ender repeatedly.

    This saves time and preserves Eyes of Ender for activating the End Portal instead.

    How Many Strongholds Exist Per World?

    Java Edition generates 128 strongholds per world in rings radiating from spawn.

    The first ring contains 3 strongholds at 1,408-2,688 blocks from spawn.

    Second ring has 6 strongholds. Third ring has 10 strongholds, and so on.

    Bedrock Edition generates infinite strongholds, but only 3 in the main area near spawn.

    Most players only need to find one stronghold to access the End dimension.

    Finding the Portal Room Inside Strongholds

    End Portal room layout diagram showing lava pool, portal frame, and spawner in Minecraft stronghold

    Strongholds are maze-like structures with multiple rooms and corridors.

    The End Portal room is just one room among libraries, prisons, storage rooms, and hallways.

    Portal room characteristics:

    • Contains a 5×5 pool of lava on the floor
    • End Portal frame sits above the lava
    • Silverfish spawner located nearby
    • Stone brick construction with stairs leading down

    Portal rooms don’t always generate at the stronghold’s center.

    They can be on the outer edges or deep within the structure.

    How to Find the End Portal in the Stronghold

    Start at your entry point into the stronghold.

    Systematically explore every corridor. Mark explored paths with torches on one wall.

    Efficient searching strategy:

    • Always place torches on your right wall (or always left)
    • This prevents walking in circles
    • Unexplored corridors lack torches on that wall
    • Follow unexplored paths until you find the portal room

    Listen for silverfish sounds. They spawn near the portal room from the spawner.

    Break stone bricks carefully. Some contain silverfish that attack when the block breaks.

    What to Do When You Find the Portal Room

    The End Portal frame has 12 slots for Eyes of Ender.

    Some slots already contain Eyes of Ender (0-12 can be pre-filled randomly).

    Count empty slots. You need one Eye of Ender per empty slot.

    Activating the portal:

    1. Stand inside the portal frame
    2. Face outward toward the frame blocks
    3. Right-click each empty frame with an Eye of Ender
    4. The portal activates when all 12 slots are filled

    Never stand outside the frame when placing Eyes. They might pop out and disappear.

    Common Stronghold Finding Mistakes

    Digging straight down kills you when you hit lava or fall into caves.

    Not bringing enough Eyes of Ender forces you to return to the Nether for more blaze rods.

    Exploring strongholds without torches gets you lost in the maze.

    Breaking every stone brick spawns excessive silverfish and wastes time.

    Following Eyes of Ender at night makes them harder to see. Search during the daytime.

    What You Need Before Searching

    Essential items:

    • 15-20 Eyes of Ender (12 for portal, extras for navigation)
    • Pickaxe for digging
    • Torches (64+ recommended)
    • Food for health regeneration
    • Sword for silverfish
    • Blocks for pillaring up or bridging gaps

    Optional but helpful:

    • Water bucket for safe descents
    • Armor for protection
    • Ender chest to store valuable items safely

    Prepare before starting your search. You can’t pause mid-search to gather materials.

    Stronghold Structure Overview

    Strongholds contain multiple room types beyond the portal room:

    Room TypeFeaturesUsefulness
    LibraryBookshelves, chestsValuable loot (books, compasses)
    PrisonIron bars, iron doorsIron door resources
    StorageChests with suppliesFood, tools, misc items
    Portal RoomEnd Portal frameAccess to the End
    CorridorsStone brick hallwaysConnect all rooms

    Libraries often contain enchanted books and other valuable loot worth collecting.

    Using Coordinates to Navigate

    Write down your stronghold entry coordinates when you first enter.

    Note the coordinates of intersections and important rooms as you explore.

    If you get lost, return to your entry point and restart systematic exploration.

    The stronghold’s center coordinates (from OreFinder or Eyes of Ender) help orient your search.

    Portal rooms typically generate within 50 blocks of the stronghold’s center point.

    Alternative: Spectator Mode (Creative/Cheats)

    If you have creative mode or cheats enabled, switch to spectator mode.

    Fly through blocks underground to locate the portal room visually.

    This works for finding the room, but it isn’t available in survival without enabling cheats.

    Note the coordinates in the spectator, then return to survival and navigate there normally.

    FAQ

    What Y level do strongholds spawn in Minecraft?

    Strongholds spawn between Y-32 and Y48, with most generating around Y0 to Y-16. The exact Y-level varies based on world generation and terrain. Use Eyes of Ender to determine the stronghold’s depth, or check coordinates when searching underground to stay in the optimal range.

    How do you find the stronghold in Minecraft without Eyes of Ender?

    Use a stronghold finder tool like OreFinder by entering your world seed. The tool provides exact coordinates for all strongholds. Alternatively, enable cheats and use /locate stronghold command for coordinates. Without tools or Eyes of Ender, random cave exploration is extremely inefficient and unreliable.

    How do you find the portal room in a stronghold?

    Systematically explore the stronghold by placing torches on one wall (always right or always left). This prevents walking in circles. Look for a room with a lava pool and stone brick stairs. The End Portal frame sits above the lava with a silverfish spawner nearby.

    How many Eyes of Ender do you need to find and activate the portal?

    Bring 15-20 Eyes of Ender total. You need roughly 3-8 for navigation to find the stronghold (some break when thrown). The End Portal requires 12 Eyes to activate, but 0-12 slots may already be filled randomly. Having extras ensures you can both locate and activate the portal.

    Can you find strongholds in Bedrock Edition?

    Yes. Bedrock Edition has 3 strongholds in the main spawn area and infinite strongholds further out. Use Eyes of Ender the same way as Java Edition. Stronghold finder tools work for Bedrock seeds. Enable coordinates in settings to track your position while searching underground.

    Locate Your Stronghold Fast

    Strongholds hide deep underground between Y-32 and Y48.

    Eyes of Ender point you to the nearest stronghold’s location.

    Use OreFinder for instant coordinates instead of throwing dozens of Eyes of Ender.

    Find the portal room, activate it with 12 Eyes of Ender, and enter the End dimension.

  • What Level Does Ancient Debris Spawn in Minecraft: Complete Y-Level Guide

    What Level Does Ancient Debris Spawn in Minecraft: Complete Y-Level Guide

    Ancient debris is the only way to get netherite in Minecraft.

    Mining at the wrong Y-levels in the Nether wastes hours with zero results.

    Quick Answer: What Y Level Does Ancient Debris Spawn?

    Ancient debris spawns between Y8 and Y119 in the Nether. The best level is Y15, where ancient debris generates at the highest concentration with two overlapping distribution patterns.

    A secondary spawn layer exists around Y-119 for deep Nether mining.

    How Ancient Debris Generation Works

    Ancient debris uses two separate spawn patterns in the Nether dimension.

    Primary distribution: Generates from Y8 to Y22 in a triangle formation. This pattern creates the highest concentration at Y15 and accounts for most findable ancient debris.

    Secondary distribution: Spawns uniformly but rarely from Y8 to Y119. This adds bonus debris at extreme heights and depths.

    The two patterns overlap between Y8 and Y22, making this range ideal for mining.

    Ancient debris never generates in the Overworld or End dimension. You must mine in the Nether.

    At what level is ancient debris most common?

    Here’s the complete spawn breakdown:

    Y-Level RangeSpawn RateMining PriorityPattern Type
    Y8 to Y13HighExcellentPrimary peak zone
    Y15HighestBest levelBoth patterns overlap
    Y15 to Y22Very HighExcellentPrimary distribution
    Y22 to Y119Very LowSkipSecondary only
    Y-119Low-MediumAlternative optionDeep Nether

    Y15 gives you maximum ancient debris exposure per block mined.

    Ancient debris spawn distribution chart showing Y15 as best level in Minecraft Nether

    The 15-block range from Y8 to Y22 contains over 90% of all ancient debris in the Nether.

    Why Y15 Specifically?

    The primary distribution blob peaks exactly at Y15 based on Mojang’s generation algorithm.

    This level sits above most large lava lakes but below the Nether ceiling by enough to be safe.

    Y15 also minimizes lava encounters compared to mining at Y8-Y10, where massive lava oceans exist.

    Mining just 3-4 levels away from Y15 reduces your ancient debris finds by 20-30%.

    Checking Your Y Coordinate in the Nether

    Press F3 on Java Edition to view debug information. Your Y-coordinate appears in the XYZ line.

    On Bedrock Edition, enable “Show Coordinates” in world settings before entering the Nether portal.

    The Nether uses the same Y-level system as the Overworld. Y15 means 15 blocks above the Nether’s bottom layer.

    Keep checking coordinates while mining. It’s easy to drift to Y18 or Y12 without noticing.

    Strip Mining Strategy at Y15

    Enter the Nether through any portal. Use the Nether Calculator to plan optimal portal placement if traveling long distances.

    Strip mining pattern at Y15 for finding ancient debris efficiently in Nether

    Dig or build to exactly Y15. Create a long main tunnel extending 200+ blocks.

    Every 3 blocks, dig perpendicular branch tunnels going 20-30 blocks in each direction.

    Ancient debris generates in small 1-3 block veins. Three-block spacing between branches prevents missing veins while avoiding redundant coverage.

    Light tunnels minimally. Most Nether mobs spawn in specific biomes, not general netherrack areas.

    Bed Explosion Mining Method

    Beds explode when used in the Nether, instantly exposing large areas.

    Bed mining explosion technique for exposing ancient debris in Minecraft Nether

    Place a bed at the end of your tunnel. Stand 2-3 blocks back and right-click it.

    The explosion reveals hidden ancient debris in the surrounding blocks without destroying the ore.

    Dig forward a few blocks, place another bed, and repeat the process.

    This method is faster than pickaxe mining but requires constant bed crafting (wool + planks).

    TNT Mining Alternative

    TNT works similarly to beds for exposing ancient debris quickly.

    Place TNT, activate it, and retreat to safety. The blast radius reveals nearby debris.

    TNT requires more resources than beds unless you have a creeper farm producing gunpowder.

    Most players prefer bed mining due to easier resource acquisition.

    Common Ancient Debris Mining Mistakes

    Mining above Y22 drastically reduces spawn rates. The primary distribution ends completely here.

    Random exploration at Y60-Y80 wastes time with minimal debris finds.

    Not bringing fire resistance potions causes deaths from unexpected lava pockets.

    Using stone or iron pickaxes won’t work. You need a diamond or netherite pickaxe to mine ancient debris.

    Forgetting blocks to seal lava breaches gets you killed more than any mob.

    Lava Lake Management

    Massive lava lakes generate throughout the Nether, especially below Y31.

    Y15 positions you below most major lava lakes but above the lava ocean at Y10 and lower.

    Always carry fire resistance potions when mining between Y8-Y15.

    Keep building blocks in your hotbar. Quickly placing blocks saves your life when you break into lava.

    Ancient Debris to Netherite Conversion

    Each ancient debris block smelts into one netherite scrap in a furnace or blast furnace.

    Four netherite scraps plus four gold ingots craft one netherite ingot.

    One netherite ingot upgrades one diamond item to netherite at a smithing table.

    Full netherite armor requires:

    • 24 netherite ingots total
    • 96 netherite scraps
    • 96 ancient debris blocks minimum

    Add tools, and you need 120-150 ancient debris for a complete netherite loadout.

    Using OreFinder for Ancient Debris

    Manual strip mining works, but takes dozens of hours for full netherite gear.

    Ore Finder maps exact ancient debris locations in your Nether using your world seed.

    Enter your seed and select the Nether dimension. The tool displays every ancient debris vein with precise coordinates.

    You can navigate directly to debris-rich chunks instead of mining randomly for hours.

    This reduces mining time by 60-70% compared to blind strip mining.

    Biome-Specific Spawn Differences

    Ancient debris spawns identically across all Nether biomes at the same Y-levels.

    Nether wastes, crimson forests, warped forests, soul sand valleys, and basalt deltas have identical debris distribution.

    Basalt deltas have harder terrain to mine through but the same ore rates.

    Choose biomes based on mining ease and mob density, not debris concentration.

    Fortune Enchantment on Ancient Debris

    Fortune does not affect ancient debris drops.

    Each block always drops exactly one ancient debris item, regardless of pickaxe enchantments.

    Save Fortune pickaxes for Overworld ores. Any diamond pickaxe works for debris.

    Efficiency enchantment speeds up mining but doesn’t increase drops either.

    How Ancient Debris Changed in Updates

    Ancient debris was added in Minecraft 1.16 (Nether Update) and hasn’t changed since.

    The Y8-Y119 spawn range and Y15 peak remain consistent across all versions from 1.16 onward.

    Pre-1.16 worlds don’t have ancient debris at all. You need to explore new Nether chunks for debris to generate.

    FAQ

    What level does ancient debris spawn in Minecraft?

    Ancient debris spawns between Y8 and Y119 in the Nether dimension. It uses two distribution patterns: a primary peak from Y8-Y22 (highest at Y15) and a secondary uniform distribution from Y8-Y119. Over 90% of ancient debris generates in the Y8-Y22 range.

    At what level do you find ancient debris most efficiently?

    Y15 is the most efficient level for finding ancient debris. This Y-level has the highest concentration due to overlapping primary and secondary distribution patterns. Strip mining or bed mining at Y15 yields maximum ancient debris per hour spent mining.

    Do ancient debris spawn at all heights in the Nether?

    No. Ancient debris only spawns between Y8 and Y119. It does not generate above Y119 or below Y8. The spawn rate is heavily concentrated at Y15, with drastically reduced rates above Y22. Mining outside the Y8-Y22 range is inefficient.

    Can you use Fortune to get more ancient debris?

    No. Fortune enchantment does not work on ancient debris. Each ancient debris block drops exactly one piece regardless of enchantments. You need a diamond or netherite pickaxe to mine it, but Fortune provides no benefit. Efficiency speeds mining but doesn’t increase drops.

    How much ancient debris do you need for full netherite armor?

    You need 96 ancient debris blocks for full netherite armor (helmet, chestplate, leggings, boots). Each armor piece requires 4-8 netherite ingots, totaling 24 ingots. Each ingot needs 4 ancient debris. Add tools and weapons for 120-150 total ancient debris needed.

    Start Mining at Y15

    Ancient debris only appears in the Nether at specific heights.

    Y15 gives you the highest debris concentration in the entire dimension.

    Stop wasting time at random levels and mine where ancient debris actually generates.

    Use OreFinder to locate debris-rich Nether chunks and get netherite gear faster than everyone else.